Grade 5 - Session 6: “Simple Machines—Leveraging Force”
Session Architect: Aleeza Ayaz - Markhor3D
Session Length: 50-60 minutes
Session Overview:
In this session, students will explore the mechanics of simple machines, focusing on levers and pulleys. Through hands-on experiments, they will observe how levers and pulleys make lifting objects easier, discovering the concept of mechanical advantage. Using MeasureLab’s load cell, students will measure forces applied to different setups, learning how varying weight and distance from a pivot affects balance in a lever. With pulleys, they’ll compare the effort needed to lift weights using single and double pulley systems. This session combines practical experimentation with real-world applications, deepening students’ understanding of force, balance, and how simple machines work to reduce effort.
Equipment Required:
- MeasureLab with built-in load cell to measure weight.
- Ruler to use as a lever.
- Slotted weights to place on the lever.
- Pulley system (single and double pulley setups).
- Weight sets (slotted weights or small objects).
- Support stand and clamp for lever and pulley setups.
- Worksheet for recording observations and completing tables.
- Images and diagrams of pulleys, levers, cranes, and other simple machines.
- Pens, pencils, markers, etc.
Learning Objectives:
In this session, students will:
- Understand how simple machines (levers and pulleys) make work easier.
- Learn that the mechanical advantage of a simple machine helps lift objects with less effort.
- Use the load cell to measure weights and understand force.
- Experiment with levers by varying the weight and distance from the pivot to explore the concept of moments.
- Explore pulleys by observing how the force required to lift objects changes with different pulley setups.
- Connect real-world examples of simple machines to their classroom experiments.
- Understand the relationship between force, distance, and mechanical advantage intuitively.
Teacher Resource:
Session File: ML56.plf (58.4 KB)
Teaching Aids:
- Projector (optional) to show images of levers and pulleys.
- Visual aids of common simple machines (e.g., seesaws, cranes, pulleys on flagpoles, etc.).
Preparation:
This step has to be done before the session on each workstation/apparatus by the teacher/session instructor:
- Make sure that each computer has Physlogger installed and can detect the Measrelab when connected to it using the provided cable.
- Each Measurelab should have access to a power outlet for sensors that require external power. For this session, we will use the Load Cell in the default setup and with horizontal mounting attachment.
- Launch the Physlogger application and load the session file provided in the resources section.
Your setup will look something like this:
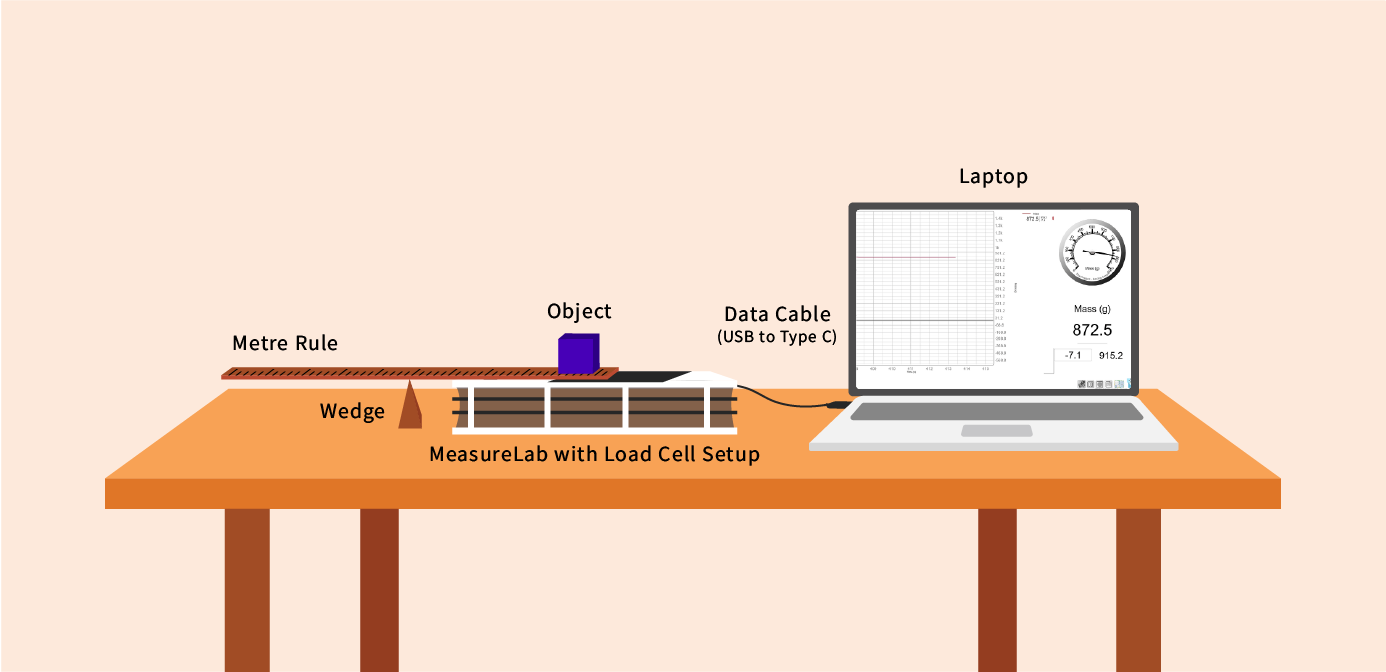
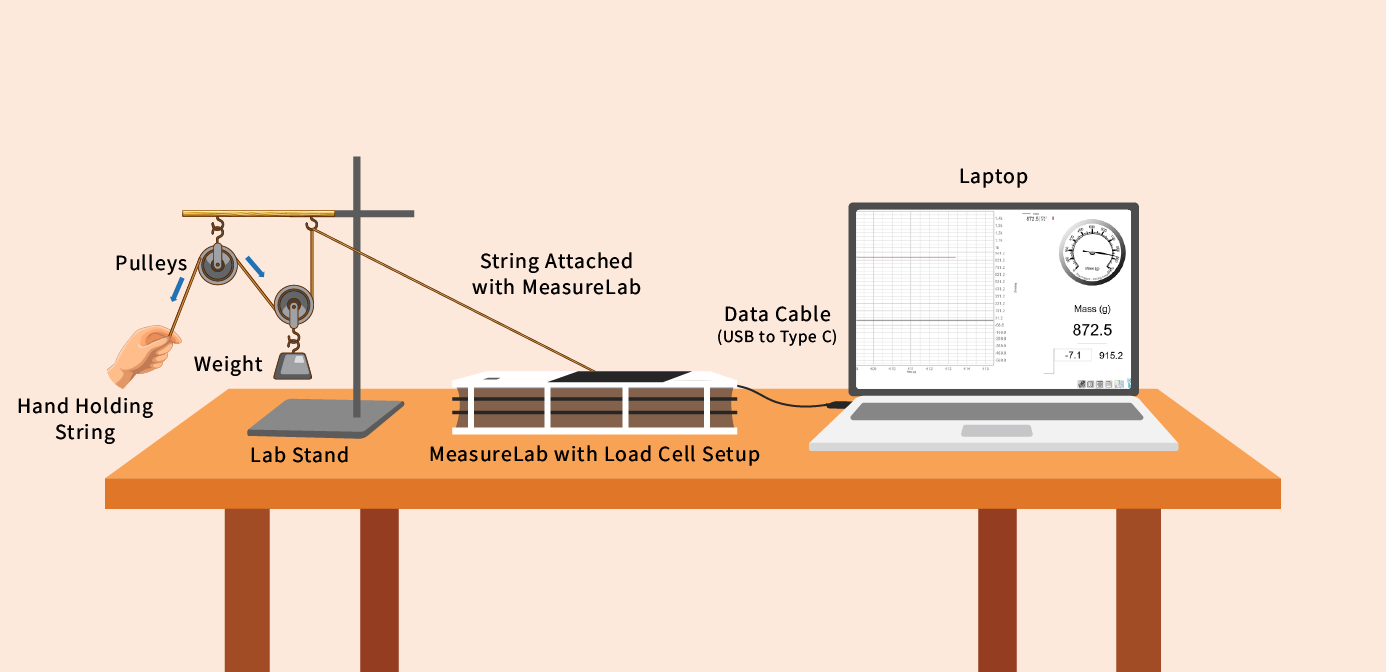
Introduction and Hands-On Exploration: (35 minutes)
- You may start by asking:
“Who likes playing on seesaws? Have you ever noticed how sometimes it’s easier to lift someone heavier than you, and other times it’s harder? Why do you think that happens?”
Wait for students’ responses. Show pictures of seesaws and ask:
- You may build on their responses by saying:
“That’s because of a simple machine called a lever! Levers help us move heavy things with less effort by changing where we apply force. Today, we’re going to explore how levers and pulleys can help us lift things more easily, just like a seesaw.”
What is a Lever?
- You may continue by asking:
“Can anyone guess what kind of simple machine a seesaw is? How does it help lift things?”
Wait for responses, guiding them toward the idea that seesaws are levers.
- You may explain:
“A lever is a simple machine that helps us lift or move things. It has a pivot point (called a fulcrum) in the middle, and depending on where you apply force, it can make lifting something easier or harder.”
- Show Examples:
“Just like a seesaw, cranes, and even bottle openers use levers! The longer the arm of the lever, the easier it is to lift heavy things.”
- Show students pictures of everyday levers like cranes, seesaws, and bottle openers to visually connect the concept.
Activity 1: Levers and Balancing Forces
Objective:
Students will experiment with a simple lever system (ruler and slotted weights) to learn how changing the weight and distance from the fulcrum affects the force needed to balance the lever. This activity introduces them to the idea of moments.
Materials:
- Ruler (used as the lever).
- Slotted weights.
- Support stand.
- Load cell to measure the weight on one side of the lever.
Procedure:
-
Set Up the Lever:
- Place a ruler on a support stand, with one side resting on the load cell and the other end free for placing weights.
- Start by balancing equal weights on both sides of the lever.
-
You may ask:
“What do you think will happen if we place a heavy weight closer to the center? Will it still balance?”- Wait for predictions. Let students try placing a weight closer to the pivot and see how it affects the balance.
-
Experiment with Distances:
- Keep one weight constant (e.g., 50 grams) on one side. Then, vary the distance of a smaller weight (e.g., 20 grams) on the other side, moving it closer and farther from the pivot.
- Record how the balance changes and note that it becomes easier to lift the weight the farther it is from the pivot.
-
Recording Observations:
- Students will complete the following table (sample filled) to explore the relationship between force and distance from the pivot:
| Mass on Load Cell Side (g) | Distance from Pivot on Load Cell Side (cm) | Mass on Opposite Side (g) | Distance from Pivot on Opposite Side (cm) | Observation (Balanced/Unbalanced) |
|---|---|---|---|---|
| 50 | 10 | 50 | 10 | Balanced |
| 50 | 10 | 20 | 25 | Balanced |
| 50 | 10 | 30 | 15 | Balanced |
- The load cell measures the weight on one side, and students place different weights on the opposite side to balance the lever.
- By changing the distance at which they place the weights, students can observe how distance compensates for weight.
- The moment (or turning effect) is determined by both the weight applied and the distance from the pivot.
- A smaller weight can balance a larger weight if it’s placed farther from the pivot, demonstrating the basic principle of levers.
- Students will learn how simple machines, like levers, help us do work more easily by changing the amount of force we need to apply depending on where and how we apply it.
Activity 2: Single and Double Pulley Systems
Objective:
Students will experiment with single and double pulley systems to observe how they reduce the force needed to lift a weight. This introduces the concept of mechanical advantage.
Materials:
- Single pulley system.
- Double pulley system.
- Slotted weights.
- Load cell for measuring the force needed to lift the weights.
Procedure:
-
Single Pulley Setup:
- Attach a single pulley system and place a weight on one side. Measure how much force is needed to lift the weight using the load cell.
-
You may ask:
“How much force do you think you’ll need to lift this weight with one pulley? Will it be easier or harder than lifting it without the pulley?”- Let students observe the load cell reading and note the force required to lift the weight with a single pulley.
-
Double Pulley Setup:
- Set up a double pulley system and repeat the experiment with the same weight. Measure the force required using the load cell again.
-
You may ask:
“What do you think will happen with two pulleys? Will you need more or less force to lift the weight?” -
Recording Observations:
Students will record the fixed mass placed on the load cell and the force required to lift it using different pulley systems:
| Pulley System | Fixed Mass on Load Cell (g) | Mass Needed to Lift (g) |
|---|---|---|
| Single Pulley | ||
| Double Pulley |
Note for the teacher:
- Explain that as more pulleys are added, the force required to lift the weight (even though we are measuring mass, teacher will have to explain they are analogous) decreases. This shows the mechanical advantage of using multiple pulleys.
Guided Activity and Worksheet: (15 minutes)
Worksheet Questions:
-
Seesaw Questions:
- “If you put a heavier person on one side of the seesaw, how could you make it balance?”
- “What happened when you moved the weight farther from the center on the lever? Did it become easier or harder to balance?”
-
Pulley Questions:
- “Which pulley system needed more force to lift the weight? Why?”
- “Can you explain why more pulleys make it easier to lift things?”
Reflection and Summary: (5-10 minutes)
-
You may summarize:
“Today, we learned how simple machines like levers and pulleys help us lift things with less effort. We saw that with levers, the farther you place the weight from the pivot, the easier it is to lift. With pulleys, the more pulleys you use, the less force you need to lift something.” -
Real-Life Connection:
“Next time you see a seesaw or a crane, remember how these simple machines help make lifting things easier!”
Glossary:
- Lever: A simple machine that helps lift or move objects by changing where force is applied.
- Pulley: A wheel and rope system that makes lifting objects easier by reducing the force needed.
- Pivot (Fulcrum): The fixed point on which a lever rests and rotates.
- Mechanical Advantage: The advantage gained by using a simple machine to make lifting easier.
- Moment: The turning effect produced by a force acting at a distance from the pivot.