Grade 5 - Session 9: “Pendulum Period Investigation”
Session Architect: Aleeza Ayaz - Markhor3D
Session Length: 50-60 minutes
Learning Objectives:
In this session, students will:
- Understand the concept of a pendulum and how it oscillates.
- Use a photogate sensor to measure the period (time taken for one complete oscillation) of a pendulum.
- Explore how the amplitude (initial angle of release) affects the period.
- Understand harmonic motion through the regular and repeating pattern of the pendulum.
- Collaborate with peers to discuss and compare findings.
- Connect real-world applications of pendulums to clocks, swings, and engineering.
Teacher Resource:
Session File: ML59.plf (57.7 KB)
Equipment Required:
- MeasureLab with a photogate sensor.
- A pre-set pendulum setup (e.g., a string with a small weight attached, already hanging from a fixed point).
- Protractor to measure the initial amplitude (angle of release).
- Stopwatch or timer (as backup for the photogate readings).
- Worksheet for recording predictions, observations, and calculations.
- Pens, pencils, markers etc.
Teaching Aids:
- Visual aids: diagrams showing the structure of a pendulum and its oscillations, explanations of harmonic motion, and how the photogate sensor works.
- Projector or screen to display the measurements from the photogate sensor.
Preparation:
This step has to be done before the session on each workstation/apparatus by the teacher/session instructor:
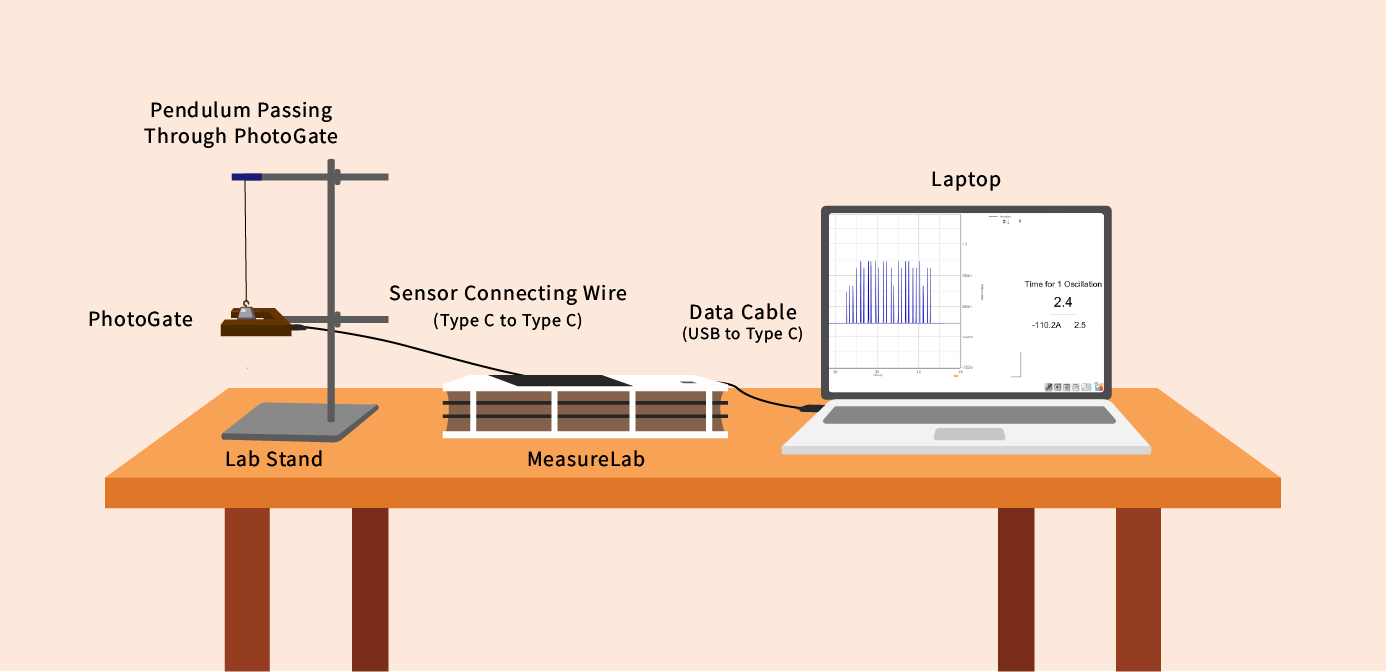
- Make sure that each computer has Physlogger installed and can detect the Measrelab when connected to it using the provided cable.
- Each Measurelab should have access to a power outlet for sensors that require external power. For this session, we will use Photogate which requires an external power source.
- Launch the Physlogger application and load the session file provided in the resources section.
Your setup will look something like this:
Introduction and Hands-on Exploration: (10 + 40 minutes)
Step 1: Ask Students to Connect to What They Already Know
Start the session by asking students where they have seen a pendulum in their everyday lives.
-
You may ask:
“Where have you seen a pendulum like this before? Maybe in a grandfather clock, a swing at the park, or even in a movie?”
- Let students respond and share their experiences.
-
You may follow up with:
“Pendulums are everywhere, especially in clocks or swings. Today, we’re going to find out exactly how they work by building our own pendulum and measuring how it swings.”
Step 2: Let Students Play and Predict (No Measurements Yet)
Let the students manipulate the pendulum themselves before taking any formal measurements. Encourage them to try different swing sizes (amplitudes) and notice the differences.
- You may say:
“Before we start measuring, let’s see what happens when we pull the pendulum back just a little and when we pull it back a lot. I want you to move the pendulum and make some predictions. What do you think will happen when we change how far we pull it back? Will a bigger swing make the pendulum move faster or slower?”
Student Action:
- Let students move the pendulum themselves, pulling it back at different angles and observing the motion.
- No measurements should be taken yet. This is purely to let them feel and understand how the pendulum behaves.
Step 3: Ask for Predictions
- You may ask:
“Now that you’ve tried it out, what do you think controls how fast or slow the pendulum swings? Does the height (angle) we pull it back matter? How about the weight of the pendulum?”
- Have students write down their predictions in their worksheets or share them with their peers.
After the prediction activity, explain how the photogate sensor will help measure the pendulum’s swing accurately.
-
You may say while demonstrating:
“Now, we’ll measure exactly how long it takes for the pendulum to complete one full swing using this photogate sensor. When the pendulum swings through the sensor, it breaks the beam of light, and the sensor will record the time it takes for one full oscillation.”
- Show the pendulum passing through the photogate to demonstrate how it works.
Now that students have made their predictions and tested the pendulum by moving it, we’ll formally measure the pendulum’s time period at four key amplitudes (10°, 20°, 30°, and 40°).
Step 1: Setting Up the Pendulum and Prediction
-
You may say:
“We’re going to test the pendulum’s swing by releasing it from four different angles: 10 degrees, 20 degrees, 30 degrees, and 40 degrees. We’ll measure how long it takes for the pendulum to complete one full swing at each angle.”
- Use a protractor to show students how to measure the angle (amplitude) of the pendulum.
-
You may ask:
“Based on what you felt earlier, what do you think will happen when we release the pendulum from these different angles? Will a larger angle make the pendulum move faster or slower?”
- Let students make their predictions and discuss briefly.
Step 2: Conducting the Experiment
Step 2a: Amplitude 1 (10°)
- Set the pendulum at an initial angle of 10 degrees.
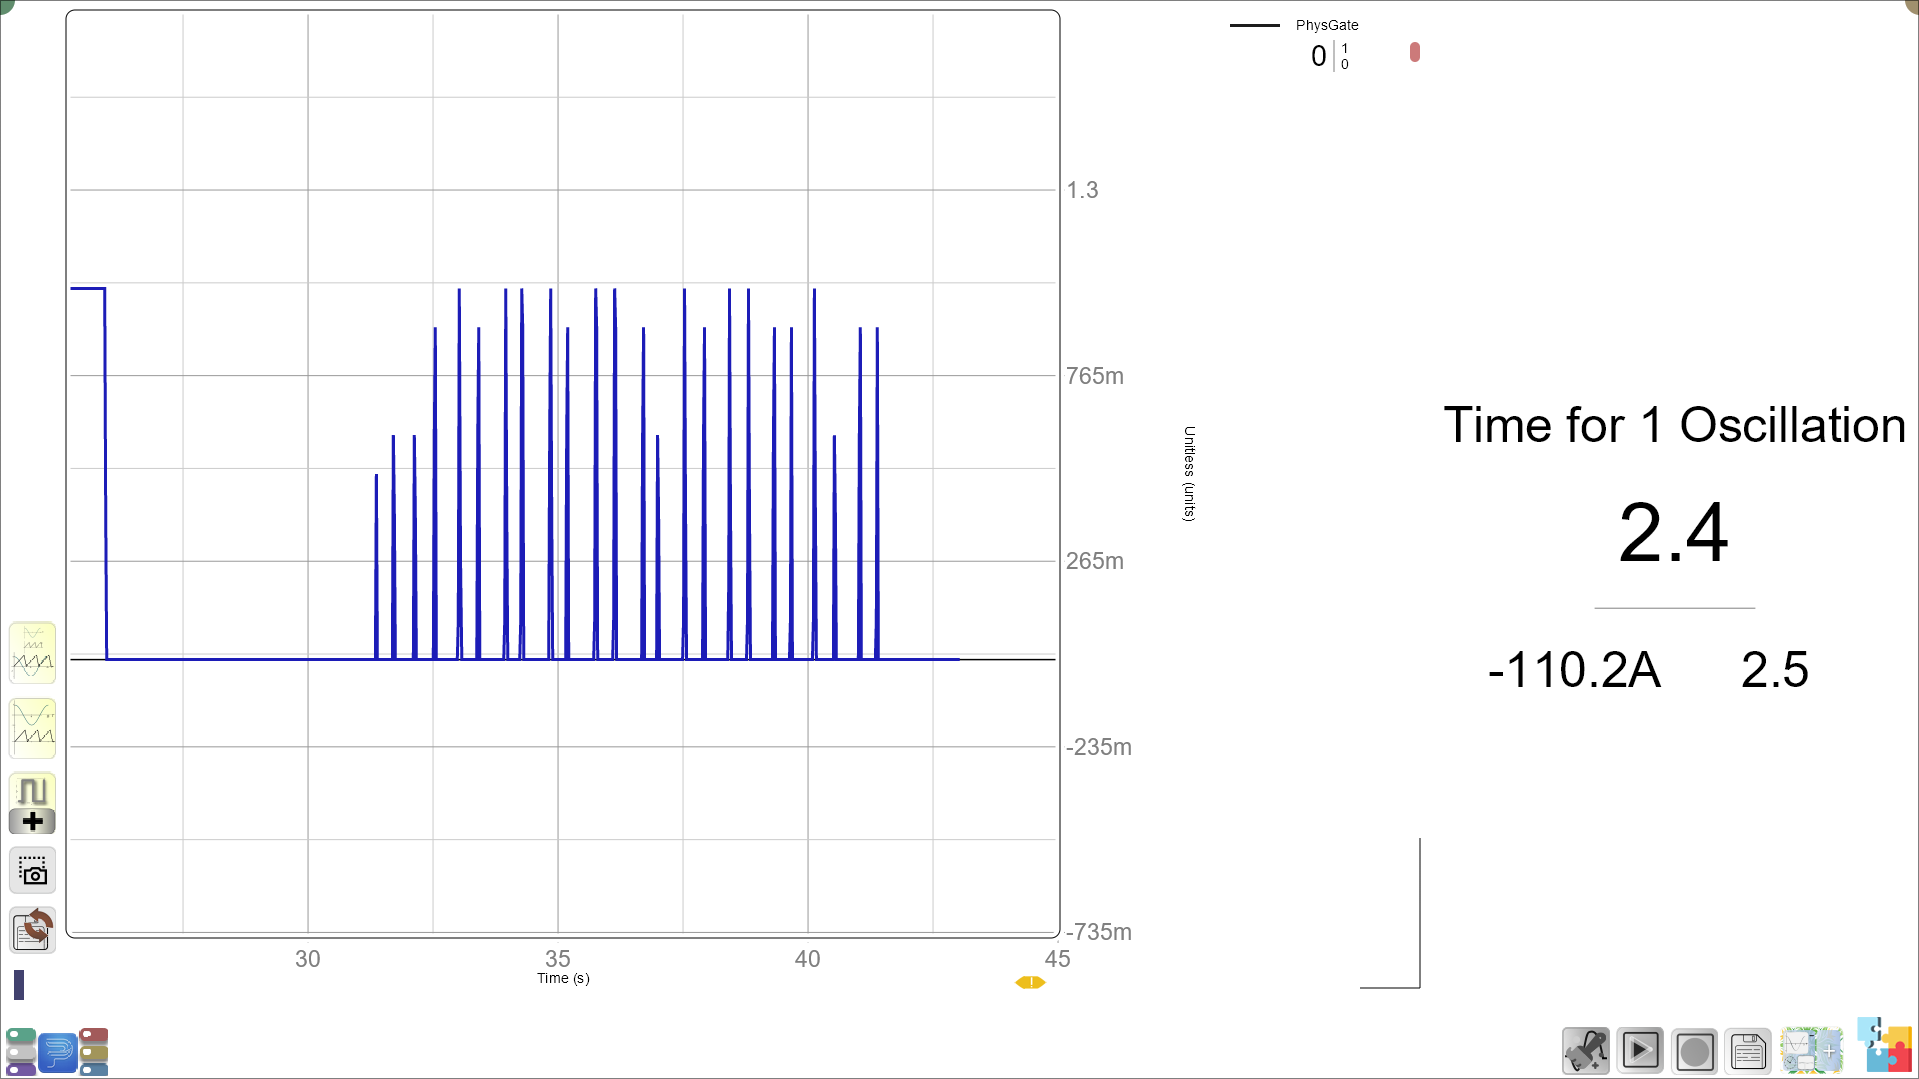
- Demonstrate how to release the pendulum and use the photogate sensor to measure the time period for one complete oscillation.
Step 2b: Amplitude 2 (20°)
- Set the pendulum at 20 degrees and repeat the measurement.
Step 2c: Amplitude 3 (30°)
- Repeat the process by releasing the pendulum at a 30-degree angle.
Step 2d: Amplitude 4 (40°)
- Finally, measure the time period at 40 degrees.
Step 3: Recording the Results
Data Table for Students to Fill:
| Amplitude (Degrees) | Measured Time for 1 Oscillation (seconds) | Predicted Outcome (Faster/Slower) | Observations |
|---|---|---|---|
| 10° | |||
| 20° | |||
| 30° | |||
| 40° |
Step 4: Peer Collaboration and Group Comparisons
Encourage students to discuss and compare their results with their peers.
-
You may ask:
“What did your group notice about the time period when we increased the angle? Did the time change much between 10°, 20°, 30°, and 40°?”
- Have students compare their results with other groups.
-
You may say:
“Did everyone’s pendulum behave the same way? If some groups got slightly different results, what could explain those differences?”
Step 5: Explaining Harmonic Motion (Using the Pendulum)
Explain harmonic motion using the pendulum as a live demonstration. Use visual aids to support the explanation.
- You may say while swinging the pendulum:
“As you can see, the pendulum moves back and forth in a very smooth and regular way. This type of motion is called harmonic motion. It means that the pendulum is swinging in a repeating pattern, moving the same way each time. Let’s break down what’s happening.”
Step 6: Breaking Down the Pendulum’s Motion
-
You may ask:
“When I pull the pendulum back and let it go, where does it go next? What happens when it reaches its highest point on the other side?”
- Pause for student responses. Allow them to visualize the pendulum’s movement and respond.
-
You may explain:
“That’s right! The pendulum swings from one side to the other and back again. This full swing from one side to the other and back is called an oscillation.”
Step 7: Regularity of Harmonic Motion
-
You may ask:
“Do you think the pendulum takes the same amount of time for each swing? Why or why not?”
- Allow students to guess based on their observations.
-
You may explain:
“The special thing about harmonic motion is that it’s very regular, meaning the pendulum takes the same amount of time for each swing. No matter how many times it swings, the time it takes for one full swing—what we call the period—stays almost the same.”
- Pause and show them the measured time periods on the photogate sensor for each swing.
-
You may ask:
“Why do you think the pendulum keeps the same time for each swing, even when we release it from different angles?”
- Encourage discussion and build on their answers.
Step 8: Why Harmonic Motion Happens in the Pendulum
-
You may explain:
“Harmonic motion happens because of two main forces acting on the pendulum. Can anyone guess what pulls the pendulum down when I release it?”
- Allow students to guess gravity.
-
You may explain:
“Exactly! When I pull the pendulum back, gravity pulls it down, causing it to swing. But once the pendulum reaches the middle, it doesn’t stop. It keeps going because it has momentum—the energy from the swing keeps it moving. It slows down as it reaches the top on the other side, where gravity pulls it back again.”
-
Pause for student responses. Ask them to describe what happens when the pendulum swings to the other side.
Step 9: Connecting Harmonic Motion to Real Life
-
You may ask:
“Can you think of other examples where you’ve seen something move back and forth like this? Maybe on the playground, in a park, or somewhere else?”
-
Let students suggest examples, such as:
- Swings at the playground.
- Amusement park rides that swing back and forth.
- A metronome that keeps time in music.
-
You may explain:
“In all of these examples, the motion is harmonic because it’s regular and predictable. Swings at the park move back and forth in a repeating pattern, just like the pendulum. The time it takes for each swing stays pretty much the same, just like the period of a pendulum.”
Step 10: Real-World Application of Harmonic Motion
-
You may say:
“Harmonic motion is really important in everyday life. In clocks, for example, pendulums are used to keep time because their swings are so regular and predictable. That’s why old clocks, like a grandfather clock, have pendulums—they can use this regular swinging motion to measure time accurately.”
-
You may follow up with:
“Harmonic motion is also found in lots of other places. For example, the way some bridges sway in the wind, or even how the Earth moves around the Sun, is based on these same ideas of regular, repeating motion.”
- Encourage students to suggest other examples where they’ve seen regular, repeating motion in the world around them.
Reflection and Discussion:
-
“What did you notice about the time period as we increased the amplitude?”
-
“Why do you think the time period stayed consistent, even though the pendulum was released from different angles?”
-
“What real-life examples can you think of where pendulums or swinging motions are used?”
Summary and Wrap-Up: (5-10 minutes)
-
You may summarize:
“Today, we learned about pendulums and how we can measure their time period using a photogate sensor. We also saw that the amplitude doesn’t affect the time period much, and we introduced the concept of harmonic motion, which helps us understand why pendulums keep such regular time.”
-
You may end with a real-life connection:
“Next time you see a clock or a ride at the amusement park, think about how the swinging motion works. Pendulums are all around us, helping keep time or creating regular motion in things we use every day.”
Next Session
Previous Session
Glossary:
- Pendulum: A weight suspended from a fixed point that swings back and forth under the influence of gravity.
- Photogate: A sensor that measures time by detecting when an object passes through a beam of light.
- Oscillation: The movement of the pendulum from one side to the other and back.
- Period: The time it takes for the pendulum to complete one full swing (oscillation).
- Amplitude: The angle or height from which the pendulum is released.
- Harmonic Motion: A type of motion where an object moves back and forth in a regular, repeating pattern.