Grade 7 - Session 4: “Expansion of Air with Heat”
Session Architect: Aleeza Ayaz - Markhor3D
Session Length: 60-70 minutes
Learning Objectives:
In this session, students will:
- Observe the relationship between temperature and pressure when heating and cooling air in a sealed container.
- Explore how gases expand when heated and contract when cooled.
- Use the pressure sensor and temperature sensor to collect data on gas expansion and contraction.
- Understand the Ideal Gas Law and apply it to real-world scenarios.
- Learn what moles represent through an intuitive, hands-on analogy.
- Analyze their experimental results by graphing the relationship between pressure and temperature and identifying patterns.
Teacher Resource:
Session File: ML74.plf (57.6 KB)
Equipment Required:
- PC/Laptop to display measurement and live plot
- MeasureLab with built-in pressure sensorand temperature sensor.
- A sealed container (such as a strong glass or plastic beaker with a lid).
- Hot water bath and cold water bath.
- Timer or stopwatch.
- Worksheet for recording observations and data.
- Pens, pencils, markers, etc.
Preparation:
This step has to be done before the session on each workstation/apparatus by the teacher/session instructor:
- Make sure that each computer has Physlogger installed and can detect the Measrelab when connected to it using the provided cable.
- Each Measurelab should have access to a power outlet for sensors that require external power. For this session, Temperature Sensor Probe and the built-in Pressure Sensor will be used which require an external power source.
- Connect the Temperature Sensor to the Measurelab using the following port:

- Launch the Physlogger application and load the session file provided in the resources section.
Your setup will look something like this:
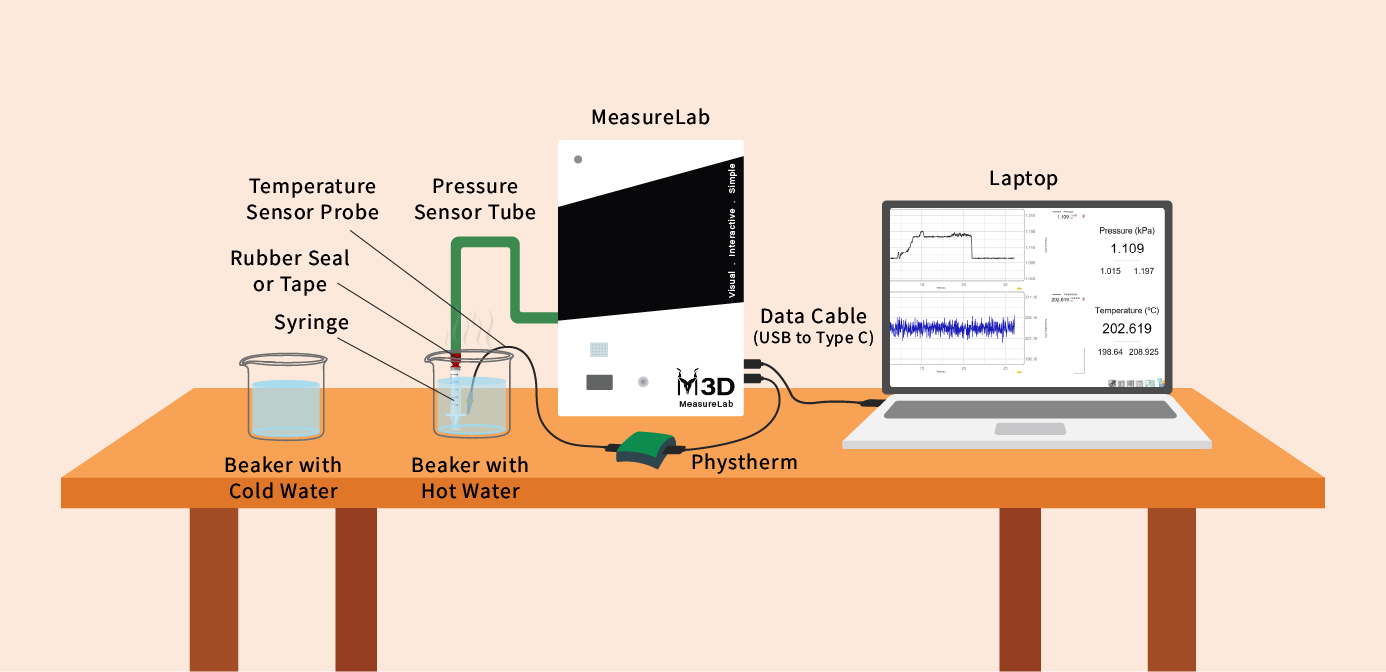
- Set up the apparatus as shown in the diagram above.
Introduction and Hands-On Exploration: (35-40 minutes)
Starting with an Engaging Question:
- You may start by asking:
“Do you know why perfumes shouldn’t be left in the sun?”
- Allow students to share their thoughts. Some might mention heat or air expanding, but don’t explain too much yet—let them experiment to find the answer.
Set Up the Experiment:
-
Introduce the Equipment:
Explain that students will be using a sealed container with air inside. The container will be placed in hot and cold water baths to heat and cool the air. The pressure sensor will measure how much the air pushes against the container as it heats up or cools down, while the temperature sensor tracks how hot or cold the air is inside the container. -
Ask for Predictions:
- You may ask:
“What do you think will happen to the pressure inside the container when we put it in hot water?What about when we put it in cold water?”
- Have students write their predictions on the worksheet before starting the experiment.
Running the Experiment:
- Hot Water Bath:
- Place the sealed container in the hot water bath.
You may ask:
“Look at the live plot. Is the pressure going up or down? Why do you think that is happening?”
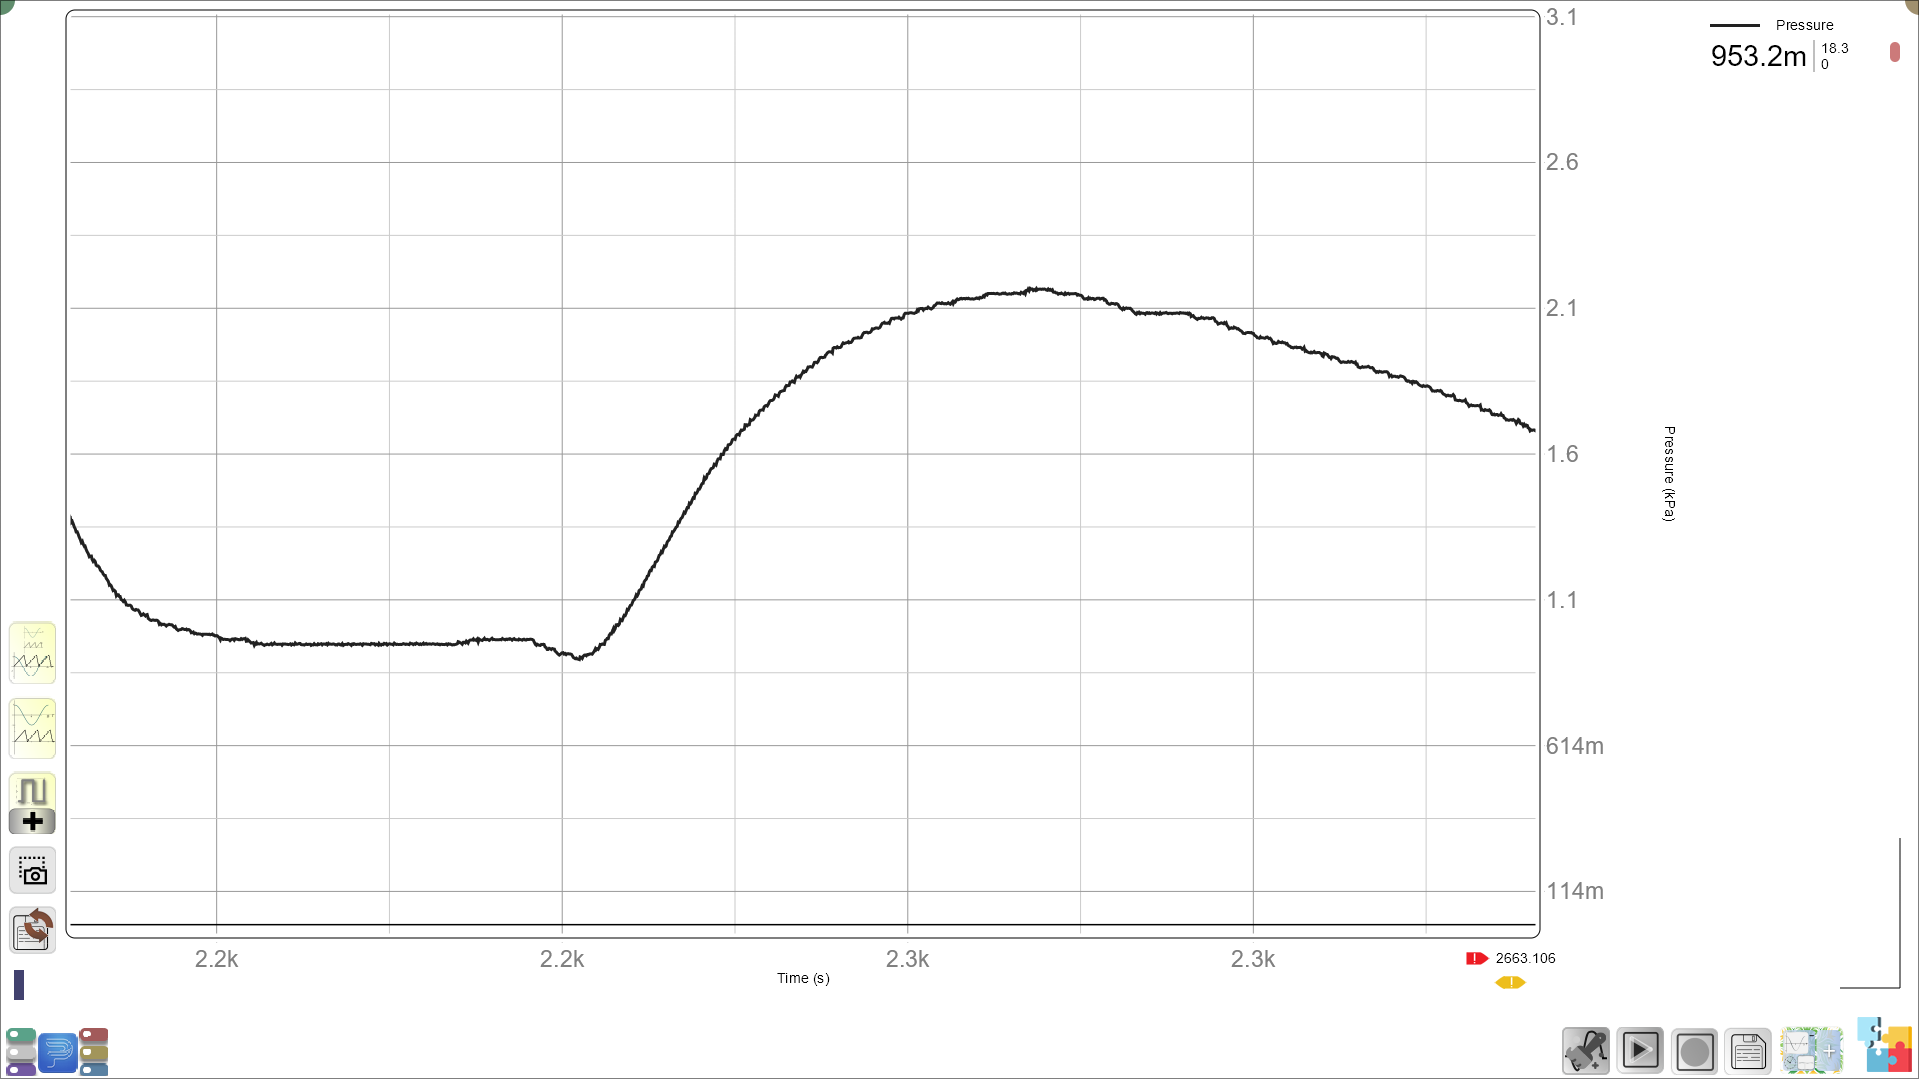
- Let students observe the pressure increase in real-time as the temperature goes up. Have them record the initial pressure and temperature, and the pressure and temperature after 5 minutes in the hot water bath.
- Cold Water Bath:
- After heating, quickly move the container to the cold water bath.
You may ask:
“Now that we’ve moved the container to the cold water, what do you think will happen to the pressure?”
- Allow students to watch the pressure drop as the temperature decreases, and have them record the final pressure and temperature.
Building Understanding Through Observation:
You may ask:
“What did you notice about the pressure when we increased the temperature? Why do you think the pressure went up?”
-
Encourage students to discuss and come to the conclusion that as air heats up, the particles move faster and push harder against the walls of the container, increasing pressure.
-
Follow-up question:
“And what happened when we cooled the air down? Did the pressure go up or down?”
Let students explain that when the air cooled, the particles moved slower, leading to lower pressure.
Introduce Moles Using a Hands-On Analogy:
You may explain:
“The air inside the container is made up of tiny particles. Imagine that each of these particles is like a bead. The more beads you have, the more space they take up, and the more pressure they can create when they bounce around. We call this amount of particles a ‘mole’ in chemistry.”
- Activity:
Use a beaker of beads to visually represent how adding more particles (beads) fills up the space and increases pressure, helping students intuitively understand the idea of moles.
Explaining the Ideal Gas Law
You may explain:
“The relationship between pressure, volume, temperature, and the number of particles (moles) is described by the Ideal Gas Law. The formula is PV = nRT, where P is pressure, V is volume, n is the number of moles, R is a constant, and T is temperature.”
- Relate this to their observations:
“When we increased the temperature, T went up, so P (the pressure) also went up because the volume (V) stayed the same. But if we had added more air, or moles (n), the pressure would’ve gone up even more.”
- Keep the math at a basic level and encourage students to understand how pressure, volume, and temperature are connected.
Follow-Up Questions and Graphing the Data: (15-20 minutes)
Worksheet Section:
Recording Temperature and Pressure Data:
| Condition | Initial Temperature (°C) | Initial Pressure (atm) | Final Temperature (°C) | Final Pressure (atm) |
|---|---|---|---|---|
| Hot Water Bath | ||||
| Cold Water Bath |
- Analyzing the Data:
Have students plot their results on a graph with temperature on the x-axis and pressure on the y-axis.
You may ask:
“What kind of pattern do you see in your graph? What happens to pressure as the temperature increases?”
- Interpreting the Graph:
You may ask:
“Is your graph a straight line or a curve? What does that tell us about the relationship between temperature and pressure?”
- Identifying Variables:
You may ask:
“What did we change in this experiment (the independent variable)? What did we measure (the dependent variable)? What did we keep the same (the controlled variables)?”
- Reflection Questions:
- What happened to the pressure when the temperature increased?
- Why does heating the air cause the pressure to rise?
- Can you think of real-life examples where this happens, like hot air balloons or engines?
Conclusion and Summary: (5 minutes)
- You may summarize:
“Today, we saw how air expands when heated and contracts when cooled. The pressure increased as the temperature went up because the air particles moved faster and pushed harder on the container. This experiment helped us understand the Ideal Gas Law and how temperature, pressure, and volume are related.”
- Real-life connection:
“Next time you see a hot air balloon rising, or a pressure cooker whistling, you’ll know that it’s because the air (or steam) inside is expanding with heat!”
Glossary:
- Pressure: The force that particles inside a gas exert on the walls of a container.
- Temperature: A measure of how hot or cold something is, related to the speed of particles.
- Ideal Gas Law: A formula that describes the relationship between pressure, volume, temperature, and the number of particles in a gas.
- Moles: A unit that represents the amount of particles in a substance.
- Expansion: When air or gas takes up more space as it heats up.