Grade 8 – Session 3: “Sealed & Squeezed: The Mystery of Fluids
Session Architect: Aleeza Ayaz – Markhor3D
Session Length: 50-60 minutes
Session Overview:
In this interactive session, students explore how air pressure behaves in a closed system using a sealed syringe. They’ll intuitively discover the relationship between pressure and volume by attempting to push and pull the syringe’s plunger, discussing what’s happening inside and why the system resists movement. By connecting the syringe to MeasureLab, they’ll observe real-time pressure changes and predict what happens when the system is punctured. The session connects their discoveries to real-world applications like tires, balloons, and pumps, sparking curiosity about the role of air pressure in everyday life.
Learning Objectives:
In this session, students will:
- Experiment with a sealed syringe and observe resistance to movement.
- Develop and test hypotheses about what’s inside the syringe and why pressure builds.
- Observe real-time pressure changes using MeasureLab while varying the plunger’s position.
- Analyze what happens when a puncture allows air to escape from the system.
- Connect their observations to real-world systems like tires and pumps.
Equipment Required:
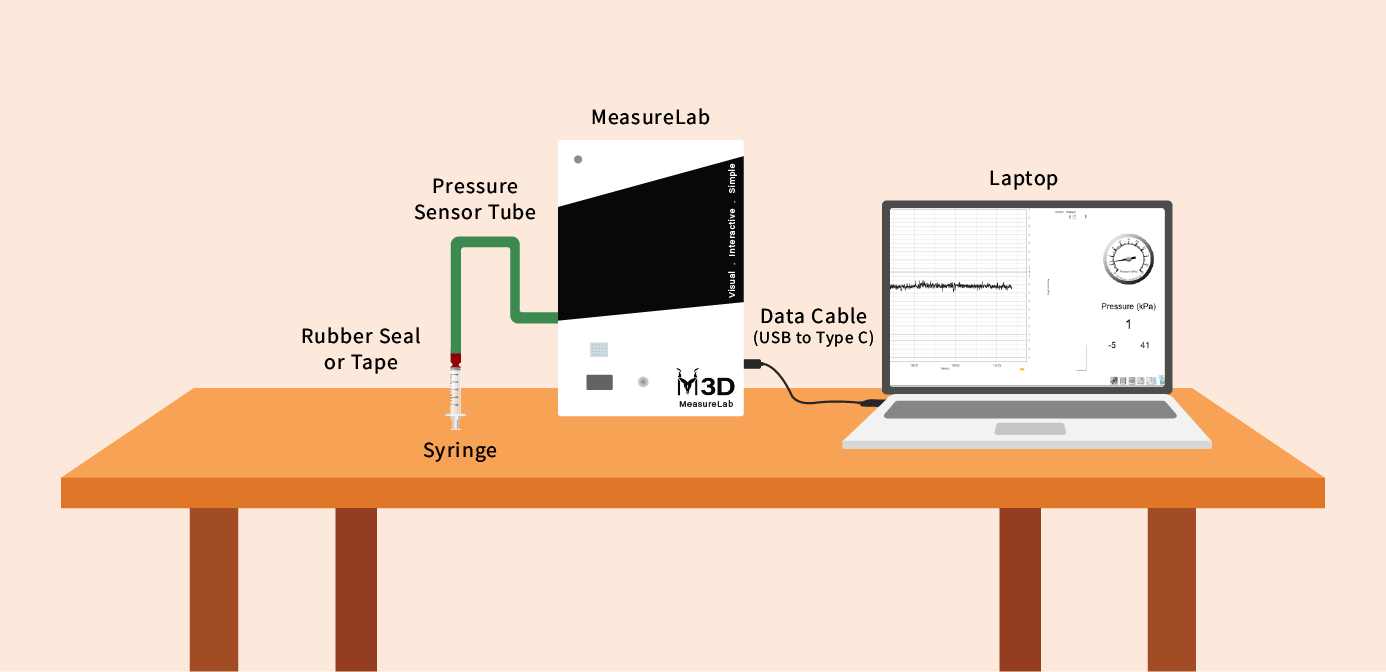
- MeasureLab with a pressure tube sensor
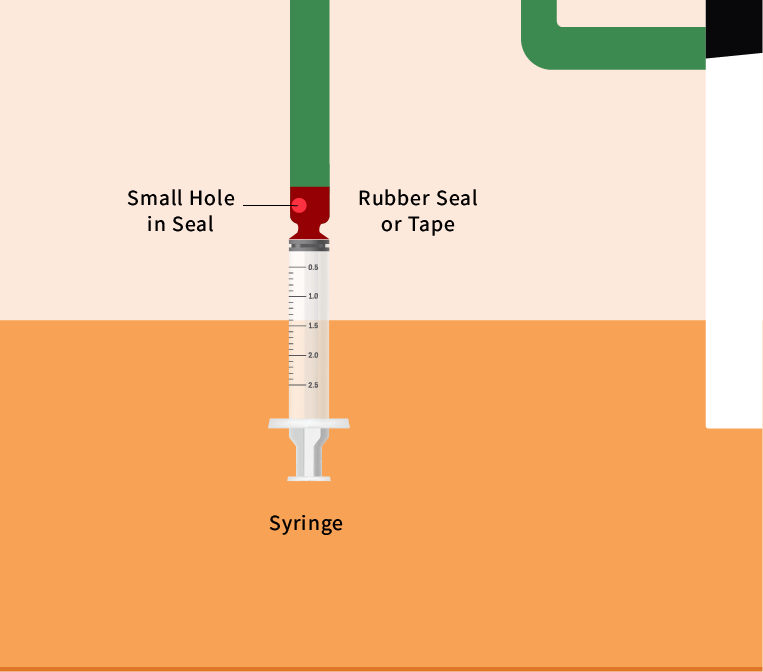
- Syringe sealed at one end (rubber stopper or cap)
- Small extension tube to connect the syringe to the pressure sensor
- A small pin (to create a small hole in the extension tube)
- Worksheet for recording predictions and observations
Teacher Resource:
Session File: ML83.plf (55.5 KB)
Preparation:
This step has to be done before the session on each workstation/apparatus by the teacher/session instructor:
- Make sure that each computer has Physlogger installed and can detect the Measrelab when connected to it using the provided cable.
- Each Measurelab should have access to a power outlet for sensors that require external power. For this session, the built-in Pressure Sensor along with it’s pressure sensing tube will be used. This sensor requires an external power source.
- Launch the Physlogger application and load the session file provided in the resources section.
Your setup will look something like this:
Introduction: A Thought Experiment (10-12 minutes)
Start by sparking curiosity with a fun mental exercise:
“Imagine you’re holding a balloon filled with air. Now, think about what happens when you squeeze it tightly. What do you feel? Can you keep squeezing forever, or does something stop you?”
Allow students to play around with the balloon and share their ideas about the behavior of air in the balloon—some might say it gets harder to squeeze, others might mention that the air escapes or pops the balloon. Build on their responses to guide the discussion.
“Why do you think it gets harder to squeeze? What exactly is pushing back?”
Transition to introducing the syringe:
“Now let’s try a similar experiment, but with a different container—this syringe. What do you think happens when we pull the plunger? What do you think will happen if we push the plunger while the tip is completely sealed?”
Exploring Resistance in the Syringe (10 minutes)
Hand out the sealed syringes and let students experiment freely for a few minutes by trying to push and pull the plunger.
Encourage them to notice:
- “How hard is it to push the plunger down?”
- “Can you pull the plunger back easily, or is there resistance?”
Gather students and ask them to describe what they experienced. Some might say the plunger barely moves, or that it bounces back when released. Ask thought-provoking questions:
“Why do you think it’s so hard to push or pull the plunger? What’s inside the syringe that could be causing this resistance?”
Let them hypothesize, guiding them to think about the air inside:
“If the syringe is sealed and air can’t escape, what do you think happens to the air as you push the plunger?”
Following the discussion, naturally hint towards the idea of compression and pressure .
Measuring Pressure Changes (15-20 minutes)
Step 1: Connecting the Sensor
Now that students have a basic understanding of the resistance caused by air, introduce the pressure sensor by saying:
“We’ve felt some resistance, but we can’t see what’s really happening to the air inside. Let’s measure it to get a clearer picture.”
Step 2: Hypothesis Development
“If the air is being squeezed when we push the plunger, what do you think will happen to the reading on the screen?”
- “What do you expect to see when you pull the plunger back and give the air more space?”
Let students write down their predictions on the worksheet before they begin testing.
Step 3: Conducting the Experiment
“We’ve felt resistance, but let’s go a step further and measure what’s actually happening inside the syringe.”
Step 4: Marking Plunger Positions for Measurement
“Before we begin measuring, let’s mark some positions along the syringe so we can observe how the pressure changes as we push the plunger down.”
Instructions:
- Use the markings on the syringe in mL to see where the plunger was at the start and observe how much the plunger is pushed and the corresponding change it causes in the reading.
- Students will take pressure readings at each position.
Step 3: Recording and Testing Predictions
Before starting, let students hypothesize:
- “What do you think will happen to the pressure as you push the plunger to different positions?”
- “What will happen if you pull the plunger back and give the air more space?”
Let students write down their predictions in the worksheet.
Conducting the Experiment:
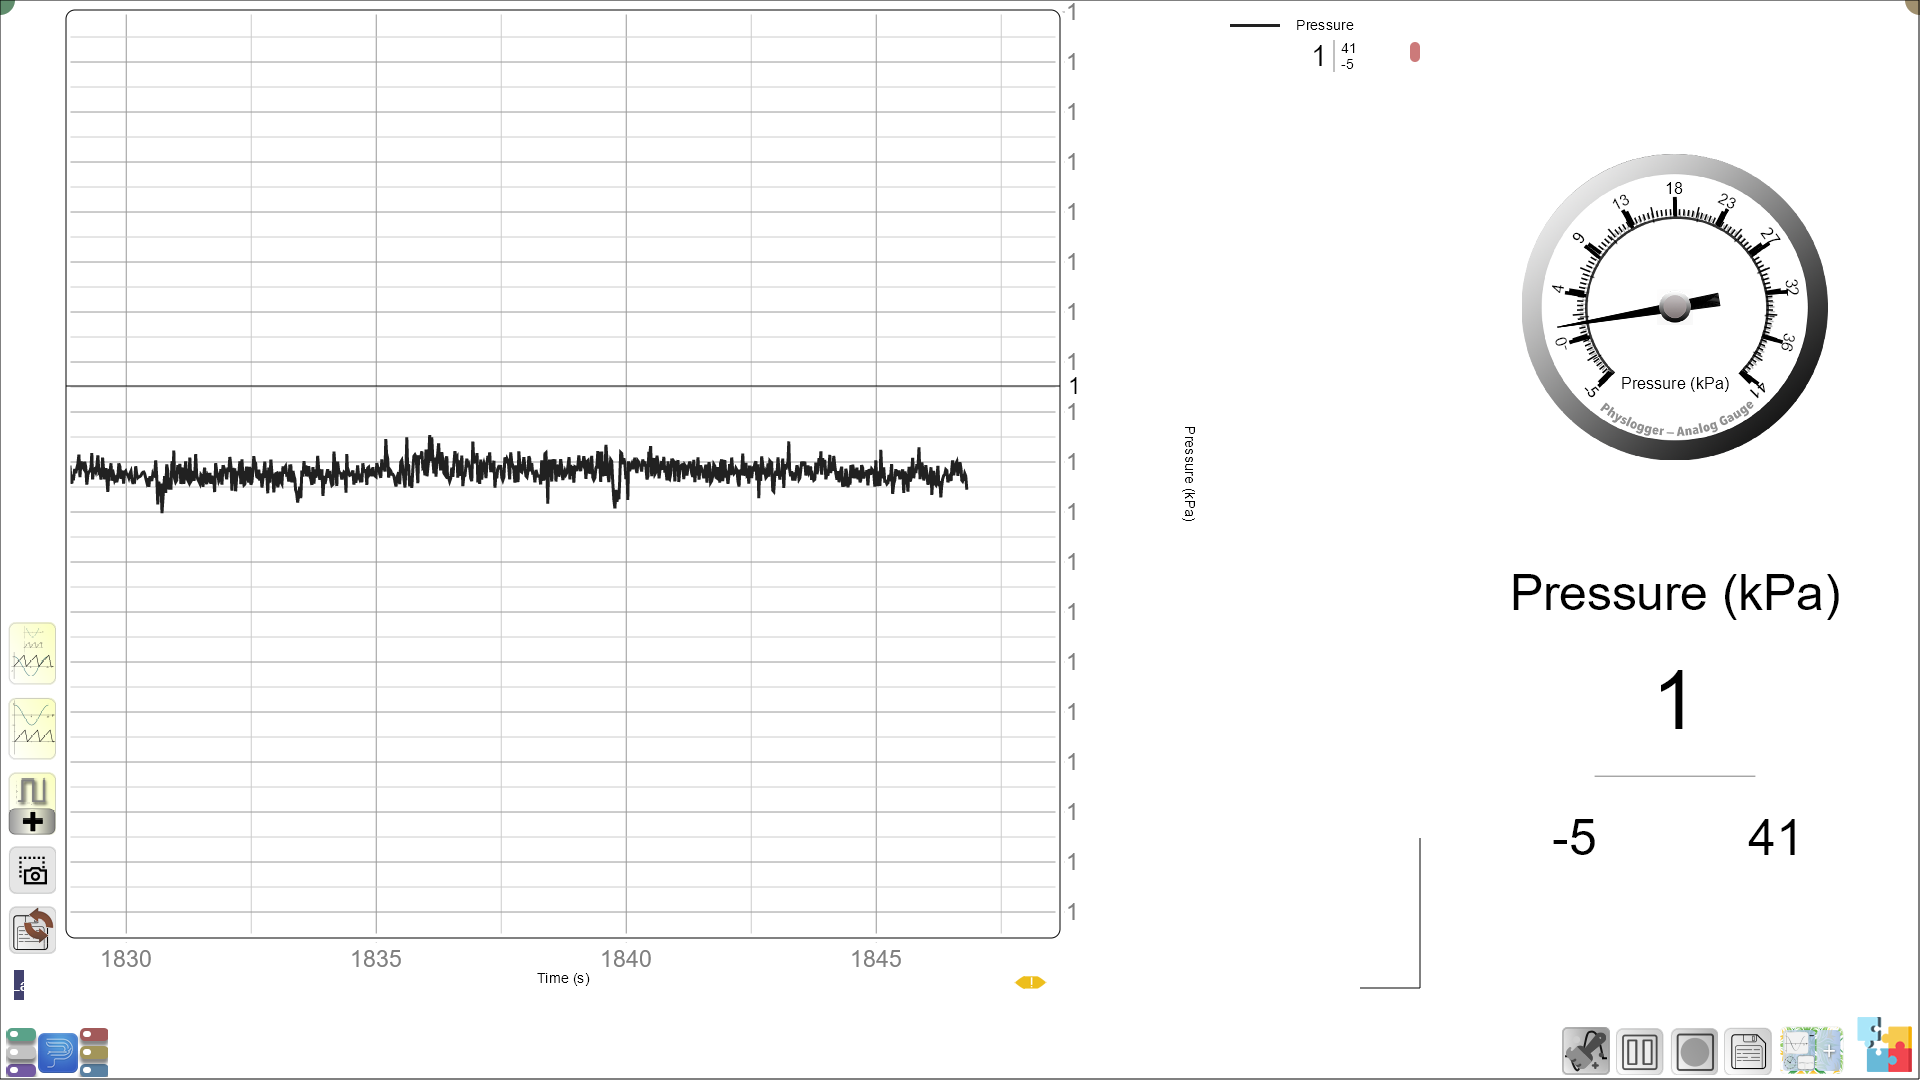
- Record the starting pressure (when the plunger is fully extended).
- Gently push the plunger to the first marked position and note the pressure reading.
- Continue moving the plunger to the next positions, recording the pressure at each step.
- Then, slowly pull the plunger back and observe the drop in pressure.
Data Table Example:
| Plunger Position (cm) | Pressure (kPa or Pa) | Observation (Resistance) |
|---|---|---|
| 30 mL (fully extended) | ||
| 25 mL | ||
| 20 mL | ||
| 15 mL | ||
| 10 mL |
You may ask them:
- “What do you notice about the pressure readings as you push the plunger further down?”
- “Is there a pattern between the plunger position and the pressure?”
Introducing Air Leaks: What Happens When Air Escapes? (10-15 minutes)
Once students have measured and understood the relationship between pressure and volume, introduce a new variable:
“What do you think will happen if we let some air escape from the syringe while you’re pushing the plunger?”
Step 1: Creating a Leak
Make a small puncture in the extension tube and ask students to repeat the experiment. This time, as they push the plunger, the air will escape through the hole.
Step 2: Observing and Analyzing
“How does the pressure reading compare to before? Is it as high as when the syringe was fully sealed? When you pull the plunger back, does the pressure drop faster or slower with the air leak?
Activity:
- Measure Pressure Before the Leak: Have students push the plunger to a marked position and record the pressure in a data table.
- Measure Pressure After the Leak: Puncture the extension tube, repeat the same plunger positions, and compare the readings.
| Plunger Position (cm) | Pressure (Sealed) | Pressure (With Leak) | Difference |
|---|---|---|---|
| 30 mL (fully extended) | |||
| 25 mL | |||
| 20 mL | |||
| 15 mL | |||
| 10 mL |
Discussion Questions:
- “Why do you think the pressure doesn’t build as much when there’s a leak?”
- “Can you predict how pressure would behave with a larger leak or a smaller hole?”
Encourage them to discuss why the air leak affects the pressure:
“With a small hole, the air has somewhere to escape, which lowers the pressure. What real-world situations can you think of where air leaks affect pressure?”
Discussion: Real-World Connections (5-7 minutes)
Guided Discussion:
“Let’s think about tires on bikes or cars. What happens if they get a small puncture? Why do they slowly deflate over time instead of all at once?”
Help students relate the experiment to practical scenarios:
- Car and bike tires: How pressure keeps them inflated and how leaks cause deflation.
- Air pumps: How they increase pressure by squeezing air into a smaller space.
- Sealed containers: Why pressure builds up inside containers when heated.
Ask:
- “What would happen if you tried to ride a bike with a tire that had very low pressure?”
- “How do engineers make sure that tires and air pumps maintain proper pressure?”
Summary and Reflection (5 minutes)
Summarize:
“Today, we discovered that when we squeeze air into a smaller space, its pressure increases. We also saw how an air leak can change the pressure and learned why this concept is important in things like tires, pumps, and sealed containers.”
Reflection Questions:
- “What did you learn about how air behaves when it’s trapped inside something?”
- “Why is it important to control air pressure in real-life applications?”
- “Can you think of any other devices or tools that rely on controlling air pressure?”
Glossary:
- Pressure: The force exerted by air or any fluid when compressed into a smaller space.
- Volume: The amount of space occupied by a substance, such as air inside a syringe.
- Compression: Squeezing a gas or liquid into a smaller space, increasing pressure.
- Air Leak: An opening that allows air to escape, reducing pressure.