Session 7: Robot Detective – Following the Line
Duration: 50-60 minutes
Equipment Required:
- M3D Robotics kit with the line detector sensor attachment.
- Laptops with Scratch pre-installed.
- Pre-provided code file for line-following.
- White Paper and black tape to create line paths.
- Small objects or props to simulate detective clues (optional).
Learning Objectives:
- Understand how the line detector sensor works and how it helps the robot follow a path.
- Learn to connect and integrate the line detector sensor with the robot.
- Understand how the line sensor works and use it to make the robot follow a path.
- Design and create custom paths for the robot to follow, simulating a detective investigation.
Resources:
Session Scratch Code File:
Grade 4 Session 7 .sb3 (130.9 KB)
1. Introduction to Paths and the Line Detector Sensor (5 minutes)
Activity:
Introduce the idea of following a path, linking it to real-life situations like going to school or navigating through a maze. Explain that just like we follow paths, robots can do the same using the line detector sensor.
Instructions:
- You might say:
“Every day, we follow paths—whether it’s the road to school, the hallway to our classroom, or a path in the park. Today, we’re going to teach our robot to follow a path too! How does it do that? It uses something called a line detector sensor that helps it ‘see’ the line and stay on track.”
- Ask students to think of a path they follow every day:
“What paths do you follow every day? How do you know where to go?”
Start a discussion with them on how paths are important in our life. Then you can relate that to the robot by saying:
“Our robot follows different paths too right? When we tell it to go forward or backward, it is following a path. But the robot is only moving when we tell it to move. What if we wanted it to follow a specific path:”
- Explain that the line detector sensor helps the robot stay on a defined path, just like how we follow paths with our eyes and feet. In some sense, the line detector is the robot’s eyes.
Teacher’s Role:
- Engage students with relatable examples of following paths in daily life.
- Help them connect the idea of following a path with how the robot will use its sensor to stay on track.
2. Connecting and Exploring the Line Detector Sensor (10 minutes)
Activity:
The teacher will guide students in connecting the line detector sensor to the robot. Students will open a pre-provided code file that programs the robot to follow a line. They will experiment with the sensor and see how the robot reacts.
Instructions:
-
Guide students in connecting the line detector sensor to the robot.
-
Once the sensor is connected, you can show them how the sensor works. You may say:
“Now that we’ve connected the sensor, let’s open Scratch and see what the sensor is telling us. What would happen if we put the robot on the line!”
Display the values of both IR sensors on the screen so that the students can see how it changes under different colors in real time:
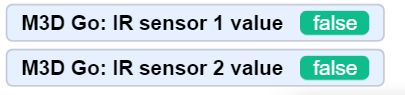
- Let students place the robot on different surfaces. Encourage them to note how the value changes when it is placed on a white sheet of paper compared to black tape or any other surface.
- Instruct them to note down the value the sensor gives when there is a color under it. They are going to use this value in their code.
- The robot stores these values in the premade variables available in the M3D Go Block section:
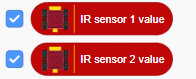
- Students can display their live values by clicking the checkbox next to them.
Teacher’s Role:
- Walk around the room, helping students as they connect the sensor and test the pre-written code.
- Encourage students to observe how the robot stays on the line, guiding them to understand how the sensor helps the robot detect and follow it.
3. Making the Robot Follow the Line (15 minutes)
Activity:
Students will code the robot to follow a path using the line sensor values. They will guide the robot from one point to another, mimicking a detective searching for clues along the path.
Instructions:
- You can introduce the activity by saying:
“Imagine you’re a detective and your robot is helping you solve a mystery by following clues! The path is like the trail of clues, and the robot will need to stay on the line to reach the end. Let’s code it to follow the path just like a detective would.”
- Provide students with paper and black tape to create their own line paths.
- Guide them through creating conditions for the robot’s movement using the “or” block. Begin with an example:
“There are two sensors on our robot, one on each side. We want the robot to move forward if either sensor detects the line. Let’s use an ‘or’ block to make this happen.”

- Show how the “or” block works with a relatable example:
“If it’s raining or it’s too cold, we stay indoors. Similarly, if either sensor detects the line, the robot will keep moving forward.”
- Demonstrate a simple code using the “or” block, such as:
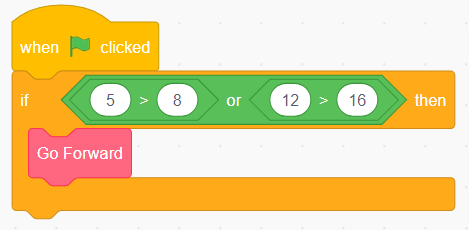
Explain how even if one condition is false, the robot will still move forward if the other condition is true.
-
Guide students to build their own conditional code using the “or” block and test it by placing the robot on their paths.
-
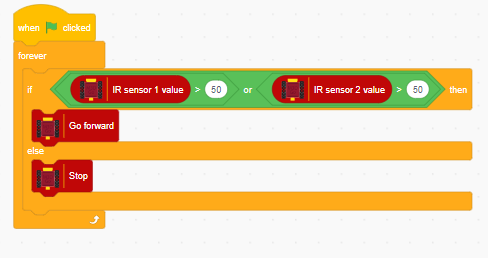
Their code should look like this:
-
Encourage them to observe how the robot reacts to staying on or going off the line and make adjustments to improve its accuracy.
Teacher’s Role:
- Assist students in creating and testing their paths, ensuring they understand the “or” logic.
- Encourage creativity as students design different paths for their robots.
- Offer guidance on troubleshooting sensor placement or path design if the robot doesn’t follow the line correctly.
- Reinforce the connection between coding decisions and real-world problem-solving.
4. Where did the line go: Finding the lost path (20 minutes)
Activity:
Students will use previously learned blocks like “Express,” “Show Text,” loops, and if-then logic to make the robot more interactive as it follows the line. For example, the robot can display expressions when it reaches certain points or show text as it follows the path.
Instructions:
Start a discussion about the paths we can create. You may say:
“Great! The robot is following the path. It can see where we have marked the line with the tape, but does it really? How about we add a turn in our path?”
Create a path that turns as it progresses to see if the robot is able to keep track of the curved path. When the robot moves away from the line, you can point it out to students:
“Why did that happen? Let’s look at our code. Did we tell our robot to turn in the code?”
Wait for them to look and their code and observe. Then, you can build up on their answers:
“Exactly! We didn’t. So how about we fix that. Let’s teach our robot how to follow a curved path.”
- Instruct them how to use the two sensors to detect in which direction the line is being curved.
- You can do this using a physical activity where a student tries a walk straight on a curved drawn path. Ask them which foot is not on the line if it curves.
- Help them build the intuition that when the path curves right, the left foot is not on the line. So we need to move right and vice versa if the path curves left.
- Encourage them to translate this example for the robot and it’s sensors by thinking of the two sensors as it’s feet.
- If they are facing trouble in this, you can guide them by starting a discussion on it:
““When the right sensor goes off the line, the robot should turn left to correct itself. When the left sensor goes off the line, it should turn right. Let’s try to code the robot to ‘follow the line’ just like we would follow a path with our feet.””
The final code should work on the logic that:
- If both sensor readings are above a certain value (IR Sensor 1 value > Normal value and IR Sensor 2 value > Normal value at the same time) meaning the robot is on the line, the robot should forward.**
[Note that the normal value is what the sensor reads on a white sheet of paper in the absence of any other colors.]
- If one sensor reading is high and the other is low (IR Sensor 1 value > Normal value and IR Sensor 2 value = Normal value or vice versa), the robot will rotate to stay on the line.
- If neither sensor detects the line (IR Sensor 1 value = Normal value and IR Sensor 1 value = Normal value), the robot will stop.**
The code should look like this:
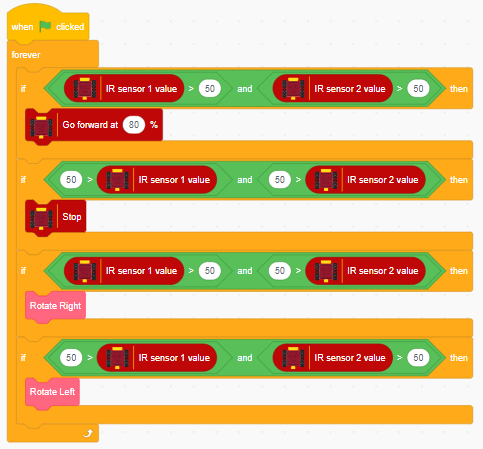
-
Guide students to code their robot’s movements based on these sensor inputs. Explain how the robot can adjust its path based on what the sensor detects.
-
Encourage students to test their code on the pre-drawn black line and adjust as needed.
Teacher’s Role:
- Assist students as they add extra code to their robot’s movements, making it more interactive.
- Encourage experimentation with different expressions and messages, as well as loops and if-then logic to trigger actions based on sensor data.
5. Reflection and Wrap-Up (5 minutes)
Activity:
Gather the students together to reflect on their experience with the line detector sensor. Let them share their detective paths and how they made their robot come alive with expressions and text.
Reflection Questions:
- “What was the most fun part about using the line detector sensor?”
- “Did your robot follow the path perfectly, or did you have to make adjustments?”
- “How hard was it to make the robot follow curved paths?”
- “Was your robot able to follow the path? If not, what do you think were the reasons?”
Teacher’s Role:
- Lead the reflection discussion, helping students understand how sensors allow robots to interact with their environment.
- Celebrate their efforts in coding and detective path creation, encouraging excitement for future sessions.
Learning Outcome:
By the end of the session, students will understand how the line detector sensor works and how it helps robots follow paths. They will have experimented with pre-written code and enhanced it with expressions, text, loops, and if-then logic, creating their own detective-style challenges.