Session 4: Exploring Sensors – Using the Distance Sensor
Session Architect: Muhammad Bilal
Duration: 50-60 minutes
Equipment Required:
- M3D Robotics kit with the distance sensor attachment.
- Laptops with Scratch pre-installed.
- Small objects for the robot to detect.
- Paper and pencils for students to document their discoveries.
Learning Objectives:
- Understand the concept of sensors and how they help robots interact with their environment.
- Learn to integrate the distance sensor with the robot and use the “Range Finder Value” variable to detect obstacles.
- Practice coding with sensor data to control the robot’s actions.
- Introduce the “Wait_Seconds” block to create delays between movements.
Resources:
Scratch Code for the session:
Grade 4 Session 4.sb3 (3.4 MB)
1. Introduction to Sensors (10 minutes)
Activity:
Introduce the concept of sensors by linking it to the students’ five senses, which help them understand the world. Explain that robots have sensors too, and today they’ll be learning about the distance sensor.
Instructions:
- You might say:
“How do you know what the world around you is like?”
Wait for there answers, guide them towards the answer towards our five senses and build up on that.
“Just like we use our eyes to see things around us or our ears to hear sounds, robots have sensors to help them sense the world. Today, we’re going to learn about one special sensor that helps the robot ‘see’ how far objects are from it—just like how we see and avoid things when walking!”
- Ask questions to engage students, such as:
“How do you avoid running into things when you walk around? How does your brain know how close something is?”
- Explain that the distance sensor works like our eyes, helping the robot know when something is in its way.
Teacher’s Role:
- Help students connect the idea of sensors to their own experience of sensing the world. Engage them by asking questions and keeping the conversation simple and relatable.
2. Understanding the Distance Sensor (15 minutes)
Activity:
Students will explore how the distance sensor works by connecting it to the robot and using the “Range Finder Value” variable in Scratch to see the data it provides in different conditions.
Instructions:
-
Guide students in connecting the distance sensor to the robot using the plug-and-play connector.
-
Show them the “Range Finder Value” variable in Scratch and explain that this number changes depending on how close or far something is from the sensor.
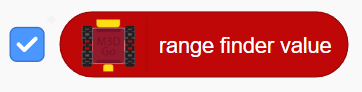
You can click on the checkbox to the left of the “range finder value” to see the live value of the sensor on
- Let students experiment by clicking on the variable while placing different objects in front of the sensor or blocking it with their hands:
“What happens when there’s nothing in front of the sensor? What number do you see when you place something close to it?”
Encourage them to write down the values on a sheet of paper so that they can easily use them when they are programming their robot to avoid obstacles.
Teacher’s Role:
- Walk around the room as students test the sensor, encouraging them to observe the changes in the variable.
- Help them understand that the sensor is giving the robot information about how far away objects are.
3. Coding the Robot to Avoid Obstacles (15 minutes)
Activity:
Students will use the distance sensor to write code that makes the robot stop or turn when an object is detected in front of it. This will teach them how to use sensor data to control the robot’s actions.
Instructions:
- You can explain:
“Just like how we change our path when something is in front of us, the robot can avoid obstacles using its sensor! Let’s code the robot so it stops or turns when it detects something in its way.”
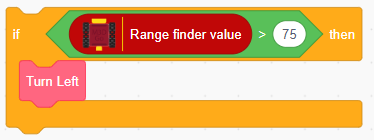
- Guide students through writing code that uses the Range Finder Value variable. They can create a simple “If” condition, like:
"If the range finder value is less than a certain number, the robot will stop or turn. What that number will be? That is up to you to figure out. Test out different values of the sensor when it is blocked and when it is not and use the values you see fit.
- Encourage students to test their code by placing objects in the robot’s path to see how it reacts.
A simple obstacle detection code could be:
Teacher’s Role:
- Assist students as they write the code, helping them understand how to set the correct values for the sensor to detect obstacles.
- Provide encouragement as they test their robots, reinforcing the idea of using sensor data to adjust the robot’s behavior.
4. Fun with Text, Expressions, and Variables (10 minutes)
Activity:
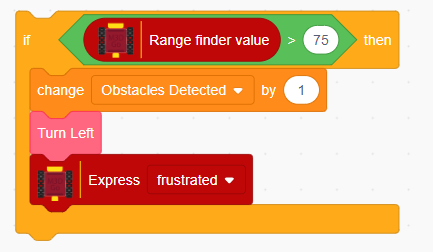
After coding the robot to avoid obstacles, students will add text and expressions to make the activity more fun. They’ll also create a variable that counts how many objects the robot has detected.
Instructions:
- You can say:
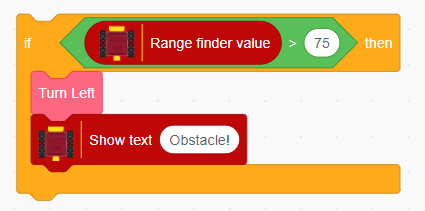
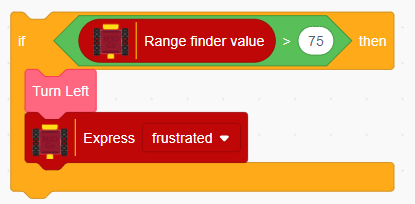
“Let’s make the robot even more fun! We can make it show expressions and count how many objects it sees on its journey. Maybe it smiles when it stops or says ‘Watch out!’ when it sees something in front.”
-
Guide students to use the “Show Text” and “Express” blocks to display messages or emojis when the robot detects an object.
-
Help them create a variable that counts how many times the robot has encountered obstacles.
Teacher’s Role:
- Guide students through adding the fun elements to their program, encouraging them to experiment with different expressions and messages.
- Help them create the counting variable and show how to update it whenever the robot detects an object.
5. Experimenting with the Wait_Seconds Block (10 minutes)
Activity:
- Introduce the Wait_Seconds block and encourage students to use it to create delays between actions. Let them experiment with adding pauses to their robot’s movements.
- Encourage them to think of all the concepts they have learnt e.g. wait, express, show text, if-then, etc. and how they can make their code more fun and advanced using those blocks
Instructions:
- You can say:
“Now, let’s add something new to our code—a wait block! This lets us pause the robot for a few seconds between actions. Maybe it stops and waits before moving again or pauses before turning.”
- Encourage students to play around with the Wait_Seconds block, trying out different lengths of time between actions.
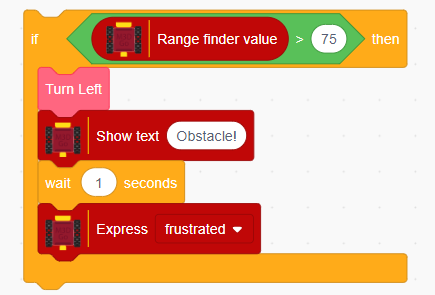
Once they know how to create such blocks. Let them experiment with different arrangement. You may give them ideas such as:
- What if your robot turns around and comes back 5 steps if an obstacle is detected.
- What if the robot says turns around to you and asks for help by saying it using the screen.
- What if the robot comes turns around, makes a sad face, says help, and then comes back to you.
Encourage them to code these different situations so that they can better understand the concept of sensors and how to use it with their robot.
Teacher’s Role:
- Help students understand how the wait block works and how it can be used to make their robot’s movements more controlled and precise.
- Encourage them to try different values for the wait time and see how it changes their robot’s behavior.
6. Conclusion and Wrap-Up (5 minutes)
Activity:
Summarize what the students learned about sensors and how robots use them to interact with the world. Let them share what they found fun or challenging about using the distance sensor.
Reflection Questions:
- “What was the most fun part about using the distance sensor?”
- “How did the robot know when something was in front of it?”
- “What would you like to try next with the robot’s sensor?”
Teacher’s Role:
- Lead the reflection discussion, helping students reinforce their understanding of sensors and the role they play in robotics.
- Celebrate their efforts in coding and experimentation, and encourage excitement for the next session.
Learning Outcome:
By the end of the session, students will understand how the distance sensor works and how sensor data is used to control the robot’s actions. They will have practiced using the “Range Finder Value” variable and added fun elements like text, expressions, and a counting variable to enhance their coding skills.