Session 3: Decision-Making Robot
Duration: 60 minutes
Architect: Muhammad Bilal – Markhor3D
Equipment Needed:
- M3D Robotics kit (M3D Go + distance sensor attachment)
- Laptops with Scratch pre-installed
- Paper and pencils for students to document ideas
- Small obstacles for testing
Learning Objectives
By the end of the session, students will be able to:
- Understand how if–else statements help a robot make decisions.
- Combine loops and conditionals to create repeated, smart behaviors.
- Use the distance sensor to detect obstacles and trigger reactions.
- Explore thresholds and see how small changes affect robot actions.
- Connect sensor readings to real-world ideas of speed, distance, and time.
- Design and test different reactions for the robot’s patrol or evasion maneuvers.
Resources:
Scratch Code File: AI Lab - Session 3.sb3
Session Flow
1. Introduction (5 minutes)
Start with an engaging discussion and asking them:
“Have you ever walked and suddenly stopped because someone was in your way? How did your brain know when to stop?”
Wait for their responses and then continue the discussion:
“What if your feet couldn’t feel anything—how would you know when to stop or turn? There has to be another way to do it. Let’s explore that today as we help our robot to avoid obstacles and navigate on it’s own!”
You may ask them:
“Can anyone think of other situations where you have to make a quick decision, like avoiding a chair, a friend, or a toy on the floor?”
- Teacher encourages students to share personal experiences of reacting to obstacles.
- Discussion highlights how humans constantly make decisions based on what they sense.
- Teacher draws a connection to coding: “Today, we’ll teach the robot to make decisions like we do—without telling it exactly what to do every time.”
2. Recap: Linking to Previous Learning (5 minutes)
You may ask them:
“Last session, we gave our robot loops and variables—so it could remember things and repeat tasks. Today, we’ll use it’s eyes(distance sensor) and code it to make decisions on its own!”
Here:
“Think about how a traffic light helps cars decide whether to stop or go—our robot will do something similar with the distance sensor.”
- Teacher reviews loops, variables, and user input as memory tools for the robot.
You can build excitement for students before they start making their code:
“Now the robot won’t just follow your commands; it will sense its environment and react differently depending on what it finds.”
3. Guided Exploration: Sensor Awareness (5 minutes)
- Introduce the distance sensor and demonstrate measuring objects at different distances.
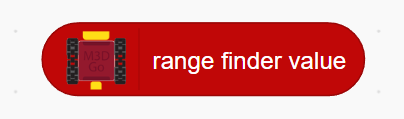
Encourage them to place their hand or objects at different distances and see the value of distance sensor change in real time on gamepad on the right.

You may tell them:
“Now that our robot can sense things around it, we need to tell how and when it can decide what to do! What do you think should happen if the obstacle is very close?”
Take suggestions from students as to what the behaviour of the robot should be in different situations.
“If the robot sees nothing close by, what could it do next? How many options do you think we can give it?”
- Teacher prompts students to predict the robot’s behavior before running code.
- Students discuss different reactions: stop, turn left, turn right, or display an emoji.
4. Hands-On: Simple Conditions:(15 minutes)
Introduce the if-then block to students:
Now that we want to teach our robot how it can make a decision, we first have to decide and be able to code the condition. A lot of our decisions are based on some sort of condition. We do something because of some condition. We brush our teeth because our teeth get dirty all day. We change our path because there’s an obstacle in it. We do everything because of something.
Can you list some more reasons behind your actions?
Take in their answers and then continue:
So, for our robot, what would be the condition? Remember we tested how the value of our sensor changes as something gets closer and closer? That means, if the number is small the robot is close to an object/obstacle. We just need to tell it that.
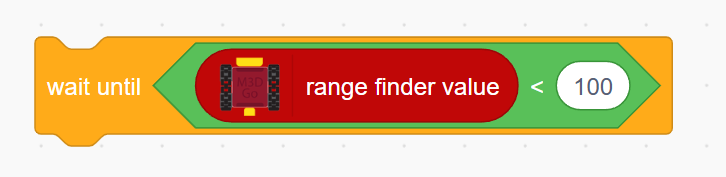
Ask them to choose a number, which represents a safe distance at which the robot should stop e.g.(100).
Now, we need to code the condition that the robot should do something when the distance is less than 100. We know how to do it. We made our robot do work based on conditions in the last session as well. Let’s try it!
Encourage them to use the “Wait Until” block to code the condition. Their condition will look something like this:
Now, they just need to code the robot to stop when this condition is true as follows:
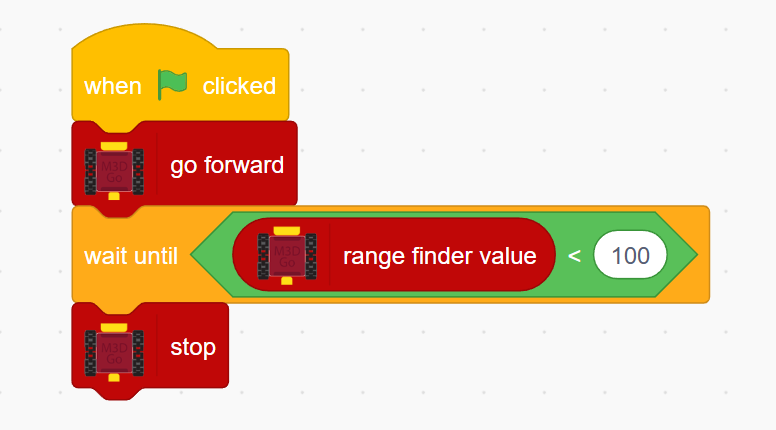
The code will make the robot move forward and wait until the value of distance sensor goes below 100. Once it does, it means that there is something in front of the sensor and it will execute the next instruction which in this case is Stop.
- Assist them in understanding the logic of the code blocks.
- Guide them in selecting a suitable range and creating a condition on that.
Once they are able to understand the condition logic and create this code block themselves. Ask them to test it out.
You may ask them to add their own changes into the code.
Why just stop? We can ask it do anything now that we know how conditions and decisions work. How about we change it’s behaviour?
Encourage them to try out different code blocks along with decision blocks.
- Encourage students to observe and note outcomes: what worked, what didn’t.
- Teacher highlights the concept of “reaction based on sensor input.”
What’s missing in our program?
Once they finish creating their codes, you can ask them:
“What happens if the obstacle is removed from the path? Can your robot start moving again automatically?”
Let them try this out. Since the code is not designed like that, the robot will just stay still. On this observation, you can continue the discussion:
The robot hasn’t moved again. This is because it is not checking for the obstacle anymore. Why would it when we haven’t told it to? Let’s look at the code again.
Recall the code logic/flow with them and point out how after stopping, there are no further instructions:
The code makes robot move forward and wait until the value of distance sensor goes below 100. Once it does, it means that there is something in front of the sensor and it will execute the next instruction which in this case is stop.
5. Decisions upon Decisions - Using Multiple Conditions (15 minutes)
Once they understand what is missing in their code, now you can introduce if-then blocks.
To solve this problem, let’s look at some other code blocks which help us code conditions and decisions in a better, more efficient way.
Show them if-then and if-then-else blocks:
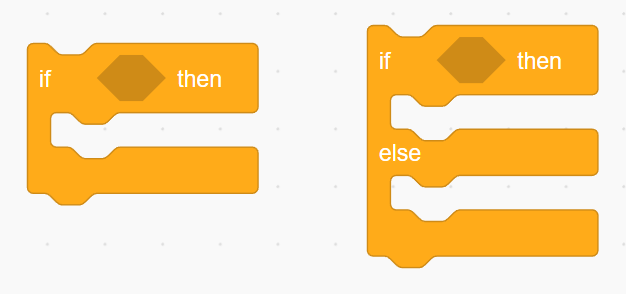
Explain to the student how this code block works:
Just like repeat until works until a certain condition is specified, these blocks work when a certain condition is true. Understand the difference? One works only up till the condition is satisfied while these work only if the condition is satisfied. Let’s try coding the same situation using these new blocks.
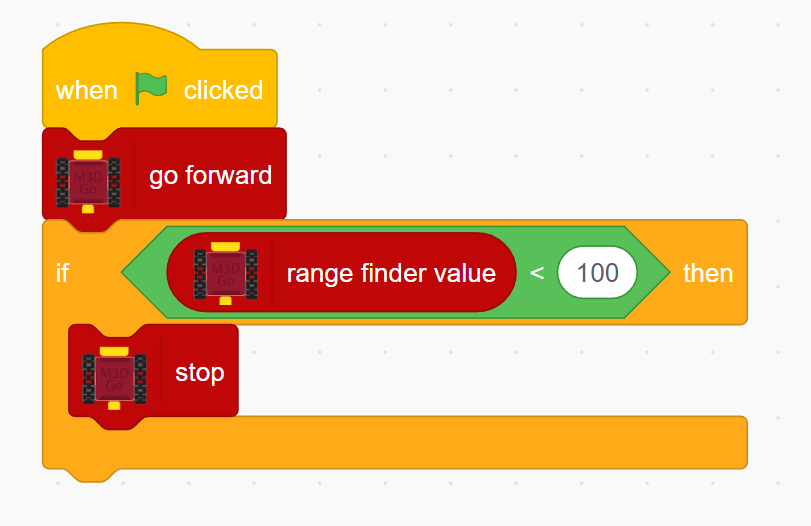
Explain to the students how these new code blocks and their logic works and assist them in creating their own obstacle detector bot.
Once they understand these new blocks, you can them show how if-then-else helps them check multiple conditions at the same time and perform varying actions depending on the surroundings:
Great work! We’ve so far replicated the same behaviour we did with “wait until” block. But we still haven’t solved our original problem. The robot still does not move when we remove the obstacle. Now we’re going to use the second block I showed you, the if-then-else block.
This block allows us to check for two different conditions and assign a different action to each condition. Let’s try creating our code using this code block:
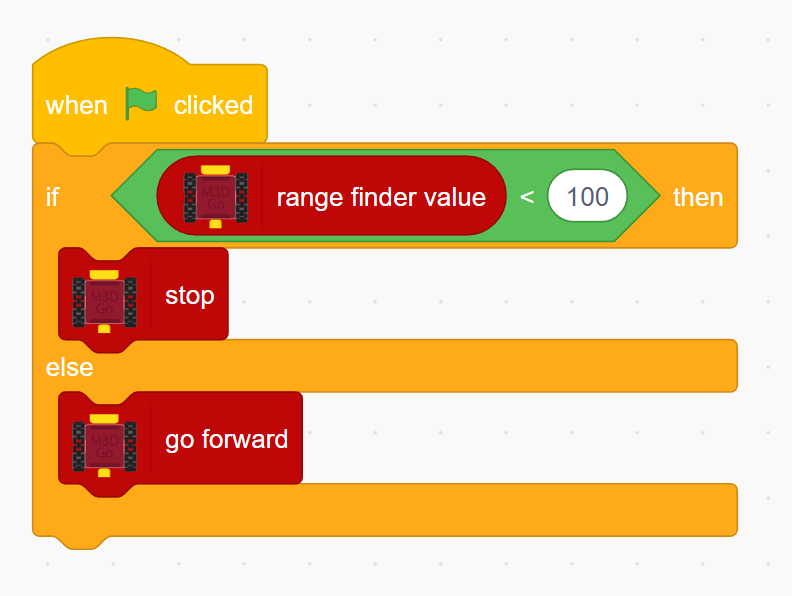
Explain how this new code defines an action for each condition. If the value is less than 100, the robot will stop. Else, it will move forward.
Once they reach this stage and have successfully recreated this code, now you can introduce the final missing element in creating their fully autonomous robot. To help them understand what’s missing, you can use an engaging discussion as follows:
Now our code is almost ready. I say almost because we still need one small thing. Let’s look at our code and see what that is. The code check if the value is less than 100, if it is the it will ask the robot to stop, otherwise it will tell it to move forward. That’s it. This is a one time process. The robot won’t check if the value has changed even if we remove or add obstacles.
Introduce an analogy to help them understand the situation in a better way.
Think of it this way: When you are walking on the street, you don’t just look at the ground once and start walking do you? You constantly check if the area is safe, where you should place your step and what to avoid. We need our robot to do the same. For this purpose, we will use a loop, since we want it to do the same process, that is to check the distance sensor value, again and again
Help them recall loops, specifically the forever loop, since we want the robot to repeat the same process indefinitely.
Once they understand why they are doing this, they can add the forever loop and test out their code. Their code should look something like this:
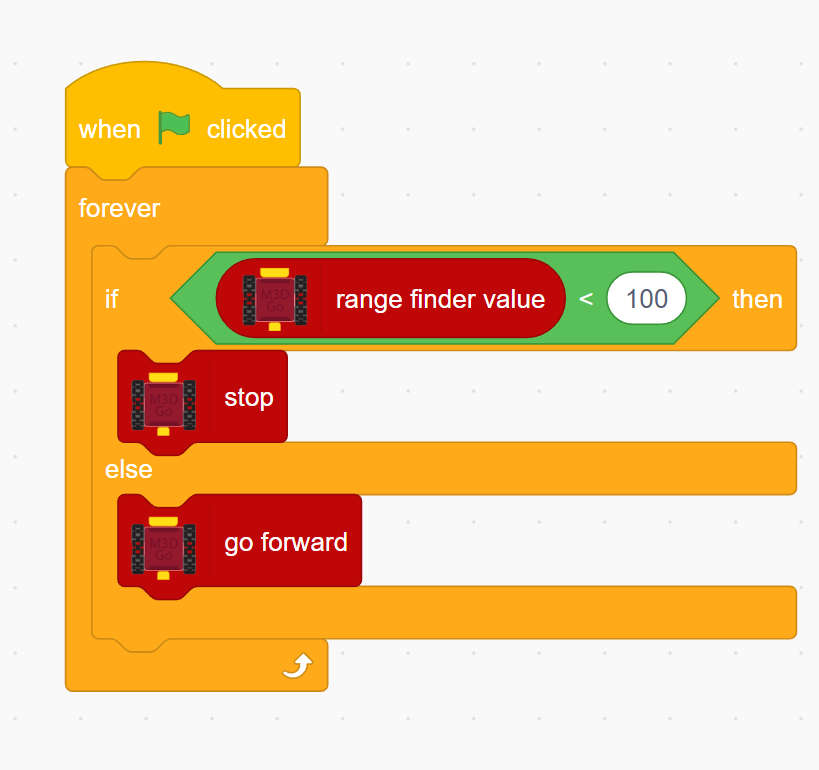
5. Student Extension: Multiple Reactions & Creativity
-
Introduce different reactions based on distance thresholds:
- Very close(value less than 50) → display sad emoji
- Medium distance(value less than 200) → turn 90°
- Far →(value greater then 200) happy emoji or continue moving
“Can your robot show emotions based on what it senses? How would it act if something is very close vs. very far?”
“Let’s think creatively: can your robot ‘patrol’ the area and avoid obstacles in a fun way? Can it zig-zag like a snake, or circle around the obstacle?”
- Students can combine loops + conditional b[locks for repeated patrol patterns.
- Teacher encourages experimentation: adjusting thresholds, adding different reactions, comparing group approaches.
6. STEM Connection: Distance, Speed & Reaction (with Intuitive Inertia)
-
Students record distances detected by the robot in different scenarios (obstacle very close, medium, far).
-
Real-world analogy:
“Just like self-driving cars, our robot uses its sensor to decide when to stop. But notice—our robot stops instantly because it’s small and its motors can lock quickly. A real car doesn’t stop like that. Why do you think that is?”
Discuss the idea and their answers with the whole class to understand what the students think about this situation. If the students want more explanation, you may break down the scenario as follows:
“If a car is moving fast and the driver sees a wall, why can’t it stop immediately like our robot?”
“What happens to a car’s motion when the brakes are applied? Does it go exactly where the brakes start, or does it take some distance to slow down?”
“Our robot is small and light—so it stops very fast. What would happen if it were bigger or heavier?”
“Can you think of other examples where something keeps moving even after we try to stop it? (A rolling ball, a bicycle, a skateboard…)”
-
Discussion points:
- Students explore that bigger/heavier objects need more distance to stop.
- They intuitively connect speed, mass, and stopping distance.”
- Highlight that sensors + coding can help machines predict and react before a collision, but real-world physics still matters.
-
Wrap-up link:
“So, the robot can stop instantly because it’s small, but in the real world, cars must sense obstacles early and start braking sooner. This is why timing, distance, and speed are all important when we design robots or vehicles!”
7. Wrap-Up / Conclusion
“Today, your robot learned to sense the world and decide what to do, all by itself! How did it feel seeing it react differently each time?”
Some students might feel distracted because of these abstract tools e.g. loops, conditions etc. and how they connect to an AI robot. You may encourage them and give them a hint of the bigger picture:
“Some of you might feel that what we are learning seems unrelated or confusing. Remember, this is just the start! Each tool we’ve learned—loops, variables, sensors, and conditionals—can combine to make a really smart robot. Soon, you’ll see how these all come together.”
“Who wants to share the most surprising thing their robot did today?”
- Encourage students to reflect, share observations, and discuss improvements.
- Connect to next lesson: combining loops, variables, and conditionals for more complex autonomous behavior.