Session Plan: Decision Time – What Will Your Robot Do?
Session Architect: Muhammad Bilal
Duration: 50-60 minutes
Equipment Required:
- M3D Robotics kit (including M3D Go and its display attachment)
- Laptops with Scratch pre-installed
- Paper and pencils for students to document their discoveries and ideas
Learning Objectives:
- Understand the basics of conditional logic using “if-then” and “if-then-else” blocks in Scratch.
- Learn how to program the robot to react based on specific conditions.
- Apply decision-making logic to make the robot display text or perform actions based on user input.
Resources:
Scratch Code for the session:
Grade 5 Session 4.sb3 (490.7 KB)
1. Introduction to Conditional Logic (5 minutes)
Activity:
Introduce the concept of conditional logic through a fun and interactive activity, where a student and the teacher demonstrate how conditions work in real life. This will help students understand the “if-then” structure physically before applying it to code.
Instructions:
Start by choosing a student volunteer:
“Let’s play a game! I need a volunteer.”
- Explain that you’re going to give the student instructions based on certain conditions:
“Alright, here’s how this works: If I say ‘jump,’ you will jump. If I don’t say ‘jump,’ you will stay still. Let’s see how this works!”
- Say “jump” a few times, and the student jumps. Say nothing and see if the student stays still. Then, say:
“See what’s happening? If I tell you to jump, you do it. But if I don’t, you stay still. That’s just like an ‘if-then’ condition for our robot!”
- Build on the demonstration by giving another instruction:
“Now, let’s add another option. If I say ‘clap,’ you clap. If I don’t say ‘clap,’ do nothing. Let’s try that!”
- Have the student clap when you say “clap” and stay still otherwise. Continue with a few rounds to reinforce the idea:
“This is exactly how robots make decisions! If something happens, they follow one action. If it doesn’t happen, they do nothing. And just like this, we can make our robot follow instructions using ‘if-then’ blocks.”
- After the activity, explain:
“Now, we’re going to use Scratch to give our robot instructions, just like how I gave you instructions! Let’s learn how to use ‘if-then’ blocks to make the robot decide what to do.”
Teacher’s Role:
- Guide the activity by actively participating with the student, demonstrating how conditions work in real life.
- Help students connect the physical activity with what they will soon do in coding.
- Encourage students to think of other real-life scenarios where they make decisions based on conditions, helping reinforce the concept of conditional logic before moving into coding.
2. Guided Coding: Using If-Then Blocks (25 minutes)
Activity:
Students will create their first conditional program using the “if-then” block to control the robot’s actions.
Instructions:
Start with showing them “If-Then” block and the different conditions that are available to them:
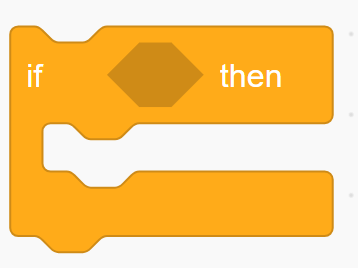
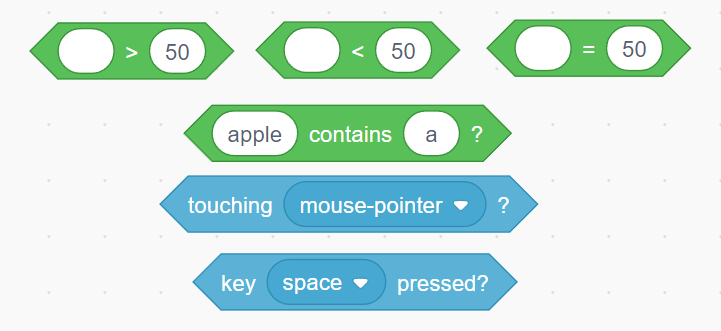
Encourage them to observe the connection between the shape of the conditions and the empty space in the “If-Then” block so that they understand which blocks can be used as conditions just by looking at them.
- Demonstrate a simple condition where the robot displays a smiley emoji when a key is pressed:
“If the space key is pressed, then show the smiley face emoji on the robot’s screen.”
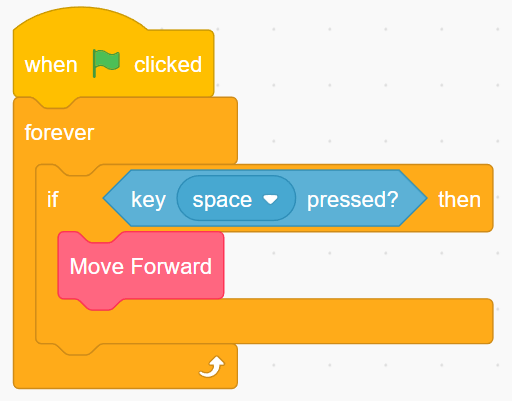
- Explain to them how to code check if the “space” is pressed, and if it is the robot moves forward.
- Help them understand the use of “Forever” code block here. You can start by asking them if they understand it’s purpose.
“We were talking about If-Then block but what is that Forever loop doing here. Can anyone take a guess?”
- Listen to their answer and build up on them if someone gave the right answer. Else, you can explain it to them by saying:
“Remember when we were clapping? How you guys were waiting for me to say clap so that all of you can clap? When you were waiting, what you were actually doing was checking if i clapped or not again and again.”
- Explain to them how for many conditions, we need to check again and again if it is true or not. Give them relatable examples like when they have to go outside and it’s raining, they check again and again it the rain has stopped etc.
“Just like you guys, the robot needs to check again and again if the button is pressed or not. We learnt in the last lecture that to repeat an action, we need to use a specific block”
Encourage them to remember what that block is.
-
Ask students to program their robots using the “if-then” block, guiding them to:
- Show an emoji if a key is pressed.
- Move forward or turn based on a different key press.
-
Encourage students to experiment by adding different conditions and actions.
Students will add complexity by using the “if-then-else” block, allowing their robot to choose between two possible actions.
Instructions:
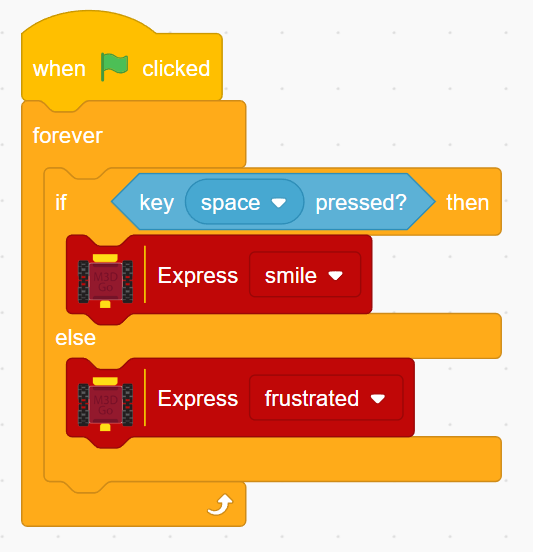
- Show an example where the robot performs one action if a key is pressed, and another if it’s not:
“If the space key is pressed, show a smiley face. Else, show a sad face.”
-
Ask students to update their programs using the “if-then-else” block. You can give them tasks such as:
- If one key is pressed, the robot performs one action (e.g., move forward). Else, it does something different (e.g., show text or another action).
- If the left number is smaller than the right number, the robot should say “Smaller”. If it is not, it should say “Greater”.
Teacher’s Role:
- Guide students through the programming process, helping them with block placement and logic.
- Encourage them to try different key presses and actions to see how the robot responds.
3. Expanding with Logic Blocks (10 minutes)
Activity:
Students will now use multiple conditions at the same time using the "if-then and "“if-then-else” blocks together, allowing their robot to choose between two possible actions based on two different conditions.
You can show them an example of how they can do this:
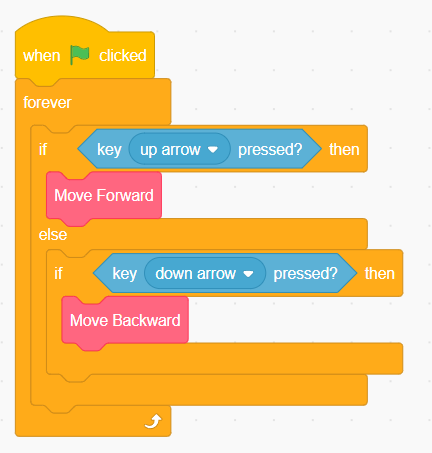
Explain the working of this code:
- If the up arrow is pressed, the robot moves forward, but if the down arrow is pressed the robot will move backward. In this way, the robot has two conditions to check. This can be done by using an “If-Then-Else” block and inserting an “If-then” block in it.
Teacher’s Role:
- Demonstrate how to combine “if-then” and “if-then-else” blocks using a clear example.
- Explain the example step-by-step.
- Encourage students to experiment with different key presses and actions.
- Offer guidance and support as students test and adjust their code.
4. Talking to the robot (10 minutes)
Activity:
Once they are done with the conditional blocks, this fun segment is to help them wind down. You can start by appreciating their work:
““Great job, everyone! Now your robots can make decisions! Let’s just have a bit of fun now. How about we teach the robot to ask you questions, and you get to answer? Imagine your robot asking, ‘What’s your name?’ and showing it on the screen! Let’s see how we can make our robot talk and interact with us!””
Instructions:
- Show them the “Ask _ and wait” block:
Explain to them how this block can make the robot ask whatever they write. The robot sprite on their scratch screen will show the question:
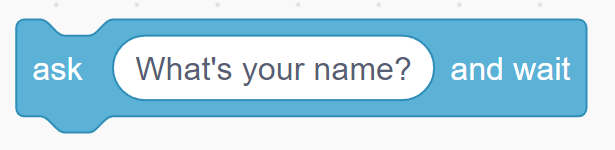
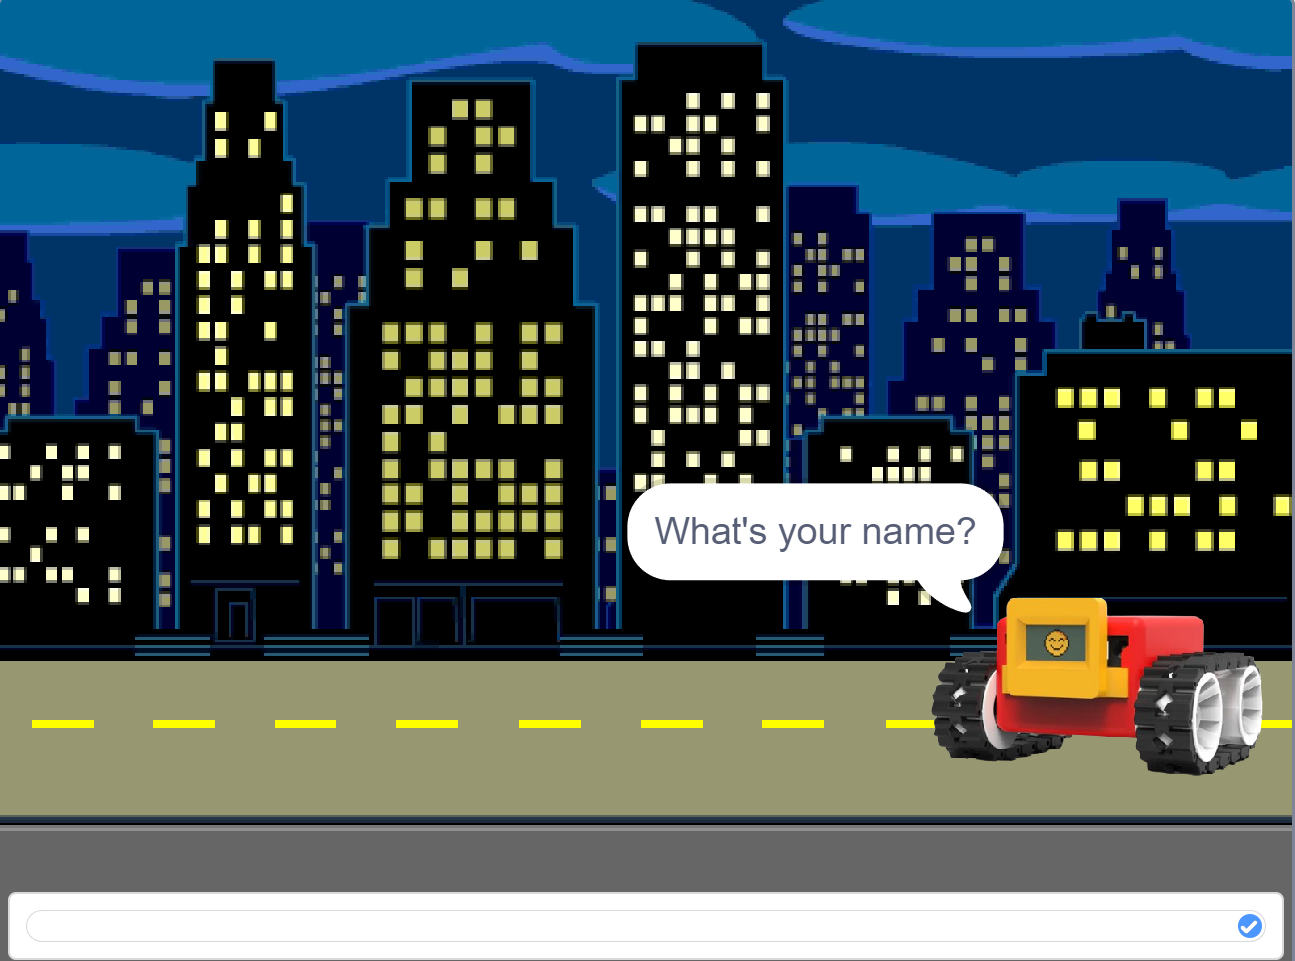
Encourage them to try different questions. But soon, they will realize that nothing is happening and they don’t know what the robot is doing with their answers. At this point, show them the answer block where there answers are being stored:

They can show their answer by clicking the checkbox next to their block:

-
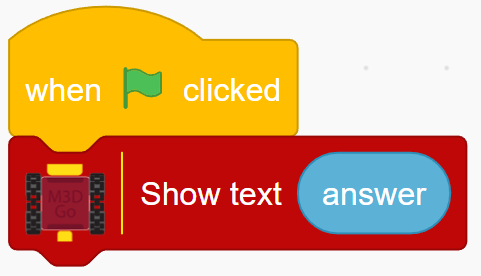
Show them how they can use the answer as well. They can code the robot to display their answer using the “Show Text” block.
-
Ask them to figure out how to do it on their own. You may guide them if they are stuck.
-
Their code should look like this:
-
Now, ask them to try different questions and if the robot is showing their answer correctly.
Teacher’s Role:
- Introduce the “Ask _ and wait” block and explain how the robot asks questions.
- Guide students to experiment with different questions.
- Show how the “answer” block stores responses.
- Encourage students to display answers using the “Show Text” block.
- Provide help if needed, but let students explore independently.
5. Reflection and Wrap-Up (5 minutes)
Activity:
To conclude the session, gather students and ask them to reflect on their experience working with conditional logic blocks and interacting with their robot. Let them share what they found interesting, fun, or challenging about the activities.
Reflection Questions:
- “What was the most exciting thing your robot did today?”
- “Was it fun to see your robot making decisions on its own?”
- Ask probing questions to ensure understanding, such as, “What happens when neither key is pressed?” or “How does the robot know which action to take?”
- “What would you want to try next with your robot?”
Teacher’s Role:
- Facilitate the discussion, helping students express their thoughts and ideas.
- Encourage students to think about how they used conditional logic and how it applies in real life.
- Provide positive feedback on their efforts and creativity.
Learning Outcome:
By the end of the session, students will have learned how to use “if-then” and “if-then-else” blocks to create simple decision-making logic for their robots. They will understand how to control the robot’s actions based on specific conditions, and they’ll have gained hands-on experience with combining conditional logic blocks to make the robot more interactive.