Session 1: Meet Your Robot: Mapping Moves
Session Architect: Muhammad Bilal
Duration: 50-60 minutes
Equipment Required:
- M3D Robotics kit (M3D Go)
- Laptop with Arduino IDE pre-installed and setup
- USB/OTG cables to connect the robot to the laptop
- Projector for live code demonstration
- Paper and pencils for students to document their observations
Learning Objectives:
- Understand how to upload code to the robot using Arduino IDE.
- Learn basic movement commands to control the robot’s motion.
- Experiment with movement timing and directions.
- Understand the role of comments in code for clarity and organization.
- Develop a foundational understanding of code syntax in C++ (e.g., using semicolons and functions).
1. Introduction to Robots and M3D Go Kit (5 minutes)
Activity:
Start the session by engaging students in a discussion about robots. Build on their knowledge by asking what robots they have seen or know about in daily life. Guide them through examples like robot vacuums, self-driving cars, and industrial robots.
Instructions:
“Can anyone tell me what a robot does? Have you seen robots in action, maybe at home, in movies, or at school?”
-
Let students answer, and build upon their responses, introducing the broader concept of robots—how they sense their environment and act on it.
-
Introduce M3D Go and tell them how you will have a robot of your own in this class. Ask students to identify the different components and attachments of the robot from the kit, including the wheels, motors, sensors, and display.
Teacher’s Role:
Facilitate the discussion by relating robots to the students’ everyday life. Encourage students to interact with the kit and recognize the components, reinforcing the idea that these parts are what allow the robot to move and perform tasks.
2. Setting Up Arduino IDE and Introducing the Code Structure (10 minutes)
Discussion:
Begin by engaging students with a discussion on how we communicate with the robot. Start with a few questions to get them thinking:
“So, how do you think we can tell our robot what to do? How does it understand what we want?”
- Let students respond and explore ideas. Lead the conversation to help them realize that robots don’t understand human language, but they can follow commands in a language they are designed to understand.
“Just like how we talk to each other using words, we need to communicate with the robot using something it understands. For our M3D Go robot, that language is code. The code we write is like giving instructions to the robot. It follows them one by one, just like you’d follow steps in a recipe or a set of rules in a game.”
"For example, when I say ‘move forward’ to you, you understand what to do. But the robot only understands this when we use a specific code command. Let’s see how we can give these instructions in code!”
Activity:
Students will open their laptops and launch the Arduino IDE with a pre-loaded C++ file containing the basic structure of their code:
#include <M3DGo.h>

void setup() {
    go.begin();
}

void loop() {

}
Instructions:
- Introduce the structure of the code:
-
#include <M3DGo.h>: This is where we tell the robot what tools and instructions to use. It’s like giving the robot a dictionary so it can understand the commands we write.
-
void setup(): This is where the robot gets ready to move. The setup block tells the robot what it needs to do when it first starts (like waking up and getting ready to move, starting its motors etc.).
-
void loop(): This is where the robot’s main instructions go. These commands will keep repeating in a loop, so the robot keeps performing actions until we stop it.
-
“In between these curly brackets { }, you’ll be writing the instructions for the robot. Think of them like the robot’s to-do list. You’ll tell the robot what to do, step by step. But remember—every instruction must end with a semicolon “;” to show where one instruction ends and the next one starts.”
Introducing Comments:
Explain that anything after // in the code is a comment and is meant for humans, not for the robot. It helps to explain what each part of the code is doing.
“Look at how I’ve written comments next to my commands to explain what each one does. These lines are just for us to understand. The robot ignores comments, but they help us (or anyone reading the code) understand what’s happening. It’s like leaving notes for yourself!”
Teacher’s Role:
Guide students through opening the file and recognizing how the commands are structured. Answer questions about the role of semicolons, basic code layout, and comments. Encourage students to write their own comments in the code to help keep things organized and easy to understand.
3. Exploring Basic Movement Commands (15 minutes)
Activity:
Students will learn how to make the robot move using simple commands. The teacher will demonstrate with a basic program on the projector screen where the robot moves forward, waits for 2 seconds, and then stops. The delay instruction will be introduced to show how timing and delays work.
Instructions:
- Introduce the following commands and what they do:
go.forward(): makes the robot move forwardgo.reverse(): makes the robot move backwardgo.spinClockwise(): makes the robot spin in clockwise directiongo.spinCounterClockwise(): makes the robot spin in anticlockwise directiongo.travel_cm: makes the robot travel a specific distance in centimetersgo.stop(): makes the robot stop moving
Demonstration:
- Write and explain the following code:
#include <M3DGo.h>

void setup() {
    go.begin();
}
    go.forward(100);   // Move forward at 100% power
    go.delay(2000);       // Wait for 2 seconds
    go.stop();         // Stop the robot

void loop() {

}
- Explain the comments and delay in the code:
Encourage them to observe the code and see how each instruction changes the robot’s behavior.
“Notice the green text after the // marks? These are comments! They explain what each line of code is doing. They don’t affect the robot, but they help us understand our code better. It’s like leaving yourself or someone else a helpful note!”
- Ask students to predict what the code will do before running it.
“What do you think this code will make the robot do?”
- Once the students make predictions, run the code and observe the robot’s behavior.
When introducing milliseconds in the context of coding (such as go.delay(2000) for a 2-second pause), you can explain it like this:
“Milliseconds are just a way to measure very small amounts of time. There are 1,000 milliseconds in 1 second. So when you see
go.delay(2000), it means the robot will wait for 2,000 milliseconds, which is 2 seconds.”
To help them understand the concept of time values smaller than a second, you can set up an activity where students use the stopwatch inside their laptop to measure how quickly there team members can blink their eyes:
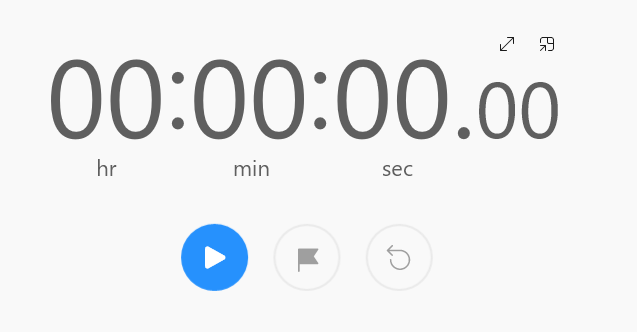
Point out the time on the far right and how it is much smaller than 1 second:
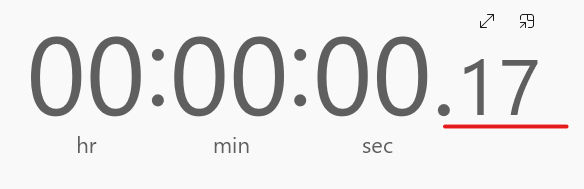
You can also relate it to things they know, like sports timers or video games, where milliseconds are often displayed during speed runs or races like F1 and MotoGP . This explanation will help them understand how milliseconds relate to time intervals in programming.
Teacher’s Role:
Lead the students in predicting and observing what the robot does. Explain how the delay works and why it’s important for controlling the timing of actions. Reinforce the importance of comments for keeping code clear and easy to understand.
4. Changing the Robot’s Speed (5 minutes)
Activity:
Students will learn how to adjust the speed of their robot’s movements by specifying a speed percentage in the movement commands. This will help them understand how to control the robot’s speed, whether it’s moving forward, backward, or spinning.
Instructions:
- Introducing Speed Control:
Start by explaining how the robot’s movement speed can be changed by adding a number between 1 and 100 inside the parentheses of the movement commands. This number represents the speed percentage:
“You can think of this like a volume knob on a speaker. Turning it up means louder music, just like a higher number means faster movement for the robot!”
-
Example Code:
Show the students how to modify the speed in the code:#include <M3DGo.h> void setup() { go.begin(); // Start the robot } void loop() { go.forward(50); // Move forward at 50% speed }Explain that:
- 50% speed makes the robot move slower.
- 100% speed is the default if no number is specified.
-
Changing Speed for Rotations:
You can also control the speed of rotations. For example, spinning clockwise at 30% speed would look like this:#include <M3DGo.h> void setup() { go.begin(); // Start the robot } void loop() { go.spinClockwise(30); // Spin clockwise at 30% speed } -
Challenge:
Ask students to experiment by changing the speed of their robot’s forward, backward, and rotational movements. Encourage them to try different speeds and observe how the robot’s behavior changes.
Teacher’s Role:
- Guide students through the process of adding speed percentages to their movement commands.
- Ask questions to ensure they understand how the number inside the parentheses affects the robot’s speed.
- Encourage them to experiment with different speeds and observe the robot’s movement.
- Provide support if they encounter issues and suggest speed values they can try for different types of movements.
5. Hands-On Coding: Experimenting with Movement (15 minutes)
Activity:
Students will now experiment by writing their own movement commands. They will combine the basic commands they’ve learned to make the robot move in various patterns.
Instructions:
- Ask students to write code that makes the robot move forward, spin, and stop.
“Now, it’s your turn to tell the robot what to do! Use the movement commands we’ve learned and make your robot move in different directions. Can you make it spin after moving forward?”
-
Encourage students to experiment with:
- Using different commands (e.g., spinning, reversing).
- Adjusting the time delays to see how the robot’s movements change.
-
Provide challenges:
You can give students different challenges ranging from basic movement to creating patterns with delays and spin.
Code Challenge 1: Moving Forward and Backward
Question:
Write a program to make your robot move forward for 3 seconds, stop for 2 seconds, and then move backward for 2 seconds.
Hint:
- Use the
go.forward(),go.stop(), andgo.reverse()commands. - Use the
go.delay()function to control how long the robot should move or wait.
Expected Answer:
#include <M3DGo.h>

void setup() {
    go.begin();  // Start the robot
}

void loop() {
    go.forward();  // Move forward
    go.delay(3000);   // Wait for 3 seconds
    go.stop();     // Stop the robot
    go.delay(2000);   // Wait for 2 seconds
    go.reverse();  // Move backward
    go.delay(2000);   // Wait for 2 seconds
    go.stop();     // Stop the robot
}
Code Challenge 2: Spinning Around
Question:
Make your robot spin clockwise at 70 percent speed for 1 second, stop for 2 seconds, and then spin counterclockwise for 1 second.
Hint:
- Use the
go.spinClockwise()andgo.spinCounterClockwise()commands.
Expected Answer:
#include <M3DGo.h>

void setup() {
    go.begin();  // Start the robot
}

void loop() {
    go.spinClockwise(70);      // Spin clockwise at 70% speed
    go.delay(1000);             // Wait for 1 second
    go.stop();               // Stop spinning
    go.delay(2000);             // Wait for 2 seconds
    go.spinCounterClockwise(); // Spin counterclockwise
    go.delay(1000);             // Wait for 1 second
    go.stop();               // Stop spinning
}
Code Challenge 3: Travel a Distance
Question:
Write a program to make your robot travel 50 centimeters forward and then stop.
Hint:
- Use the
go.travel_cm()command to make the robot travel a specific distance.
Expected Answer:
#include <M3DGo.h>

void setup() {
    go.begin();  // Start the robot
}

void loop() {
    go.travel_cm(50);  // Travel 50 cm forward
    go.stop();         // Stop the robot
}
Code Challenge 4: Creating a Pattern
Question:
Make your robot move forward for 2 seconds, spin clockwise for 1 second, move forward at 30 percent speed for 2 seconds, and finally stop.
Hint:
- Combine movement and spin commands.
Expected Answer:
#include <M3DGo.h>

void setup() {
    go.begin();  // Start the robot
}

void loop() {
    go.forward();         // Move forward
    go.delay(2000);          // Wait for 2 seconds
    go.spinClockwise();   // Spin clockwise
    go.delay(1000);          // Wait for 1 second
    go.forward(30);         // Move forward at 30% speed
    go.delay(2000);          // Wait for 2 seconds
    go.stop();            // Stop the robot
}
Code Challenge 5: Combining Delay and Movement
Question:
Write a program to make your robot move forward for 5 seconds, stop for 1 second, spin counterclockwise for 3 seconds, and then stop.
Hint:
- Use the
go.delay()function to control the timing of each action.
Expected Answer:
#include <M3DGo.h>

void setup() {
    go.begin();  // Start the robot
}

void loop() {
    go.forward();              // Move forward
    go.delay(5000);               // Wait for 5 seconds
    go.stop();                 // Stop the robot
    go.delay(1000);               // Wait for 1 second
    go.spinCounterClockwise(); // Spin counterclockwise
    go.delay(3000);               // Wait for 3 seconds
    go.stop();                 // Stop the robot
}
- Encourage them to write comments in their code to explain what each line is doing.
Teacher’s Role:
Circulate around the room, helping students as they write and upload their code. Answer questions about command structure, timing, and the use of comments. Encourage creativity by prompting them to test different movement patterns.
6. Conclusion and Wrap-Up (5 minutes)
Activity:
Conclude the session by reflecting on what students learned about programming the robot’s movements. Encourage them to think about how different commands create different outcomes.
Reflection Questions:
- “What was the most fun movement your robot did today?”
- “How did changing the delay change the robot’s behavior?”
- “What did you use comments for in your code?”
- “Was this your first time using commands to control the robot?”
Teacher’s Role:
Facilitate the reflection discussion and encourage students to share what they learned. End with a preview of the next session, where they will build on these basics and introduce more complex functions.
Learning Outcome:
By the end of the session, students will understand how to write simple commands in C++ to control their robot’s movements, using basic functions, time delays, and comments. They will also be familiar with the Arduino IDE interface and have experimented with different robot behaviors based on the code they write.