Introduction to Cura and Slicers
What is Cura?
Cura is a free, user-friendly software developed by Ultimaker that prepares 3D models for printing. It acts as a bridge between the 3D design and the 3D printer. By converting digital 3D models into instructions the printer can understand, Cura helps ensure that your designs are printed accurately and efficiently.
The Role of Slicers in 3D Printing
A slicer is a type of software that takes a 3D model (usually in STL, OBJ, or 3MF format) and slices it into horizontal layers based on the settings you choose. It then generates a file containing instructions, known as G-code, which tells the 3D printer how to print each layer. We need to remember that G-codes are machine specific. So a G-code prepared for another printer will not work on any other model.
G-codes are like recipes that allow the printer to make the object, but different printers require modified recipes.
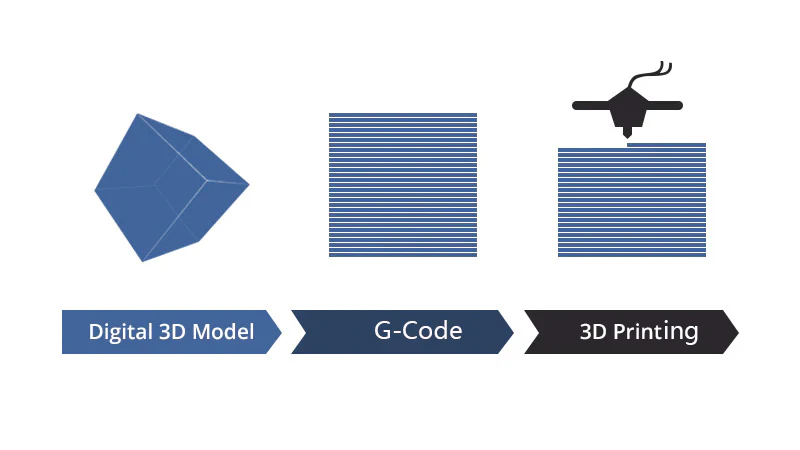
Slicers are essential because they:
- Translate Designs: Convert 3D models into a language (G-code) that 3D printers can understand.
- Customize Prints: Allow users to adjust print settings like layer height, print speed, and support structures.
- Optimize Printing: Help improve print quality and reduce printing time by optimizing the model’s orientation and settings.
1. Installing Cura:
Downloading and Installing Cura
- Download Cura:
- Visit the Ultimaker Cura download page.
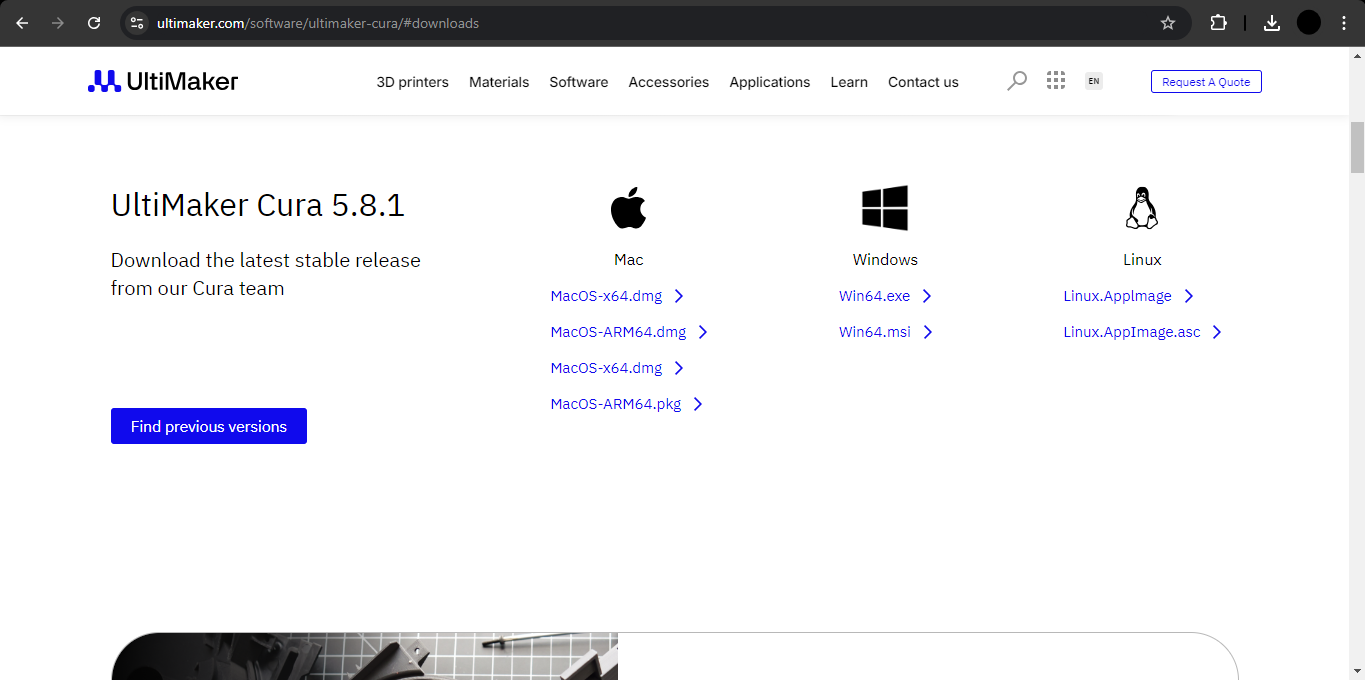
- Choose the version compatible with your operating system (Windows, macOS, or Linux).
- Install Cura:
- Run the downloaded installer file.
- Follow the on-screen instructions to complete the installation.
2. Installing M3D Enabler on Cura
- Launch Cura:
- Open the Cura application.
- Add Your Printer:
-
Step 1: In the “Welcome” screen, click on “Get started”.
-
Step 2: You’ll be prompted to add a printer. Select “Add a non-networked printer”.
-
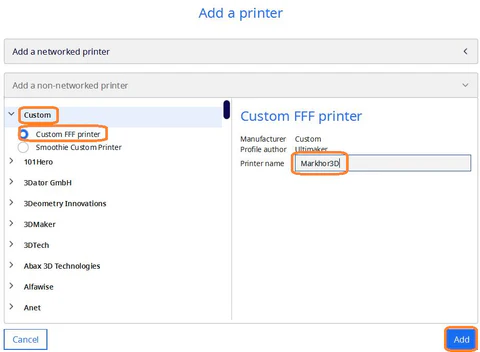
Step 3: Choose Custom FFF from the list and type in the printers name.
-
Step 4: Click “Add” to confirm.
-
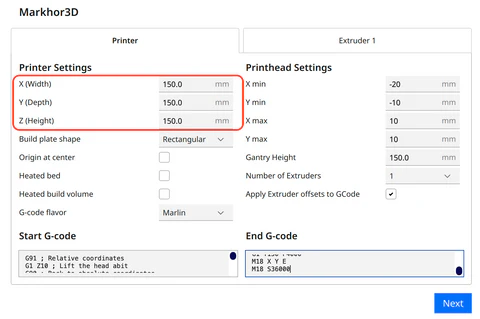
Step 5: Change the following Parameters and leave the rest to default.
X (Width) > 150
Y (Depth) > 150
Z (Height) > 150
-
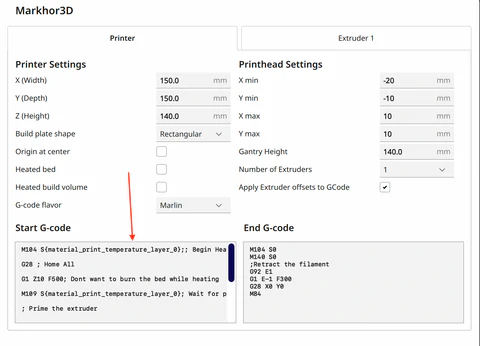
- Step 6: Start G Code for improved printing. I’ve added pre-build hot-end tip cleaning for Markhor3D and a faster start sequence. You may like to replace your existing G Code in Cura > Settings > Printers > Manage Printers > [Markhor3D activated] > Machine Settings > Start G-Code
M104 S{material_print_temperature_layer_0};; Begin Heating
G91 ; Relative coordinates
G1 Z10 ; Lift the head abit
G90 ; Back to absolute coordinates
G28 ; Home All
G1 Z10 F500; Dont want to burn the bed while heating
M109 S{material_print_temperature_layer_0}; Wait for pre-heat
; Prime the extruder
G92 E0; Set Extruder position to be 0
G1 E5 F100 ; Extrude a bit in the air
G1 X0 Y5 Z0.1 F500; Touch Down
G92 E0; Set Extruder position to be 0
G1 X100 Z0.3 E10 F500; Nozzle wipe
G92 E0; Set Extruder position to be 0
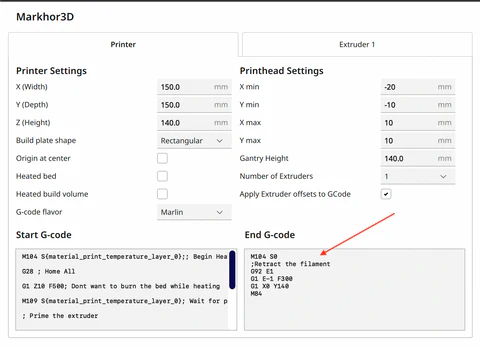
End G Code for improved printing
M104 S0
;Retract the filament
G92 E1
G1 E-1 F300
G1 X0 Y140
G1 Y150 F4000
M18 X Y E
M18 S36000
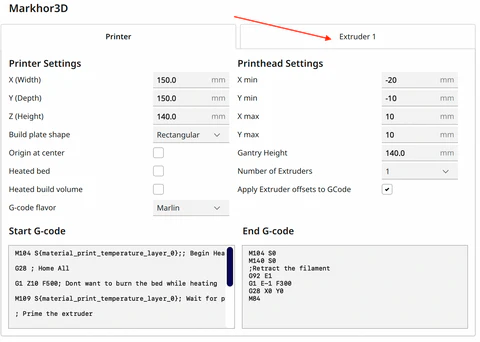
-
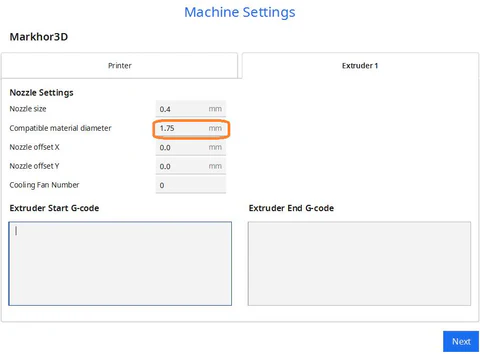
Step 7: Extruder 1 > Compatible Material Diameter > 1.75
-
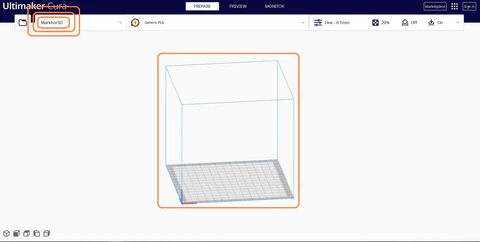
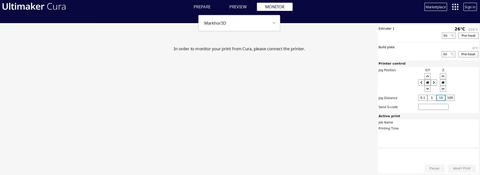
Step 8: Press Next. To make sure that your printer is connected, you may go to the Monitor screen in Cura to see if you can see your Printer’s control panel.
-
This portion is a redacted version of this document.
3. Understanding the Cura Interface
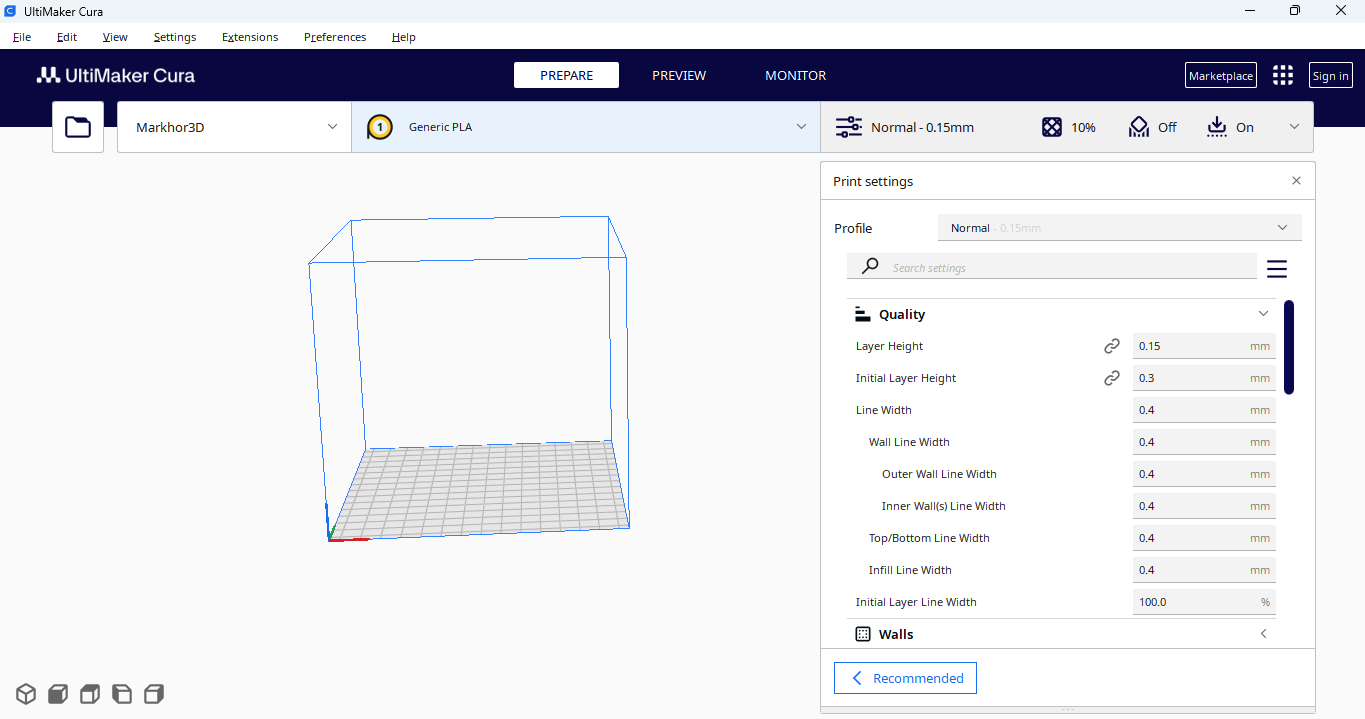
Main Areas of the Interface:
- Menu Bar: Access settings, preferences, and other tools.
- Tool Bar: Quick access to model manipulation tools.
- Viewport: The central area where your 3D model is displayed.
- Settings Panel: Adjust print settings like layer height, infill, and support.
- Printer and Material Selection: Choose your printer and filament type.
- Slice and Preview Buttons: Slice the model and preview the print layers.
4. Loading a 3D Model into Cura
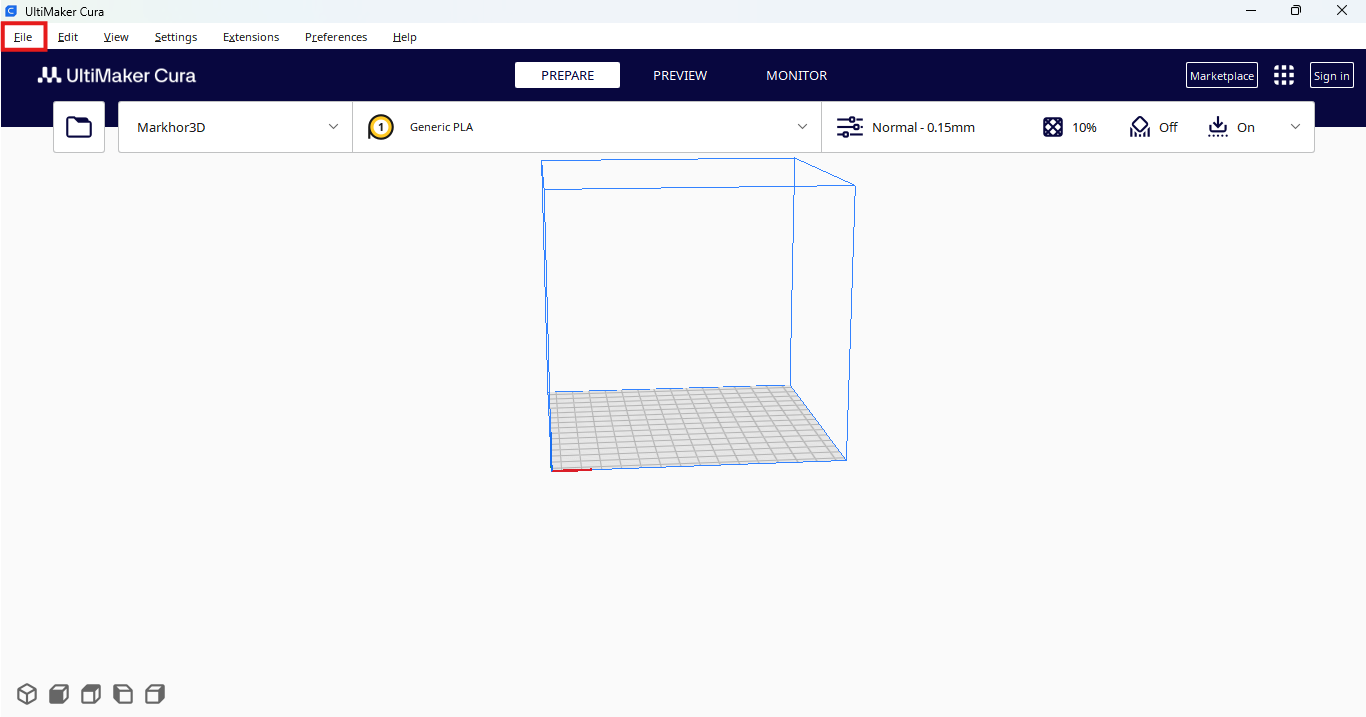
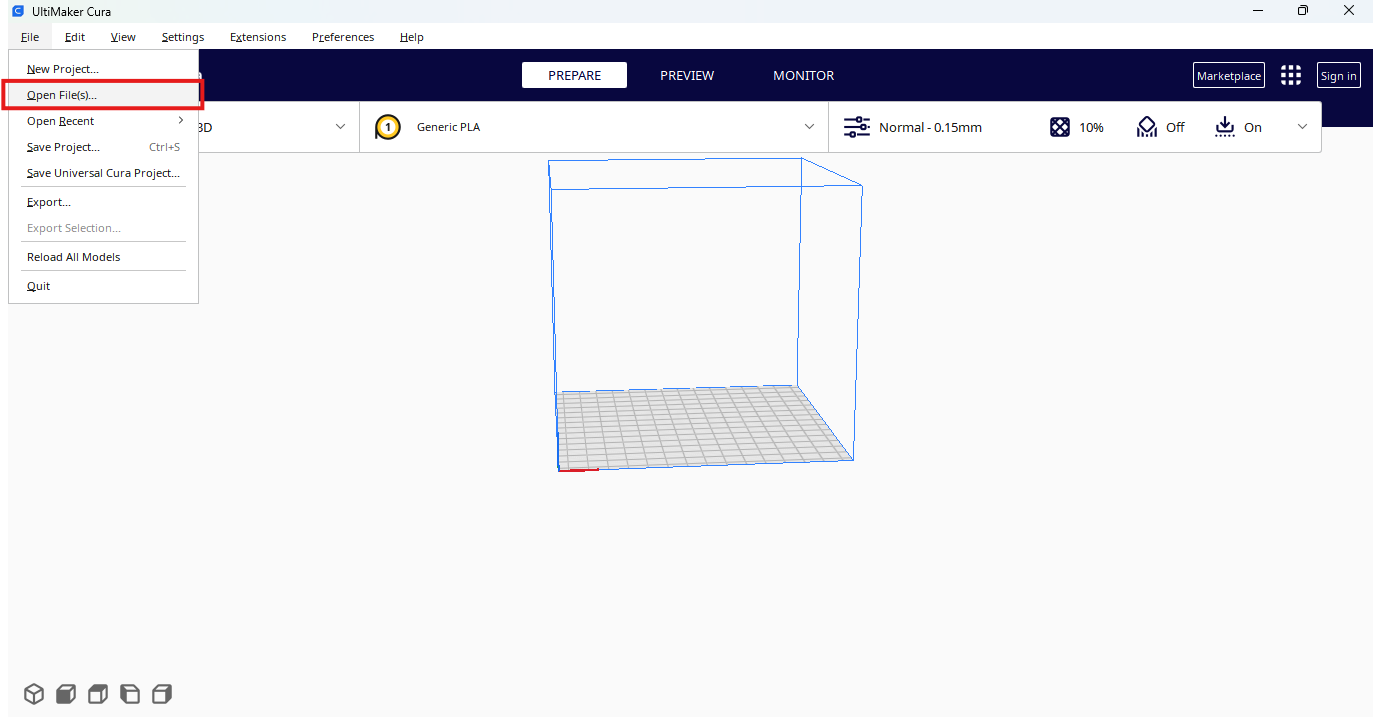
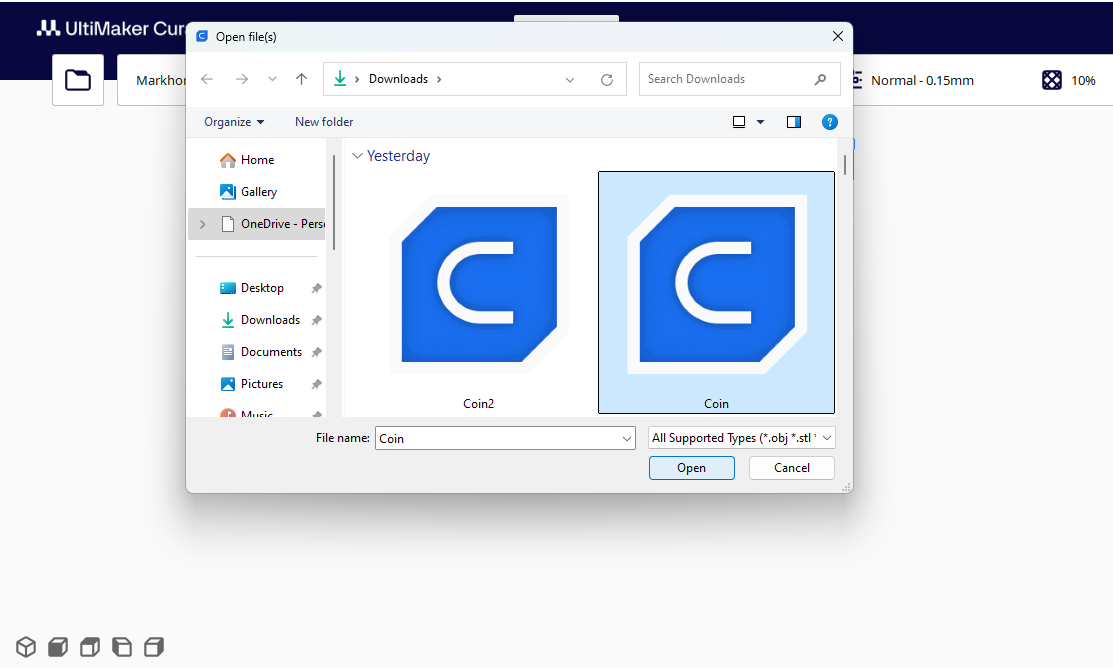
- Step 1: Click on “File” in the menu bar and select “Open File(s)”, or simply drag and drop the 3D model file (usually in STL format) into the viewport.
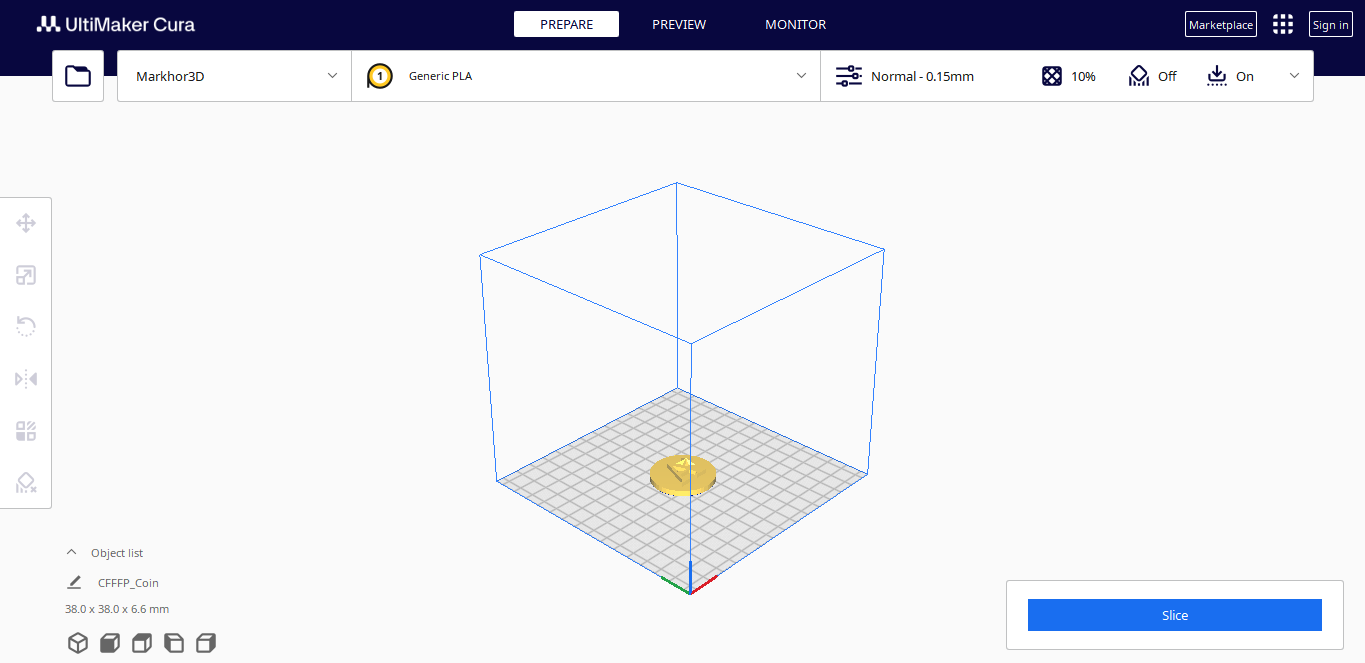
- Step 2: The model will appear on the build plate in the viewport.
5. Manipulating the 3D Model
Select the Model:
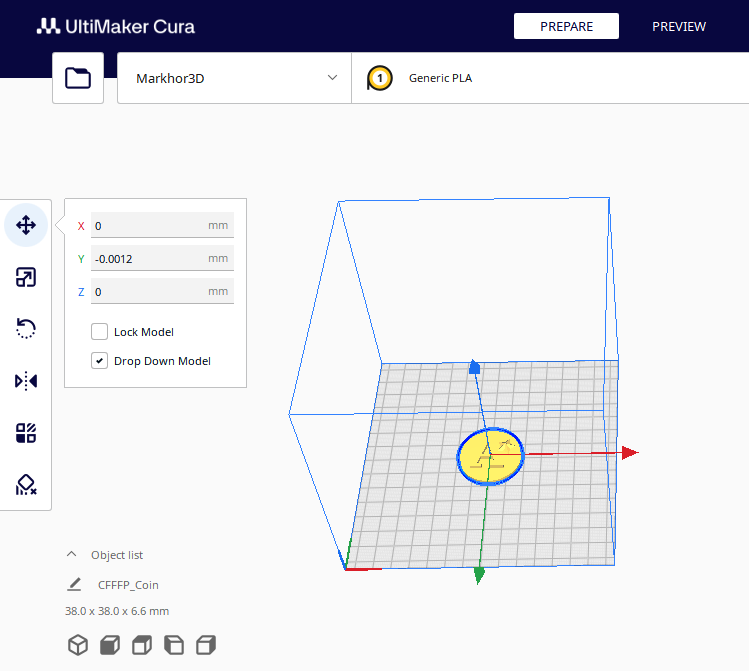
- Click on the model to select it. A bounding box with manipulation tools will appear
Move Tool:
- Icon: Four arrows pointing in different directions.
- Use: Move the model along the X, Y, or Z-axis.
- How: Click and drag the arrows to reposition the model on the build plate.
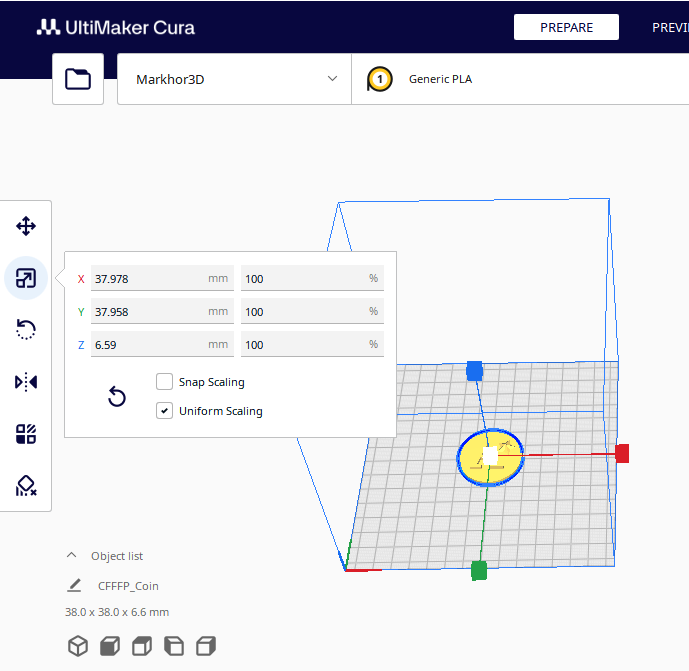
Scale Tool:
- Icon: A box with arrows pointing outward.
- Use: Resize the model.
- How: Click and drag the handles to scale up or down.
- Tip: Ensure the model fits within your printer’s build volume.
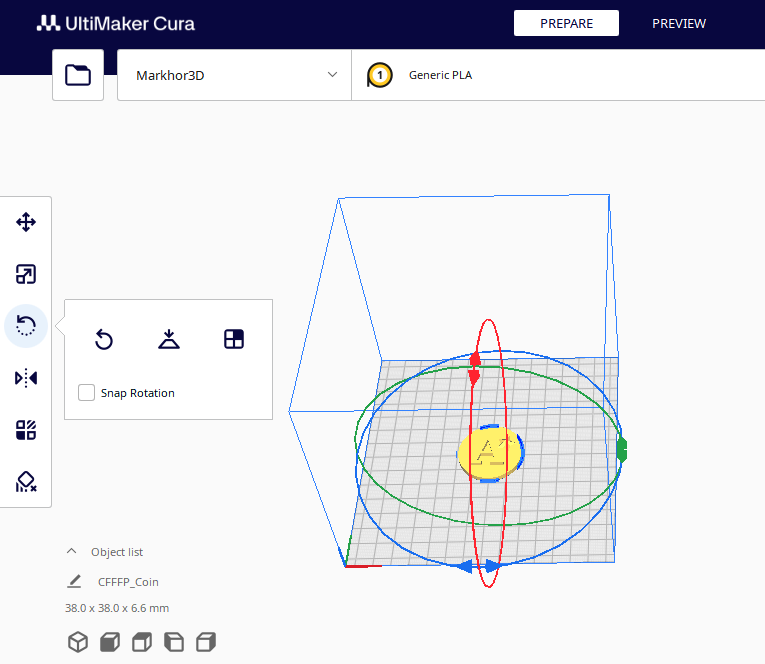
Rotate Tool:
- Icon: Rotating arrows.
- Use: Rotate the model to a desired orientation.
- How: Click and drag the rotation rings.
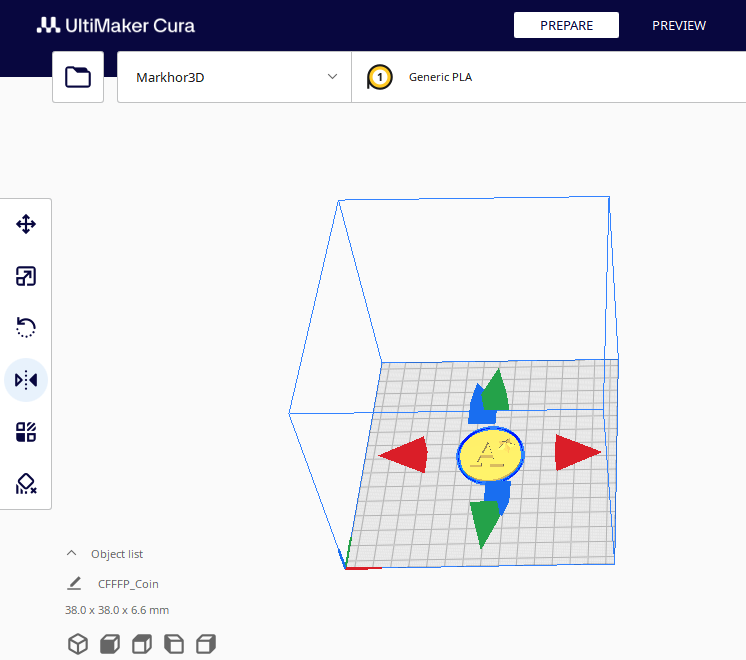
Mirror Tool:
- Icon: Two triangles facing each other.
- Use: Flip the model along an axis.
6. Adjusting Print Settings
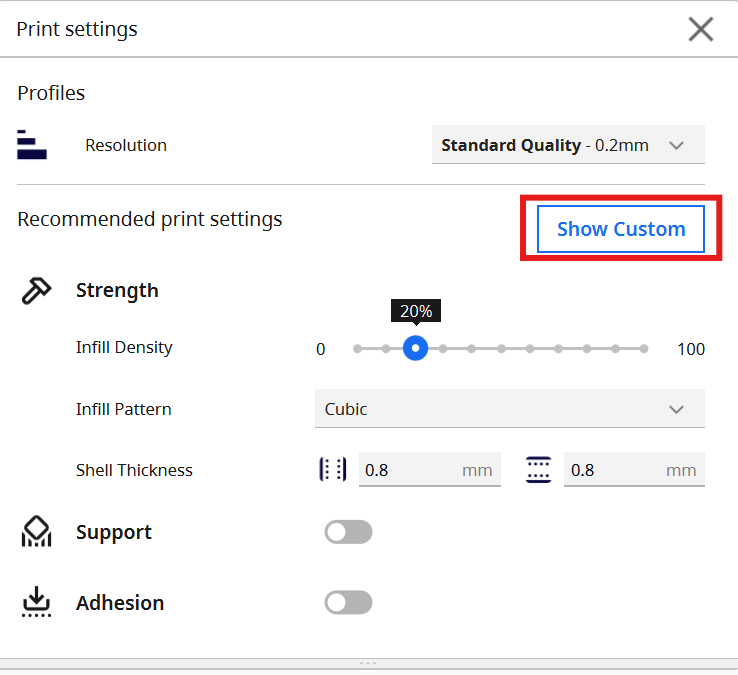
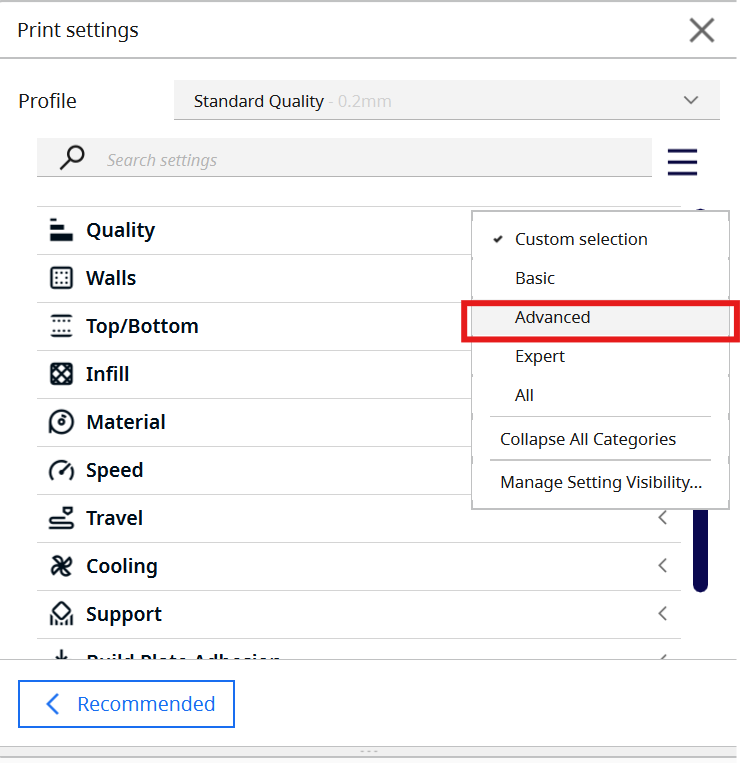
To view the advanced print settings in Cura, go to the top right corner of the screen and to view the 3 horizontal bars along with the basic print settings. Click it to open options and choose advanced settings. It will open a detailed menu of dropdowns but don’t worry, we’ll go through them together in necessary detail.

1. Quality:
1. Layer Height:
The layer height is one of the most frequently changed settings. It is the thickness of one printed layer in millimeters. Usually, thinner layers increase visual quality, give a smoother surface, and allow more detail. On the other hand, thicker layers decrease the print time substantially. Thicker layers may also give better-quality overhangs.
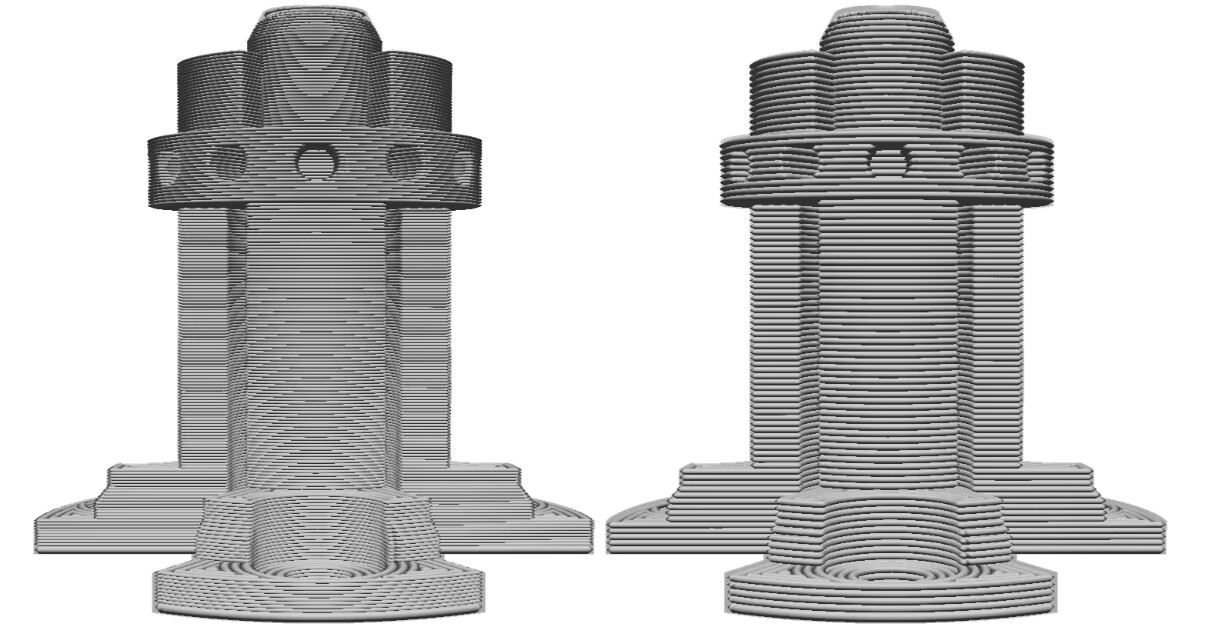
The model on the left has a smaller layer height than the model on the right.
For the Markhor3D Enabler, a good rule of thumb is:
- 0.10 mm: For very fine prints, takes the most amount of time.
- 0.15 mm: For prints of a good quality between quality and time.
- 0.20 mm: For standard prints.
- 0.30 mm: For Coarse, rough prints usually for prototyping. Takes the least amount of time.
2. Initial Layer Height:
This setting defines the height of the first layer of your print. The initial layer height is usually thicker than the layer height to create a stronger adhesion with the build plate. When the model has a lot of detail on the first layer, it might have a decreased quality because of the thicker layer.
3. Line Width:
The line width defines the width of a single printed line, which should be close to the nozzle size. Based on the line width, the extrusion rate is adjusted, which means that it will automatically calculate how much material must be extruded.
- Example 1: Decrease the line width slightly of the outer wall to allow sharper detail on the model.
- Example 2: An increased line width of the infill allows the infill to print slightly faster.

Tip: The line width is generally equal to the nozzle size. When customizing this value, it is advised to keep the line width between 75% and 125% of the nozzle size. Below 60% or above 150% is not advised as this may cause extrusion problems.
For the Markhor3D Enabler,
- 0.40 mm: Regular Setting can be run at any speed.
- 0.60 mm: Slightly stronger print, depends on number of walls- can also reduce time. Should be run at 60 mm/s max.
- 0.80 mm: For tough prints, the printer should be run slower and at a maximum temperature to avoid under extrusion.
Example: If a wall of thickness 2.4mm is required, the above nozzles will take 6, 4, 3 passes respectively reducing time.
The line width can be set individually for all line types available (optional)
- Wall Line Width: The width of a single wall line. The line width of the inner and outer walls can be adjusted separately.
- Top/Bottom Line Width: The line width with which the top and bottom layers are printed.
- Infill Line Width: The line width of all infill material.
- Skirt/Brim Line Width: The width of the skirt or brim lines.
- Support Line Width: The line width of support structures.
- Support Interface Line Width: The width of a single support interface line. The line widths for the support interface roof and floor can be adjusted separately.
- Prime Tower Line Width: The width of a single prime tower line.
- Initial Layer Line Width: The width of lines on the initial layer.
2. Walls:
1. Wall Thickness:
Wall Thickness adjusts the thickness of walls in the horizontal direction. Note that it doesn’t have an influence on the top or bottom surfaces of your print – this is controlled by the “Top/Bottom Thickness” setting.
The Wall Thickness value should be a value that’s a multiple of the nozzle size of your printer. For example, if the nozzle size of your printer is 0.4 mm and you set a wall thickness of 1.2 mm, then the printer will essentially print three walls, where each wall has a thickness of 0.4 mm.
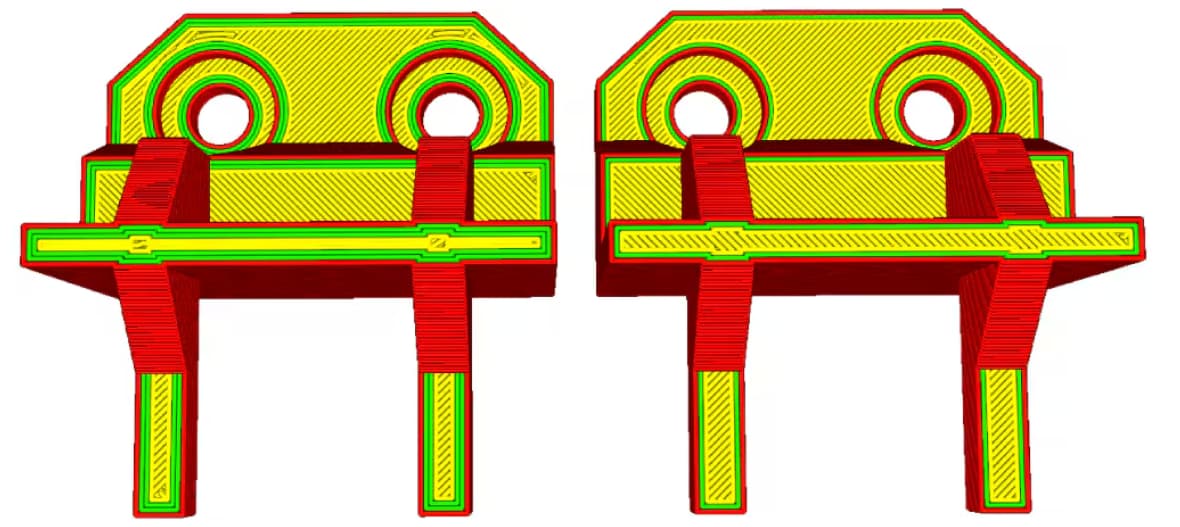
Example: A value of 1 mm, results in three walls of 0,35mm = 1,05mm wall. The model on the left has three walls, and the model on the right has two walls.
In general, a wall thickness two or three times the nozzle diameter is sufficient. Wall thickness is a useful setting to play with if you want to decrease print time – you can have thicker walls and turn off infill altogether, saving a significant amount of printing time and material.
2. Horizontal Expansion:
All plastics shrink as they cool. Plastics such as PLA only shrink a little when printed, while plastics such as ABS or Nylon shrink quite a lot. The Horizontal Expansion setting will allow you to adjust the size of your 3D print in the X/Y dimension to compensate for the change in size that happens when the plastic shrinks as it cools.
- A positive Horizontal Expansion value will increase the dimensions of your model. You should use a positive value when your printed model is smaller than you expected – which is common with shrinkage.
- A negative Horizontal Expansion value will reduce the dimensions of your model. Use a negative value when your printed model is larger than expected.
3. Top and Bottom:
1. Top Thickness:
With the top/bottom thickness you can set the thickness of the solidly printed top and bottom layers of the print. A higher value ensures all gaps on the top and bottom layers are closed completely. However, this can also increase the print time and amount of filament used. It is advised to always use a multiple of the layer height for the thickness of the top and bottom. This means, for example, that with a layer height of 0.15 mm, it’s better to set the top/bottom thickness to 0.6 mm rather than 0.7 mm.
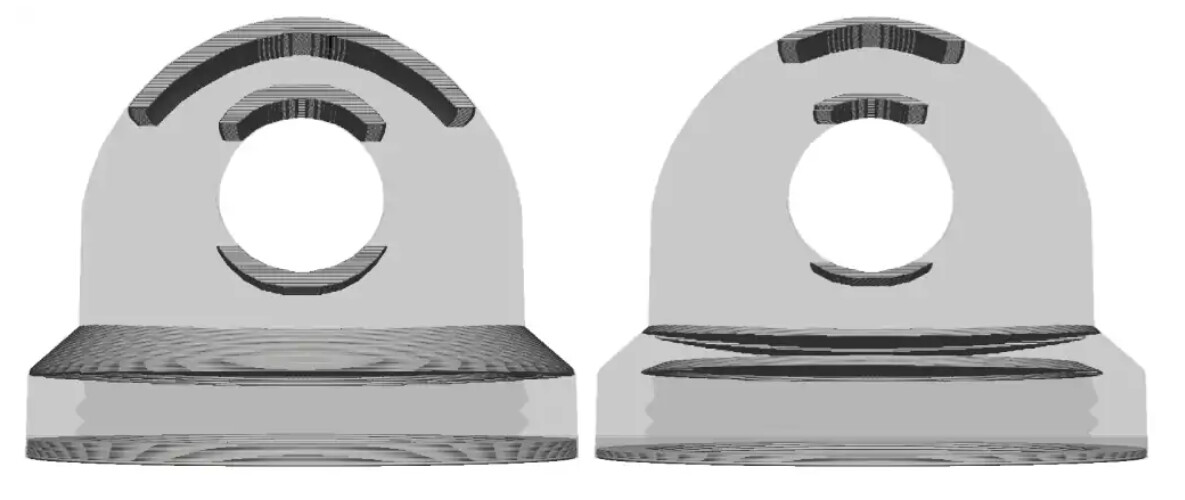
The model on the left has a top/bottom thickness of 1.4mm, the one on the right is just 0.7mm.
2. Bottom Thickness:
Separate top or bottom thickness
You can also set the thickness of the top and bottom layers separately. This is especially useful for the top as you may need a few layers to close it properly and prevent “pillowing”. By using fewer layers for the bottom you can save material and print time.
Number of top/bottom layers
Instead of setting a height in millimeters for the top or bottom layers, you can set a specific number of layers. The resulting height in millimeters will be calculated automatically depending on the layer height set. Example: Number of top layers 12 * 0.1mm layer height = 1.2mm top layer thickness.
Initial bottom layers
The number of bottom layers printed directly on the build plate can be adjusted separately. Reduce this value to improve print speed and reduce material cost, as the initial bottom layer is always fully supported and quickly watertight due to the surface it is printed on.
3. Ironing:
Ironing is a technique where the nozzle travels over the top-most layer after printing it, to iron the top layers to a smooth surface. The settings for ironing can be adjusted to get the desired surface finish:
- Only highest layer: This setting will apply ironing only to the very last printed layer
- Pattern: A pattern can be chosen to iron
- Monotonic ironing order. This will apply the monotonic effect on the ironing layer
- Line spacing: Determines the space between every line
- Flow: While ironing, this percentage of material is extruded on top of the last layer
- Inset: Ironing is applied to an offset of the outer edge of the model in the X-Y direction
- Speed, acceleration, and jerk: The speed of ironing can be adjusted to fine-tune the process
(Some of these settings will only be visible when you choose the expert options in Cura).