Session 2: “TinkerCad Explorers: Navigating New Tools”
Architect:
Syed Shayaan Haider - Markhor3D
Learning Objectives
In this session, Grade 2 students will:
- Understand Basic TinkerCad Tools: Learn how to navigate the TinkerCad interface.
- Manipulate 3D Shapes: Place, move, resize, and rotate shapes in the workspace.
- Combine Shapes Creatively: Group, duplicate, mirror, and create holes in shapes.
- Personalize Designs: Use text tools to add names or words to their models.
- Build Confidence in Digital Skills: Gain independence in using 3D design software.
Teaching Aids
Required Equipment:
- Computers or Tablets:
- One per student or pair, with internet access.
- TinkerCad Accounts:
- Set up accounts for students in advance (refer to TinkerCad teacher’s guide).
- Projector and Screen (optional):
- To demonstrate TinkerCad features.
- Whiteboard and Markers:
- For visual explanations and highlighting key concepts.
Introduction (10 minutes)
Welcome Students:
Introduce the session by expressing excitement about exploring TinkerCad together. Just like in the last class when they sketched their ideas on paper, in this session they’ll be bringing those ideas to life by recreating them using CAD software.
Explain the Concept of CAD Softwares:
CAD software is like a special computer program that lets you draw and build things in 3D, just like playing with blocks. It helps you create models of houses, cars, or anything you can imagine right on the computer!
Explain the Purpose:
- “Today, we’ll learn how to use TinkerCad, a fun computer program that lets us create our own 3D designs!”
- “We’ll learn how to make shapes, change them, and put them together to create something amazing.”
Set Expectations:
- Emphasize the importance of listening carefully and following instructions.
- Encourage students to ask questions if they need help.
Features of TinkerCad (45 minutes)
Note: With students already logged into TinkerCad, we can dedicate more time to exploring each feature thoroughly. After introducing each feature, allocate a few minutes for students to practice before moving on to the next one.
1. Placing and Moving Shapes in the Workspace (5 minutes)
Steps:
- Begin at the TinkerCad Workspace:
- Ensure all students are at the main workplane in a new project.
- Place a Shape:
- Locate the “Basic Shapes” menu on the right.
- Click and drag a box (cube) shape onto the workplane.
- Move the Shape:
- Click on the shape to select it.
- Click and drag the shape to move it around the workplane.
- Adjust View:
- Use the right mouse button or trackpad to orbit around the shape.
- Use the scroll wheel or pinch gesture to zoom in and out.
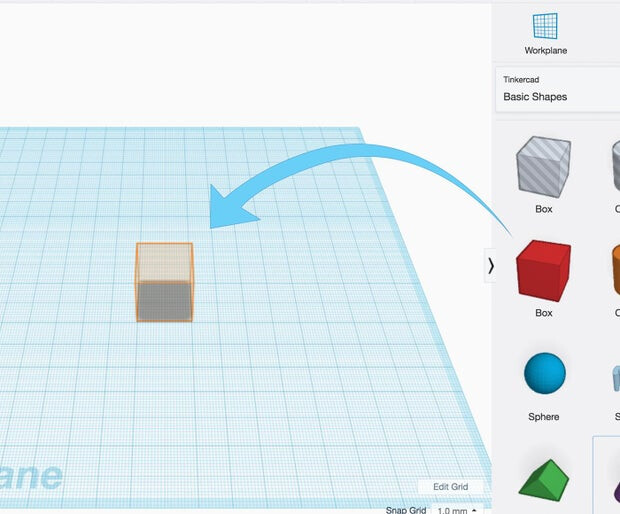
Practice Time:
- Allow students to place different shapes onto the workplane and practice moving them around.
- Encourage them to explore the workspace by zooming and rotating their view.
2. Resizing Shapes (8 minutes)
Steps:
- Select a Shape:
- Click on the shape you want to resize.
- Resize Using Handles:
- Notice the white and black squares around the shape.
- Click and drag a white corner handle to resize uniformly (changes length, width, and height together).
- Click and drag a black square handle to resize one dimension at a time.
- Adjust Height:
- Click and drag the white square on top of the shape to change its height.
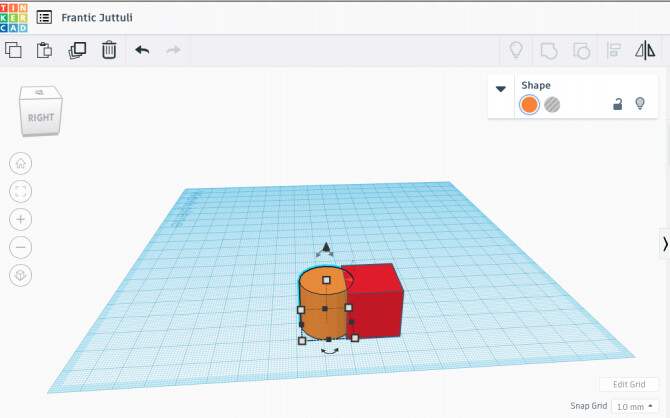
Practice Time:
- Encourage students to resize different shapes to make them taller, shorter, wider, or narrower.
- Challenge them to create a shape of a specific size, e.g., “Make a cube that is 20mm on all sides.”
3. Selecting Multiple Shapes and Grouping (10 minutes)
Steps:
- Place Multiple Shapes:
- Drag at least two different shapes onto the workplane.
- Select Multiple Shapes:
- Click and drag the cursor around the shapes to select them all.
- Alternatively, click on one shape, hold the “Shift” key, and click on the other shapes.
- Group Shapes:
- With the shapes selected, click on the “Group” button (icon that looks like a square and circle combined) at the top of the screen.
- The shapes will merge into one object, usually changing to the same color.
- Change Color of Grouped Object (Optional):
- With the grouped object selected, use the color picker to change its color.
- Ungroup Shapes (Optional):
- Select the grouped shape.
- Click on the “Ungroup” button (icon next to the Group button) to separate the shapes again.
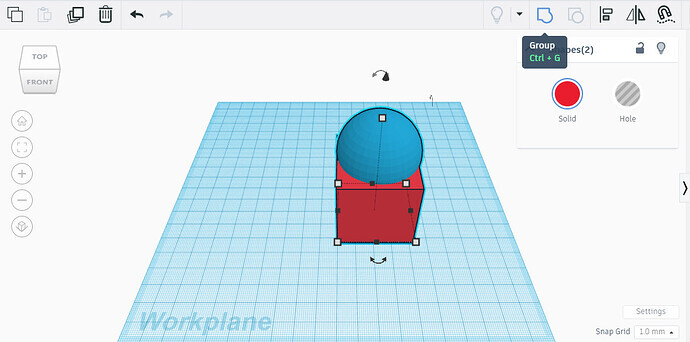
Practice Time:
- Have students create simple objects by grouping shapes, such as:
- House: Combine a cube (for the house) and a pyramid (for the roof).
- Tree: Combine a cylinder (for the trunk) and a sphere or cone (for the foliage).
- Rocket: Stack a cylinder and a cone.
- Encourage creativity by letting students design their own grouped objects.
4. Mirroring and Duplicating (7 minutes)
A. Duplicating Shapes:
Steps:
- Select a Shape:
- Click on the shape you want to duplicate.
- Duplicate the Shape:
- Press “Ctrl + D” on the keyboard (or “Cmd + D” on Mac).
- A copy of the shape will appear directly on top of the original.
- Move the duplicated shape to a new position.
Practice Time:
- Ask students to create multiple copies of a shape to build patterns or structures.
B. Mirroring Shapes:
Steps:
- Select a Shape or Grouped Object:
- Click on the object you want to mirror.
- Open the Mirror Tool:
- Click on the “Mirror” button (icon with two triangles facing each other) in the toolbar.
- Mirror the Shape:
- Arrows will appear around the object.
- Click on an arrow to flip the object along that axis.
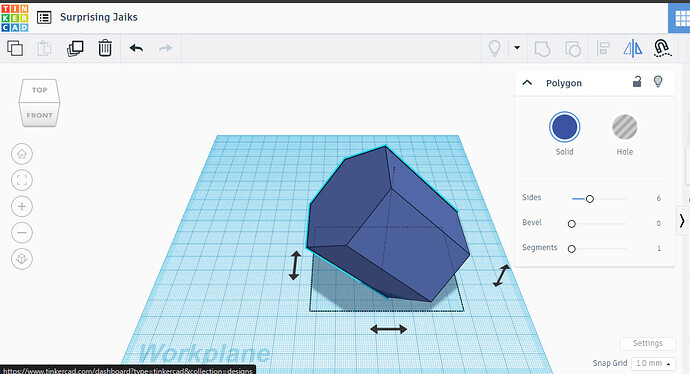
Practice Time:
- Encourage students to create symmetrical designs, such as:
- Butterfly Wings: Create one wing, duplicate it, then mirror it to make the other wing.
- Symmetrical Buildings: Design half of a building, then mirror it to complete the structure.
5. Creating Holes and Using Text (15 minutes)
A. Creating Holes:
Steps:
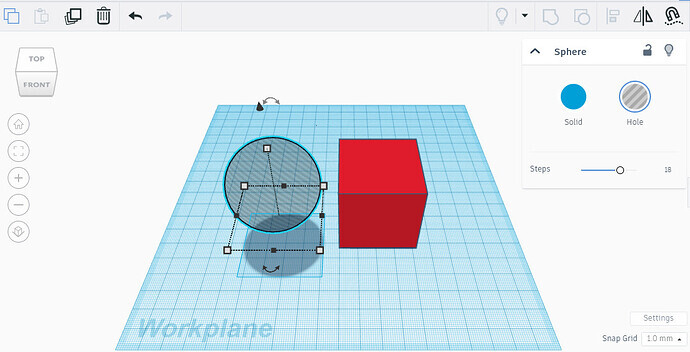
- Place a Solid Shape:
- Drag a box or any solid shape onto the workplane.
- Place a Shape for the Hole:
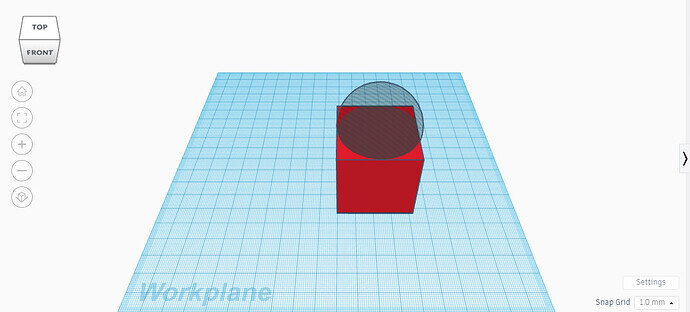
- Drag another shape (e.g., cylinder) onto the workplane, overlapping the solid shape where you want the hole.
- Convert Shape into a Hole:
- With the hole shape selected, click on the “Hole” option in the shape inspector (it looks like a gray box with stripes).
- Align the Shapes (Optional for Precision):
- Select both the solid shape and the hole shape.
- Click on the “Align” tool (icon with two rectangles and lines).
- Use the black alignment handles to center the hole precisely.
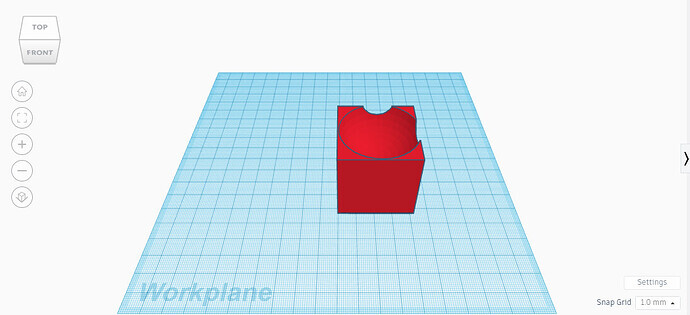
- Group to Subtract the Hole:
- With both shapes selected, click on the “Group” button.
- The hole shape will cut out from the solid shape.
Practice Time:
- Let students experiment by creating holes in different shapes:
- Dice: Create a cube and make holes for the dots.
- Window in a House: Cut out a rectangle from a wall to make a window.
- Ring: Create a thick cylinder and cut out the center with a smaller cylinder set as a hole.
B. Using Text:
Steps:
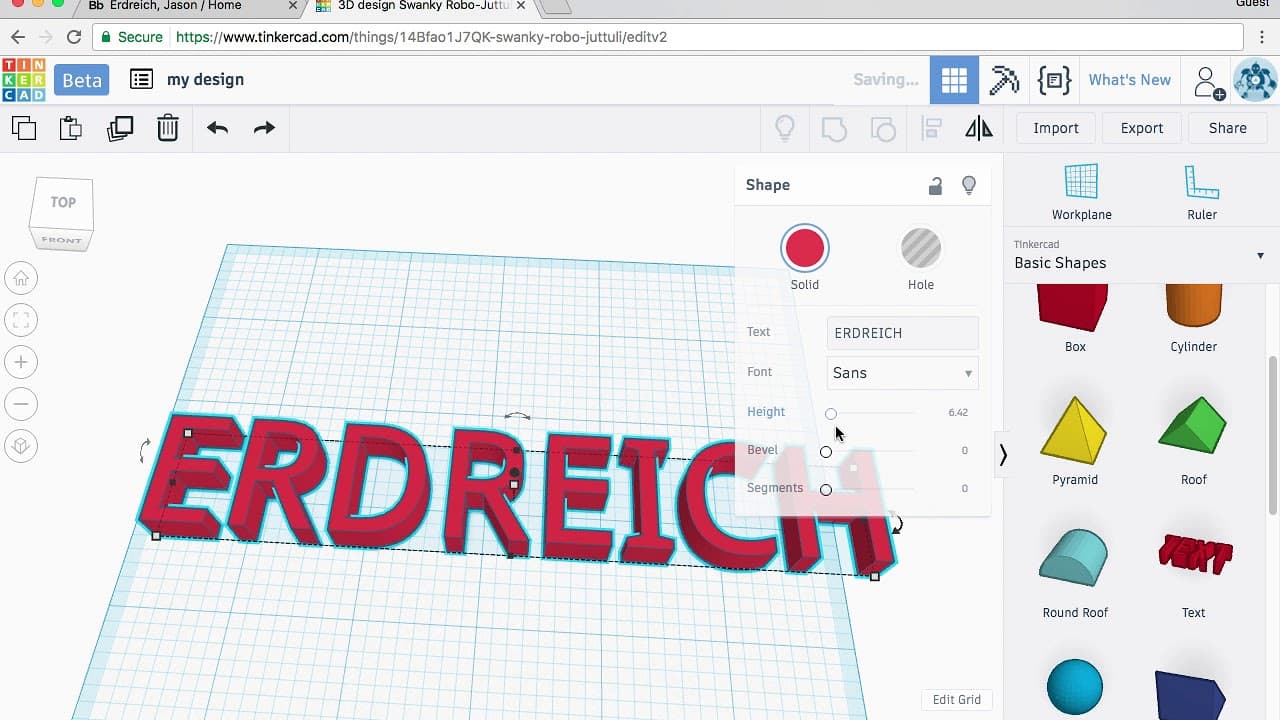
- Add Text Shape:
- Scroll down in the shapes menu and find the “Text” shape.
- Drag the “Text” shape onto the workplane.
- Edit the Text:
- With the text shape selected, find the “Shape” panel on the right.
- Type in your desired text (e.g., your name or initials).
- Change Font and Style (Optional):
- Choose a different font from the options available.
- Resize and Position Text:
- Use the handles to resize the text as needed.
- Move the text to the desired location.
- Combine Text with Other Shapes:
- Place the text on top of another shape (e.g., a rectangle to create a nameplate).
- Select both the text and the shape.
- Optional: Set the text as a hole to engrave it into the shape.
- Group them together to combine.
Practice Time:
- Encourage students to:
- Add their names to a design.
- Create a personalized keychain.
- Make a sign or label.
Conclusion and Recap (5 minutes)
Summarize Key Learnings:
- “Today, we explored TinkerCad’s features more deeply.”
- “We learned how to place and move shapes, resize them precisely, select and group multiple shapes, duplicate and mirror objects, create holes, and add text to personalize our designs.”
Encourage Reflection:
- Ask students: “Which feature did you enjoy the most today?”
- Allow a few students to share their thoughts.
Set the Stage for Next Session:
- “Fantastic work today! Next time, we’ll use these skills to design our very own keychains.”
Remind About Practice:
- “If you have access at home, feel free to explore TinkerCad and practice what we’ve learned. Remember to always ask for permission before using the computer.”
Teacher’s Resources:
- Guide to TinkerCad (link to separate document)
Key Vocabulary:
- Workplane: Place to build the object.
- Shape Handles: Handles used to resize and move a shape.
- Grouping: Merge multiple shapes into one custom shape.
- Mirroring: Flipping a shape.
- Hole: Removing a part from another shape.
Previous Session.
Next Session.
For suggestions, improvements, and corrections, feel free to reach out at shayaanhaider@gmail.com