Session 5: Exploring 2D and 3D Shapes with the Robot
Session Architect: Muhammad Bilal
Session Length: 50-60 minutes
Learning Objectives:
- Identify and classify basic 2D shapes (e.g., squares, rectangles, triangles, circles) and 3D shapes (e.g. square, sphere, cylinder).
- Program the robot to “draw” these shapes using simple commands.
- Understand the properties of 2D shapes through hands-on exploration.
Equipment Needed:
- Laptops with Scratch pre-installed.
- M3D Go Robotics Kit with pen attachment.
- Sets of papers and pens for the students to draw shapes on.
- Cut-out shapes for visual reference (squares, triangles, rectangles, circles) and 3d shapes (physical objects like cube, class duster, ball).
Resources:
Scratch Code File: Grade 3 Session 5.sb3 (3.4 MB)
Lesson Plan:
1. Introduction to 2D and 3D Shapes (10 minutes)
- Teacher’s Role: Hold up cut-out shapes or point to objects in the classroom that represent these shapes. Ask students to identify how many sides and corners each shape has.
Activity:
- Quickly review common 2D and 3D shapes shapes with the class using cutouts and physical objects.
- You may use simple examples from everyday life (e.g., “A square is like a chessboard square, and a triangle is like a slice of pizza”) so that the concept is easily digestible.
- You can use the classroom objects as:
" Memory updated
You’re right! Many 3rd graders may not be familiar with the terms “2D” and “3D” or what they actually mean. It’s important to explain these concepts in a simple, relatable way first before diving into the activity. Here’s a revised version of the introduction that explains the concepts more clearly:
“Look around the room—do you notice that some things are flat, like the screen or a piece of paper, while other things, like your backpack or a ball, aren’t flat? The flat shapes, like paper, are what we call 2D shapes. That just means they only have height and width, like a picture or a drawing. But when something isn’t flat—like a box you can hold—that’s called 3D, because it has height, width, and depth. Today, we’re going to use the robot to explore these two types of shapes, and you’ll see how 3D shapes are made from 2D shapes!”
2. Guided Activity: Drawing the Shapes by hand(10 minutes)
- Teacher’s Role: Walk around the room and provide assistance, helping students understand the connection between the robot’s movement and the shapes it draws.
- Help students identify the process of drawing 2D shapes and 3D shapes.
Activity:
Students will use pen and paper to draw basic 2D shapes. They can start by drawing a square, then progress to other shapes like triangles and rectangles.
- Instructions:
1.Allow the students to play around with different shapes and try to draw basic 2D shapes. You may use visual cut-outs for their visual reference.
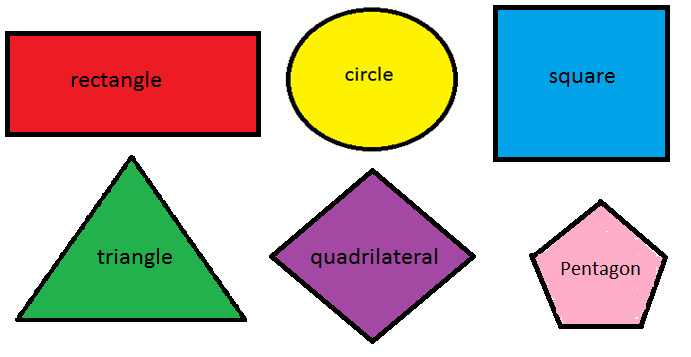
-
Encourage students to identify the pattern they use to draw each shape i.e. For a square, draw a straight line, then turn left/right and repeat.
-
This pattern will help them easily code the robot to draw these shapes in the next segment.
-
Provide them basic 3D objects e.g. cubes and spheres. Ask them to trace their shape on to the paper.
-
Through this activity, help them understand how 3D objects are made of 2D objects or have 2D part in them.
-
Use the hand made squares by students and by stacking those cut outs, students can better visualize how 3D shapes can be made by stacking 2D shapes.
3. Guided Activity: Programming the Robot to Draw Shapes (15minutes)
Activity:
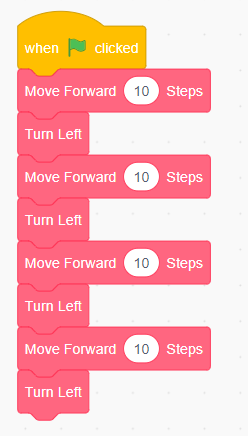
Students will use Scratch to program the robot to move in patterns that form basic 2D shapes. Start by drawing a square, then progress to other shapes like triangles and rectangles.
- Instructions:
-
Demonstrate how to program the robot to move in a straight line and turn left to draw a square. You may ask them to just repeat the blocks for simplicity.
-
Guide students through programming their own robot to draw the shape.
-
Repeat for triangles with different amount of turn. For this, students can use the “Rotate Left” and “Rotate Right” blocks:
-
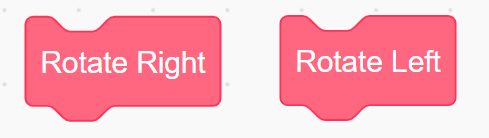
Teacher’s Role: Walk around the room and provide assistance, helping students understand the connection between the robot’s movement and the shapes it draws.
4. Guided Activity: Analyzing and Fixing Robot-Drawn Shapes (10-15 minutes)
Activity:
After drawing 2D shapes with the robot, students will examine their shapes, find mistakes, and figure out why the robot didn’t draw them perfectly. They will then try to fix those mistakes by adjusting their program.
Instructions:
You may start a discussion about their shapes as:
“Alright, now that we’ve got our shapes, let’s take a closer look. Do the lines look straight? Are the corners sharp enough? Just like when we draw by hand, sometimes the robot might make small mistakes. Let’s figure out what went wrong and why—maybe the robot didn’t turn enough, or it moved too far. Once we spot the problems, we’ll fix the code and see if we can get the shapes to look just right!”
- Each group reviews the shape their robot just drew (e.g., square, triangle).
- Students look for mistakes like uneven sides, incorrect angles, or wobbly lines.
- Discuss as a group what might have caused the mistake (e.g., wrong turn, incorrect timing).
- Adjust the program to fix the shape and test the robot again to see if it improves.
Conclusion and Reflection (5 minutes)
Activity:
Wrap up the session by reflecting on the shapes the students explored and their experiences with programming the robot.
Teacher’s Role:
Facilitate a discussion to help students reflect on what they learned. Encourage them to share their thoughts about the activity, asking specific questions to guide the conversation. You may ask them:
- Understanding Shapes:
- “What shape did you enjoy programming the robot to draw?”
- “How many sides does that shape have? What about the corners?”
- “Which shape was the easiest or hardest to program?”
- Coding the Robot:
- “What was the most fun part about using the robot to draw shapes?”
- “Was there anything tricky about getting the robot to move the way you wanted?”
- “Did any shape surprise you with how the robot moved to create it?”
- Engaging Reflection:
- “What new things did you learn about shapes today?”
- “Did you notice any similarities between shapes like squares and rectangles? How are they different?”
- “How can we use what we learned today when looking at shapes around us, like in buildings or objects?”