Session 7: “Creating a Special Pendant: Adding Holes and Text”
Architect:
Syed Shayaan Haider - Markhor3D
Learning Objectives
In this session, the students will:
- Enhance Digital Design Skills: Learn to add holes to shapes in TinkerCad to create a pendant.
- Personalize Designs with Text: Add simple text or initials to their pendant designs.
- Understand Basic Concepts of Subtraction in Design: Experience how removing parts of a shape changes the overall design.
- Express Creativity: Design a unique pendant that reflects their personal style.
- Build Confidence with Technology: Strengthen their familiarity with TinkerCad and digital creation.
Teaching Aids
Required Materials:
-
Computers or Tablets:
- One per student or pair, with TinkerCad already logged in and ready to use.
- Preferably touch-screen devices for easier interaction.
-
TinkerCad Accounts:
- Use the pre-logged-in accounts from previous sessions.
-
Interactive Whiteboard or Projector (optional):
- For demonstrating steps in TinkerCad.
-
Visual Aids:
- Posters or slides showing step-by-step instructions with images.
- Images of pendants or necklaces for inspiration.
-
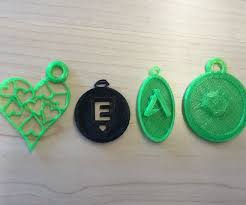
Sample Finished Pendants:
- Examples of simple pendants created in TinkerCad and 3D printed.
- Examples of simple pendants created in TinkerCad and 3D printed.

Structure and Lesson Plan (Total Time: 50 minutes)
1. Introduction and Recap (5 minutes)
-
Greet the Students:
- “Hello, everyone! Are you excited to create something new today?”
-
Review Previous Activities:
-
“We’ve had so much fun designing coins and decorating them. Who enjoyed that?”
-
Allow students to respond.
-
-
Introduce Today’s Activity:
- “Today, we’re going to design our very own pendants! A pendant is like a special charm you can wear on a necklace.”
2. Inspiration and Idea Generation (5 minutes)
-
Show Examples:
-
Display images of simple pendants.
-
“Look at these beautiful pendants! You can make one with your initial, a favorite shape, or any design you like.”
-
-
Discuss Personalization:
- “Think about what you’d like your pendant to look like. Maybe you want to use a heart shape, a star, or the first letter of your name.”
-
Explain the Concept of Adding Holes:
- “We’ll also learn how to add a hole so you can thread a string or chain through your pendant!”
3. Demonstration by the Teacher (10 minutes)
-
Explain the Purpose:
- “I’ll show you how to make a pendant in TinkerCad. Watch closely, and then we’ll make our own together!”
-
Step-by-Step Demonstration:
-
Step 1: Choosing the Base Shape
-
“First, we’ll choose a shape for our pendant. It can be a heart, star, circle, or any shape you like.”
-
Action: Drag the chosen shape onto the workplane.
-
Adjusting Size:
- “Let’s make it a good size for a pendant.”
-
-
Step 2: Adding Text or an Initial
-
“Now, let’s personalize it by adding a letter or a simple symbol.”
-
Action: Drag the ‘Text’ shape onto the workplane.
-
Typing the Letter:
- “I’ll type ‘A’ for example.”
-
Adjusting Size and Position:
- “We’ll make the letter smaller and place it on top of the pendant shape.”
-
-
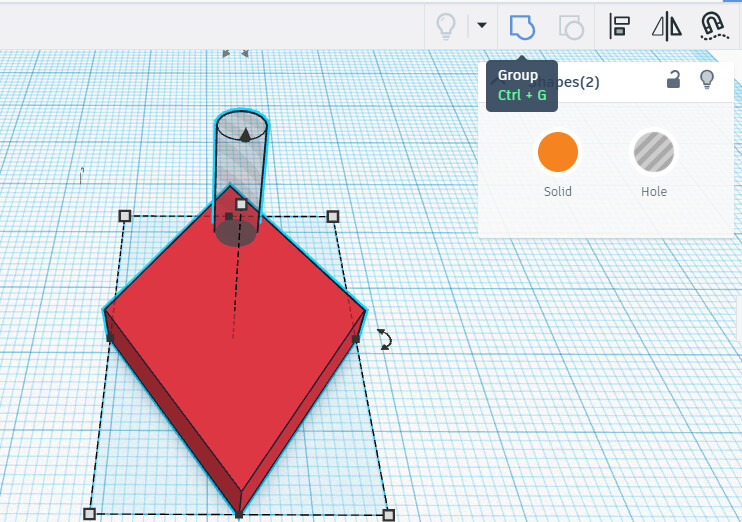
Step 3: Creating the Hole
-
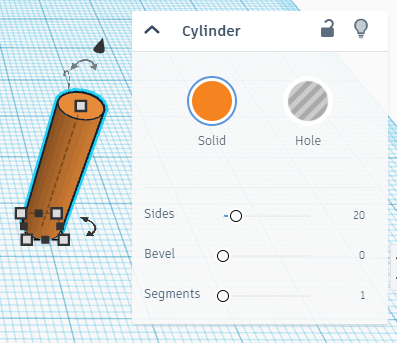
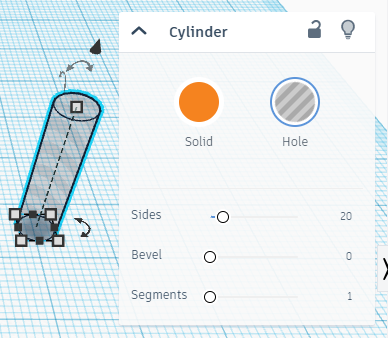
“To make a hole for the string, we’ll use a cylinder shape set as a hole.”
-
Action: Drag a cylinder onto the workplane.
-
Changing to a Hole:
- “Click on the cylinder and select ‘Hole’ instead of ‘Solid’.”
- “Click on the cylinder and select ‘Hole’ instead of ‘Solid’.”
-
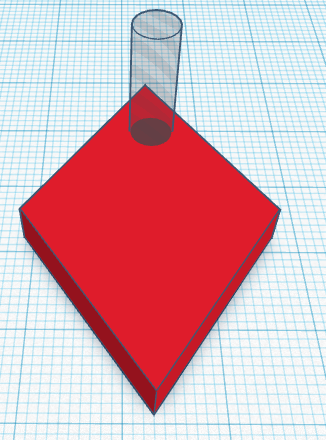
Adjusting Size and Position:
-
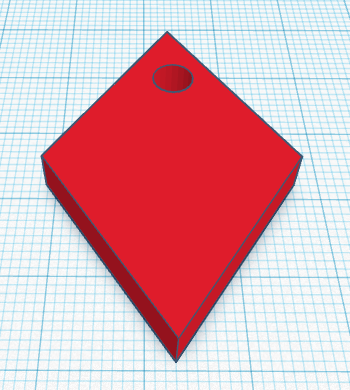
“Make the cylinder small, like a little circle, and place it at the top of the pendant.”
-
“This will be where the string goes through.”
-
-
-
Step 4: Grouping the Shapes
-
“Now, we’ll select all the shapes and group them together.”
-
Action: Click and drag to select all, then click the ‘Group’ button.
-
Result:
- “See how the hole is now part of the pendant?”
- “See how the hole is now part of the pendant?”
-
-
-
Engage Students During Demonstration:
-
“Any questions about what we did?”
-
“Do you see how the hole allows us to wear the pendant?”
-
4. Guided Practice: Students Create Their Pendants (25 minutes)
-
Step-by-Step Guidance:
- “Now, it’s your turn! Let’s make our pendants together step by step.”
-
Assist Students Through Each Step:
-
Step 1: Adding the Base Shape
-
“Choose your favorite shape and drag it onto the workplane.”
-
Assistants Help Students as Needed
-
-
Step 2: Adding Text or a Symbol
-
“Add a ‘Text’ shape or another shape to personalize your pendant.”
-
“Type your initial or choose a symbol you like.”
-
Adjust Size and Position:
- “Resize and place it on top of your base shape.”
-
-
Step 3: Adding the Hole
-
“Drag a cylinder onto the workplane.”
-
“Click on it and select ‘Hole’.”
-
“Resize it to be small, like a tiny circle.”
-
“Place it at the top of your pendant shape.”
-
-
Step 4: Grouping the Shapes
-
“Select all your shapes by clicking and dragging around them.”
-
“Click the ‘Group’ button to combine them.”
-
-
-
Teacher and Assistant Support:
-
Move around the room to help students individually.
-
Areas of Assistance:
-
Navigating TinkerCad tools.
-
Adjusting sizes and positions.
-
Changing shapes to ‘Hole’.
-
Grouping shapes.
-
-
-
Encourage Creativity:
- “Feel free to try different shapes or add more decorations to your pendant!”
-
Reminders:
- “Remember to ask for help if you’re not sure what to do.”
5. Saving Designs and Preparing for Printing (3 minutes)
-
Saving Designs:
-
“Let’s make sure to save our designs so we can print them later.”
-
Action: Show students how to save within TinkerCad.
-
-
Collecting Files:
- “I’ll collect all your designs from TinkerCad to get them ready for printing.”
6. Sharing and Celebration (5 minutes)
-
Group Sharing:
- “Who would like to show us their pendant design?”
-
Display on Projector:
- If possible, share a few students’ designs on the main display.
-
Positive Feedback:
-
“That’s a beautiful heart pendant with your initial!”
-
“I love how you added a star and a smiley face!”
-
7. Conclusion and Recap (2 minutes)
-
Summarize the Session:
- “Today, we learned how to make pendants by adding holes and text in TinkerCad.”
-
Reinforce Key Points:
- “We chose base shapes, personalized them, added holes, and grouped everything together.”
-
Express Excitement for the Next Session:
- “Next time, we’ll see your pendants come to life with the 3D printer!”
-
Closing Encouragement:
- “Great job, everyone! You all created amazing designs!”
Additional Notes for the Teacher
- Guide to TinkerCad (link to separate document)
-
Preparation:
-
TinkerCad Setup:
- Ensure all devices are ready with TinkerCad open to the design workspace.
-
Sample Pendants:
- Have physical examples to show students.
-
Visual Aids:
- Prepare step-by-step slides or posters to support the demonstration.
-
Keep the demonstration concise to allow ample time for students to work on their designs.
-
Key Vocabulary
-
Pendant: A decorative charm that hangs from a necklace or bracelet.
-
Hole: An empty space within a shape; in TinkerCad, it’s used to remove parts of an object.
-
Base Shape: The main shape forming the foundation of the design.
-
Text Shape: A tool in TinkerCad that lets us add letters or numbers.
-
Group: Combining shapes so they become one object.
-
Solid and Hole Modes:
-
Solid: A shape that adds material to the design.
-
Hole: A shape that subtracts material from the design.
-
Next Session.
Previous Session.
For suggestions, improvements, and corrections, feel free to reach out at shayaanhaider@gmail.com