Session 8: “Collaborative Creation: Building a Village – Part 2 and Printing”
Architect:
Syed Shayaan Haider - Markhor3D
Learning Objectives
In this session, the students will:
- Continue Collaborative Design: Further develop their building designs in TinkerCad as a group.
- Finalize 3D Models for Printing: Complete their models, ensuring they are ready for 3D printing.
- Apply Problem-Solving Skills: Make adjustments to their designs for printability.
- Understand Basic Printing Preparation: Learn how their designs are prepared for printing.
- Enhance Teamwork and Communication: Continue to work effectively within their groups.
Teaching Aids
Required Equipment:
- Computers or Tablets:
- One per group, with internet access.
- TinkerCad Accounts:
- Ensure continued access for each group.
- Projector and Screen:
- For demonstrations and displaying examples.
- 3D Printer:
- Set up for demonstration and starting prints.
- Cura Software:
- For slicing models and preparing them for printing.
- Whiteboard and Markers:
- For explanations and highlighting key concepts.
- Sample Printed Buildings (Optional):
- To show examples of finished products.
Structure and Lesson Plan (Total Time: 50 minutes)
1. Introduction and Recap (5 minutes)
-
Welcome Students:
- “Good morning, everyone! Today we’ll continue working on our village project.”
-
Recap Previous Session:
- “Last time, you started designing your buildings in TinkerCad. Let’s quickly remind ourselves what we did.”
-
Discuss Progress:
- “Think about what your group accomplished and what you plan to do today.”
-
Set Goals for Today:
- “Our goal is to finish our building designs and prepare them for 3D printing.”
2. Reviewing Designs and Planning Next Steps (5 minutes)
-
Groups Gather:
- Have students rejoin their groups from the previous session.
-
Review Designs:
- “Open your TinkerCad projects and look at what you’ve created so far.”
-
Identify Remaining Tasks:
-
“Discuss with your group what else you need to add or fix.”
-
Questions to Consider:
- “Are all parts of your building complete?”
- “Do you need to add any details like doors, windows, or decorations?”
- “Is your building the right size compared to others?”
-
-
Set a Plan:
- “Decide as a group what each member will work on to finish the design.”
3. Continuing the Digital Design (25 minutes)
-
Group Work Time:
- Students continue working on their building designs in TinkerCad.
-
Teacher Assistance:
-
Circulate among the groups to provide support and guidance.
-
Areas to Focus On:
-
Ensuring Printability:
-
“Remember to check for any overhangs or parts that might be hard to print.”
-
“Can you simplify or adjust these areas?”
-
-
Applying Scale and Proportion:
- “Double-check the size of your building to make sure it will fit well with the others.”
-
Encouraging Participation:
- “Make sure everyone in your group is contributing.”
-
-
-
Tips for Finalizing Designs:
-
Grouping Shapes:
- “Don’t forget to group your shapes together once you’re happy with them.”
-
Naming Files:
- “Please name your project with your group’s name for easy identification.”
-
-
Problem-Solving Assistance:
-
If groups encounter issues:
-
Technical Help:
- Assist with any TinkerCad functionalities.
-
Design Adjustments:
- Offer suggestions to improve design elements.
-
-
-
Encourage Creativity:
- “Feel free to add unique features to make your building special!”
4. Preparing Designs for Printing (10 minutes)
-
Introduction to Printing Preparation:
- “Now that your designs are ready, let’s see how we prepare them for 3D printing.”
-
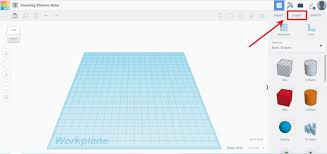
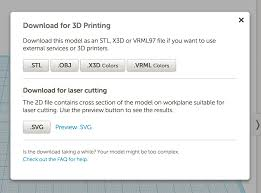
Demonstrate Exporting Designs:
-
Steps:
-
Exporting from TinkerCad:
-
“Click on ‘Export’ and choose the ‘.STL’ file format.”
-
“Save your file with your group’s name.”
-
-
Collecting Files:
- “We’ll collect all the files to prepare them for printing.”
-
-
-
Brief Overview of Slicing Software (Cura):
-
Simplified Explanation:
-
“Cura is a program that helps us get your designs ready for the printer.”
-
“It slices your 3D model into layers that the printer can understand.”
-
-
Demonstration:
-
Import one group’s design into Cura on the projector.
-
Show how the model appears on the virtual print bed.
-
Explain basic concepts:
-
Scaling (if necessary):
- “We check to make sure the size is correct.”
-
Positioning:
- “We place your building in the right spot on the print bed.”
-
Slicing:
- “We slice the model to create the instructions for the printer.”
-
-
-
-
Addressing Print Time:
- “Some buildings may take longer to print, so we’ll start printing them after class and over the next few days.”
5. Starting the Printing Process (5 minutes)
-
Begin Printing One Design (Optional):
-
If time and resources allow, start printing one of the buildings.
-
Explain:
- “We’ll start printing one of your buildings now so you can see how it begins.”
-
-
Observe the Printer:
-
Allow students to watch the initial layers being printed.
-
Safety Reminders:
- “Remember not to touch the printer while it’s working.”
-
6. Sharing and Reflecting (3 minutes)
-
Group Sharing:
- “Would any group like to share something interesting about their building?”
-
Encourage Positive Feedback:
- “Let’s appreciate each other’s efforts and ideas.”
-
Foster Excitement:
- “Your buildings are going to look amazing together!”
7. Conclusion and Next Steps (2 minutes)
-
Summarize the Session:
- “Today, you all did fantastic work finishing your building designs.”
-
Explain What Happens Next:
-
“We’ll print your buildings over the next few days.”
-
“In our next session, we’ll add final touches and assemble our village.”
-
-
Closing Encouragement:
- “Great teamwork and creativity today! I’m proud of how well you’re all working together.”
Additional Notes for the Teacher
- Guide to TinkerCad (link to separate document)
- Guide to Cura (link to separate document)
- Getting Started with M3D Enabler (link to separate document)
-
Preparation:
-
Ensure all computers are functioning and have access to TinkerCad.
-
Check that the 3D printer and slicing software are ready for use.
-
-
Time Management:
-
Allocate sufficient time for groups to finalize their designs.
-
Be prepared to assist groups that may be behind.
-
-
Formative Assessment:
-
For Advanced Students:
- Encourage them to help other groups or add detailed features.
-
For Students Needing Extra Help:
- Provide targeted support to help them complete their designs.
-
-
Technical Considerations:
-
Design Review:
- Before printing, review each group’s design for any issues that may affect printability.
-
Print Scheduling:
- Plan the printing schedule to ensure all buildings are printed before the next session.
-
-
Safety Considerations:
- Supervise students when near the 3D printer.
- Remind them of safety protocols.
Key Vocabulary
- Finalize: To complete or finish something.
- Export: To save a file in a format that can be used by another program.
- Slice/Slicing: Preparing a 3D model by dividing it into layers for printing.
- Print Bed: The surface on which the 3D printer builds the object.
- Iteration: Making changes and improvements to a design.
Previous Session.
Next Session:
For suggestions, improvements, and corrections, feel free to reach out at shayaanhaider@gmail.com