Updating Your D8500 Enabler Lite/Pro
Keep Your Printer and Software Running at Their Best
 Introduction
Just like any modern device, your M3D Enabler D8500 improves over time through software and firmware updates.
These updates help enhance performance, optimize print quality, fix minor issues, and unlock new features.
There are two types of updates you’ll occasionally receive:
 Orca Slicer Update — improves how your printer interprets slicing instructions for optimal print performance.
 Firmware Update — updates the printer’s internal software, improving reliability and adding new capabilities.
This guide will walk you through both update types step by step.
1. Updating Orca Slicer (Printer Profile Update)
Orca Slicer updates ensure that your print settings stay perfectly tuned for your M3D Enabler D8500.
With each new release, we fine-tune material profiles, calibration data, and motion parameters to deliver smoother, faster, and higher-quality prints.
Step 1: Download the Latest Configuration
You can download the latest configuration installer from the following drive link:
![]() https://drive.google.com/file/d/11zNkehGQcP-SPL1yFx0pnSAAPld-JI9S/view?usp=drive_link
https://drive.google.com/file/d/11zNkehGQcP-SPL1yFx0pnSAAPld-JI9S/view?usp=drive_link
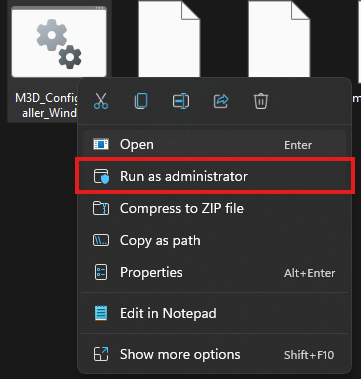
Once downloaded, run the installer as administrator by right clicking on it and selecting the option from the drop down menu:
Once launched, it will automatically download the latest config files and install them in your Orca Slicer. You should see a completion message on the screen:

Note: If you cannot see any changes even after the installer has finished installing, you can try deleting the temporary files of Orca Slicer in your computer. You can so as follows:
Press Win + R. Windows Run Dialog box should turn up:
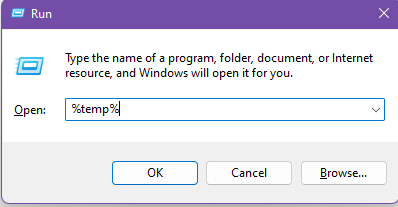
Write %temp% in it as shown in the image and press OK and a new folder will open up. In this folder, you should see a folder named Orca Slicer. Delete this folder and relaunch Orca Slicer and set up your printer again.
 Step 4: You’re Done!
That’s it — your Orca Slicer profile is now up to date!
You can begin slicing your models again as usual, and all new print instructions will be optimized for the latest firmware and performance profiles
2. Updating the Printer Firmware
Firmware updates keep your D8500 running smoothly by improving stability, print precision, and connectivity.
You can install these updates directly from the printer’s M3D Smart UI — no computer connection is needed.
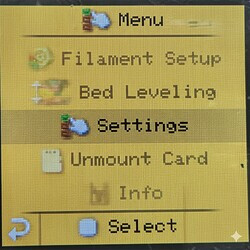
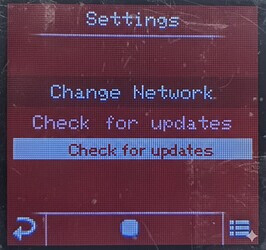
Step 1: Open the Smart UI Menu
On your printer’s screen:
- Tap the Menu icon.
- Scroll down and select Options.
- Tap Check for Updates.
If a new firmware version is available, the printer will automatically download and install it.
.
.
.
Step 2: Let the Printer Update Automatically
Once the update begins, the printer will:
- Download the latest firmware package.
- Install it automatically.
- Restart when the update is complete.
Do not power off or disconnect your printer during this process.
Note: Internet Connection Required
To check for and install firmware updates, your printer must be connected to the internet.
If it isn’t connected yet, please follow this guide to set up WiFi:
![]() Connecting Your Printer to WiFi
Connecting Your Printer to WiFi
 You’re Up to Date!
Congratulations — your M3D Enabler D8500 and Orca Slicer are now both updated to the latest versions.
You can enjoy improved print performance, smoother operation, and new features introduced with each release.