Grade 6 - Session 5: “Fuels and Foods—Energy Content”
Session Architect: Aleeza Ayaz - Markhor3D
Session Length: 60 minutes
Session Overview:
In this session, students will explore how energy is stored in food and how it is released through combustion. Using a simple calorimeter, they will measure the energy content of different food samples by burning them to heat water. Students will observe mass loss during burning and connect it to the energy released. They will analyze temperature changes in water, calculate energy transfer using basic formulas, and convert measurements between units. This session integrates hands-on experimentation with data analysis, reinforcing concepts like chemical reactions, energy transfer, and the relationship between mass and energy.
Learning Objectives:
In this session, students will:
- Understand energy transfer from burning foods and how energy moves from food to water.
- Recall what a chemical reaction is, focusing on combustion as an example.
- Explore how food stores energy and how we release that energy.
- Use a simple calorimeter to measure the energy content of different foods by burning them to heat water.
- Record mass loss of food samples to understand the relationship between mass and energy release.
- Analyze data from temperature changes and calculate energy using simple formulas, including converting mL to grams.
Teacher Resource:
Session File: ML65.plf (56.7 KB)
Equipment Required:
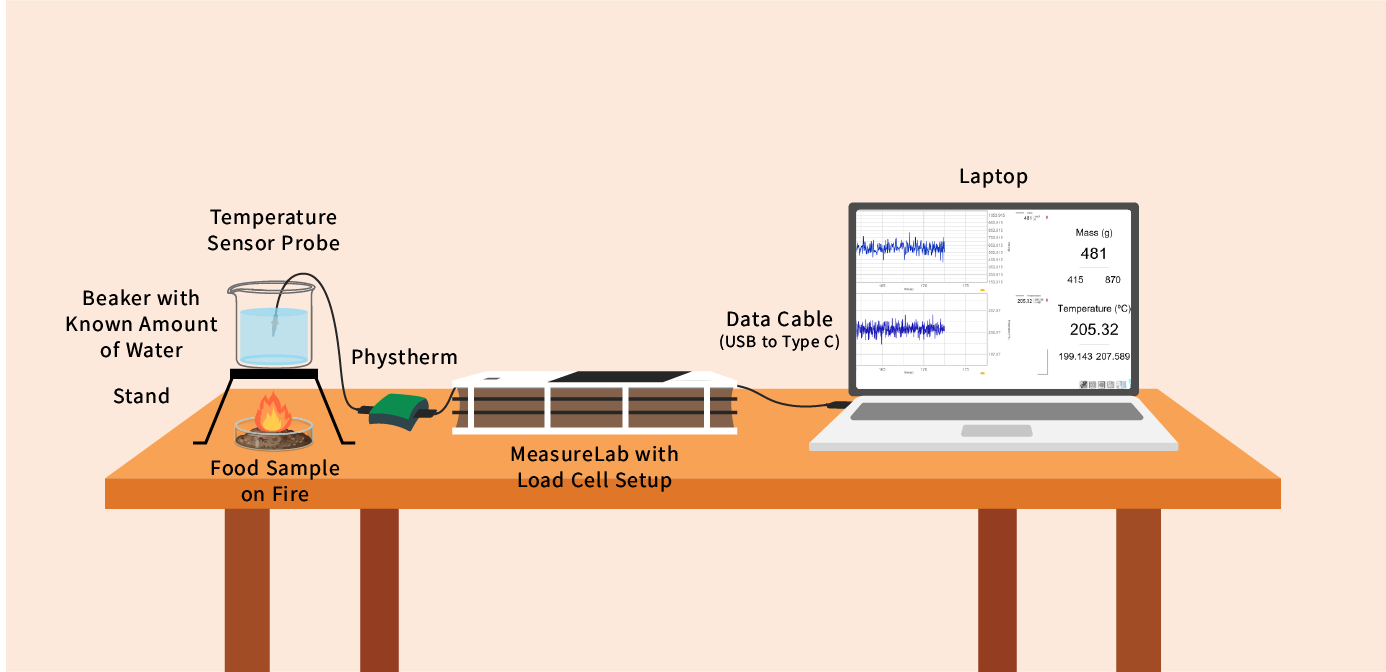
- MeasureLab with a built-in temperature sensor attached to a temperature probe.
- PC/Laptop to display measurement and live plot
- A simple calorimeter setup using:
- A beaker filled with a measured amount of water.
- A cover for the beaker with a hole for the temperature probe.
- A stand and gauze to hold the beaker above the food sample.
- A food holder (e.g., a metal mesh) placed beneath the beaker.
- A candle to burn the food sample below the beaker.
- Food samples (small pieces of food like peanuts, bread, cereal, or marshmallows).
- Water to heat using the burning food.
- Measurelab with built-in load cell** to measure the mass of food samples before and after combustion.
- Matches or a lighter to ignite the food samples (handled by the teacher).
- Heatproof gloves and fire extinguisher for safety.
- Stopwatch or timer.
- Worksheet for recording data and observations.
- Pens, pencils, markers, etc.
Teaching Aids:
- Visual aids for explaining chemical reactions, energy transfer, and combustion.
- Safety posters on handling fire and heat safely.
- Projector (optional).
Preparation:
This step has to be done before the session on each workstation/apparatus by the teacher/session instructor:
- Make sure that each computer has Physlogger installed and can detect the Measrelab when connected to it using the provided cable.
- Each Measurelab should have access to a power outlet for sensors that require external power. This session uses Temperature Sensor and Load Cell which, require external power source to be connected.
- Launch the Physlogger application and load the session file provided in the resources section.
Your setup will look something like this:
Introduction and Hands-On Exploration: (35 minutes)
-
You may start by asking:
“How do you feel after eating your favorite food? Does it give you energy?”- Let students share their experiences of feeling energized after eating.
-
You may build on this by saying:
“Exactly! When we eat food, our bodies convert it into energy. But have you ever thought about how that happens? What do you think happens to the food inside your body to release that energy?”- Wait for responses (students might mention digestion, or simply energy for movement and growth).
-
You may continue:
“That’s right! Our bodies break down food in a process called digestion, which is a series of chemical reactions. Today, we’re going to explore how food releases energy—not inside our bodies—but by burning it and capturing the heat in water.”
What is a Chemical Reaction?
-
You may ask:
“Who can remind me what a chemical reaction is? Can you think of a reaction you’ve seen before?”- Let students recall previous lessons or everyday examples (like baking soda and vinegar or fireworks).
-
You may explain:
“A chemical reaction is when substances combine or break apart to form something new. When we burn something, like food or wood, a chemical reaction happens between the material and oxygen in the air. This process is called combustion, and it releases energy in the form of heat and light.”
What is Combustion?
-
You may ask:
“Have you ever seen something burn? Maybe at a campfire or when you light a candle? What happens when it burns?”- Listen to students’ answers (like fire, heat, light, or smoke).
-
You may continue:
“Exactly! That’s combustion happening—a chemical reaction that releases energy. In today’s experiment, we’ll burn different foods to see how much energy they can release when they combust.”
*Step 1: Setting Up the Simple Calorimeter
-
Prepare the Calorimeter:
- Fill the beaker with 100 mL of water and place it on the stand and gauze, securely positioned above the food holder.
- Place the temperature sensor inside the water by inserting it through the hole in the beaker cover. Ensure the probe is positioned to measure the water’s temperature.
-
Weigh the Food Sample:
- Use the load cell to weigh the food sample before burning. Record this initial mass in the worksheet.
- Place the food sample on the food holder underneath the beaker filled with water.
-
Measure Initial Temperature:
- Before igniting the food, measure and record the initial temperature of the water using the temperature sensor.
Safety Setup:
- Ensure students are at a safe distance from the setup.
- The teacher handles lighting the food with heatproof gloves.
- The candle must be properly positioned under the food sample, with the beaker securely in place on the stand.
- A fire extinguisher should always be nearby.
Step 2: Running the Experiment
Igniting the Food Sample:
-
You may ask the students:
“What do you think will happen when we burn the food sample under the beaker of water? How will the temperature of the water change?”- Let students share their predictions (temperature increases, heat from food enters water, etc.).
-
You may explain:
“Now we’ll burn the food to release its energy, and the heat will raise the temperature of the water. Let’s watch the temperature change and measure how much energy is being transferred from the food to the water.”
“As the food burns, what do you think will happen to the temperature plot? Will it stay constant or change?”
“What will the plot look like as the temperature of the water increases? Can you predict the shape of the graph?”
- Light the food sample and allow it to burn completely underneath the beaker.
- Monitor the temperature as the food burns, recording how the temperature changes over time.
Recording Data During the Experiment:
- You may ask:
“Look at the live plot. How is the temperature changing over time? Is it rising quickly or slowly?”
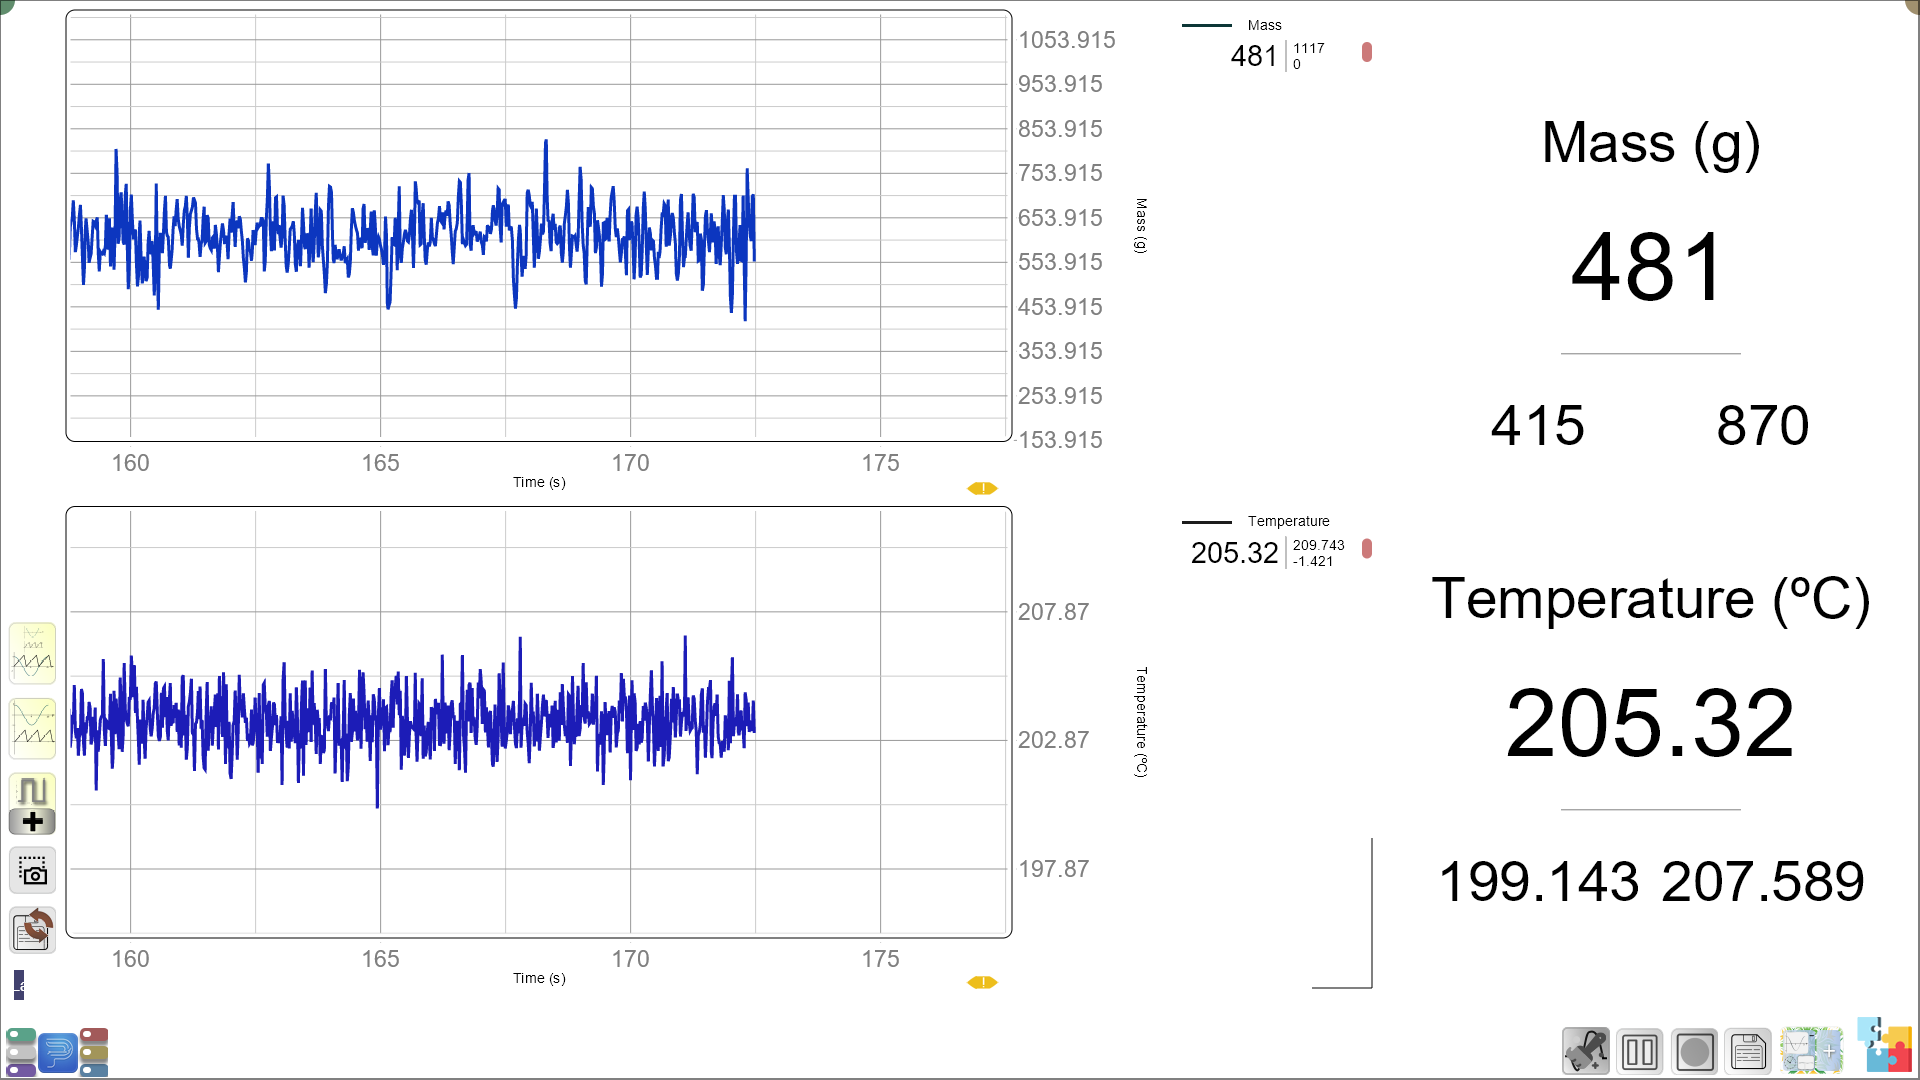
“Can you describe the pattern you see on the graph? What happens as more time passes?”
"At which time did the temperature increase the most? How does that show up on the plot?
| Time (minutes) | Temperature (°C) |
|---|---|
| 0 (Start) | |
| 2 | |
| 4 | |
| 6 | |
| 8 | |
| 10 |
- Once the food has burned completely, measure the remaining mass using the load cell.
- Record the final mass on the worksheet and calculate the mass loss of the food.
Step 3: Calculating the Energy Released
- You may explain:
“Now that we’ve measured the temperature change in the water, we can calculate how much energy the food released using this formula:
Energy (Joules) = Mass of water (g) × Temperature change (ΔT) × 4.18 (J/g°C)
-
You may ask the class:
“Why do you think we use this formula to calculate energy? What does each part mean?”- Guide the students by explaining the meaning of each component:
- Mass of water is the amount of water that was heated.
- ΔT (temperature change) tells us how much the water heated up.
- 4.18 is the specific heat capacity of water, meaning how much energy is needed to raise the temperature of 1 gram of water by 1°C.
-
Follow-up Question:
“Why do we need the temperature change (ΔT) to calculate the energy? What does it tell us about the food’s energy content?”
Worksheet: Step-by-Step Energy Calculation
Step 1: Recording the Data Before and After Burning
| Food Sample | Initial Mass (g) | Final Mass (g) | Mass Loss (g) (Initial Mass - Final Mass) |
|---|---|---|---|
Step 2: Measuring and Converting Water Volume to Mass
| Volume of Water (mL) | Mass of Water (g) (1 mL = 1 g) |
|---|---|
Step 3: Measuring Temperature Changes
| Initial Temperature (°C) | Final Temperature (°C) | Temperature Change (ΔT = Final Temp - Initial Temp) |
|---|---|---|
Step 4: Calculating the Energy Released
Formula for energy released (in joules):
Energy (J) = Mass of water (g) × Temperature change (ΔT) × 4.18 (J/g°C)
| Step | Calculation | Your Data/Answer |
|---|---|---|
| 1. Volume of water (mL) | ______ mL | |
| 2. Mass of water (g) | 1 mL = 1 g | ______ g |
| 3. Temperature change (ΔT) | Final Temperature - Initial Temperature | ______ °C |
| 4. Specific heat capacity of water | 4.18 (J/g°C) | 4.18 J/g°C |
| 5. Energy released (J) | Energy = Mass of water × ΔT × 4.18 | ______ J |
Reflection and Discussion: (10-15 minutes)
-
What happened to the temperature of the water after the food burned? Why did it increase?
-
How much mass did the food lose during combustion? How is this related to the energy it released?
-
Why did we use the formula with the temperature change (ΔT)? What does it tell us about how energy is transferred?
-
Can you think of other examples where energy is transferred through heat?
-
Based on the live plot, what did you observe about the way the temperature changed over time?
-
How does the shape of the plot reflect the rate at which heat was transferred to the water?
-
Can you explain why the plot shows a curve instead of a straight line? What might have caused any changes in the rate of temperature increase?
Summary and Wrap-Up (5 minutes)
- You may summarize:
“Today, we learned how to measure the energy content of foods by burning them and capturing the heat in water. We saw that food releases energy through combustion, and we calculated how much energy was released by observing how much the temperature of the water increased.”
Glossary:
- Energy Content: The amount of energy stored in food or fuel, measured in joules.
- Calorimeter: A device used to measure the amount of heat released during a chemical reaction, like combustion.
- Combustion: A chemical reaction where a substance reacts with oxygen to release energy in the form of heat and light.
- Mass Loss: The reduction in mass of a material after it has been burned or reacted.
- Temperature Change (ΔT): The difference in temperature before and after heat is applied, indicating energy transfer.