Grade 4 – Session 5: “Changing States—Melting and Freezing”
Session Architect: Aleeza Ayaz - Markhor3D
Session Length: 50-60 minutes
Session Overview:
In this session, students will explore how heat energy causes changes in the states of matter, specifically melting and freezing. Through hands-on experimentation, they’ll observe that temperature remains constant during phase changes even as energy is applied. Using MeasureLab’s live plots, students will visualize these changes, learning how energy transfer enables transitions between solid and liquid states. This session introduces essential concepts in heat transfer and phase changes, encouraging students to make predictions, record data, and reflect on real-life applications of energy use.
Learning Objectives:
In this session, students will:
- Understand how heat energy is linked to changes in the state of matter (melting and freezing).
- Observe that temperature remains constant during phase changes while energy is still being used.
- Understand energy transfer during phase changes and its real-world applications.
- Practice predicting outcomes and observing real-time changes with MeasureLab.
Teacher Resource:
Session File: ML45.plf (59.1 KB)
Equipment Required:
- MeasureLab with built-in temperature sensor.
- Two beakers (one with ice, one with water).
- Heat source (such as a candle or hair dryer).
- Aluminum foil or insulating material.
- A laptop or PC to display live plots.
- Worksheet for students to record predictions, observations, and conclusions.
- Pens, pencils, markers, etc.
Teaching Aids:
- Projector for displaying live plots (optional).
Preparation:
This step has to be done before the session on each workstation/apparatus by the teacher/session instructor:
- Make sure that each computer has Physlogger installed and can detect the Measrelab when connected to it using the provided cable.
- Each Measurelab should have access to a power outlet for sensors that require external power. This session uses Temperature Probe which requires external power source to be connected.
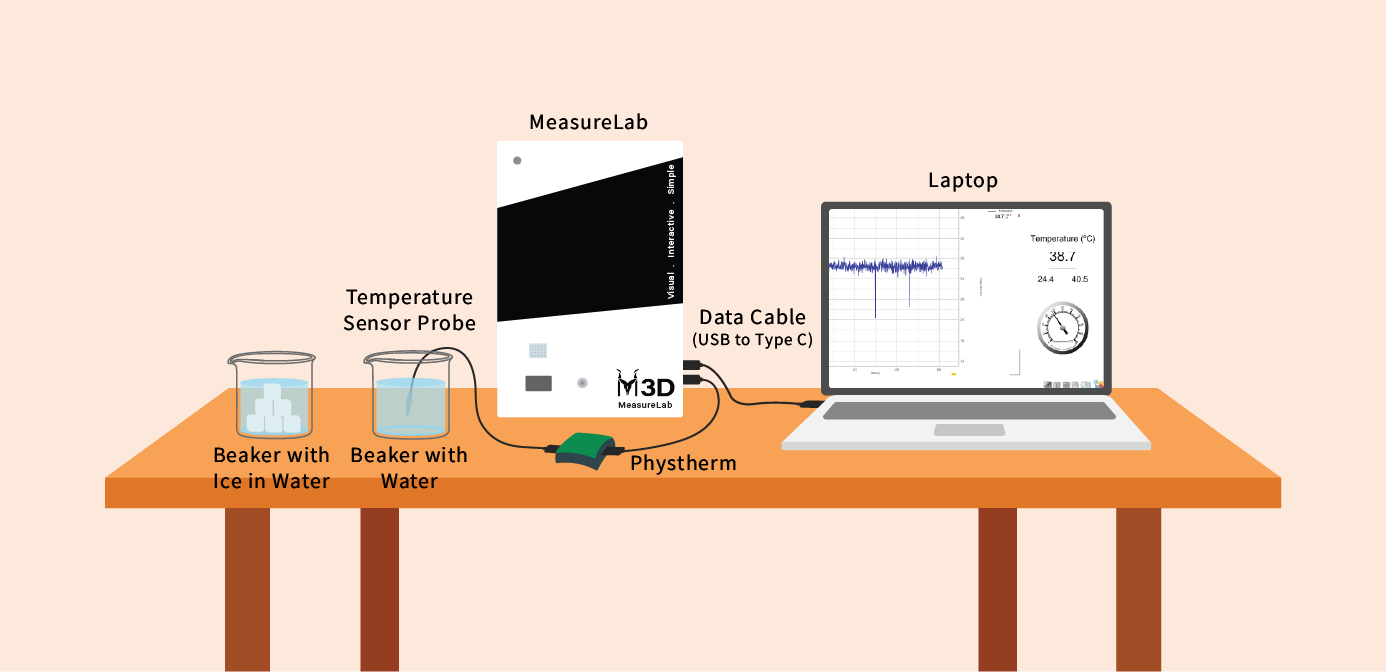
- Connect the Temperature Sensor to the Measurelab using the following port:

- Launch the Physlogger application and load the session file provided in the resources section.
Your setup will look something like this:
Introduction: (10-15 minutes)
Begin by asking:
“We all have seen ice melt, right? Who can tell me why ice melts?”
Encourage students to share their experiences:
“Can anyone tell me at what temperature water boils? Does the water increase in temperature if we keep heating it?”
Build on their responses, guiding them to think about how energy plays a role in these processes:
“We apply heat to ice for it to melt! We learned that energy transfers from one thing to another, right? So, what do you think the heat is doing when it’s making the ice melt or the water boil?”
Explain that energy is being used to change the state of matter.
You may ask:
“Do you think the temperature will keep going up as the ice melts, or will something else happen?”
Let students share their predictions before starting the experiment.
Hands-On Exploration: (25-30 minutes)
Step 1: Setting Up the Experiment
- Set up two beakers—one filled with ice, one filled with water.
- Attach the temperature sensor to MeasureLab and place it in both beakers to record the starting temperatures.
Step 2: Begin Heating the Beaker with Ice
- Start heating the beaker with ice using a heat source.
- Ask students to predict what will happen to the temperature in both beakers.
Students can record their predictions on the worksheet.
Step 3: Observing Live Plots
- Watch the live plot on MeasureLab as the beaker of ice begins to melt. Point out that the temperature doesn’t change as the ice is melting, even though the heat is still being applied.
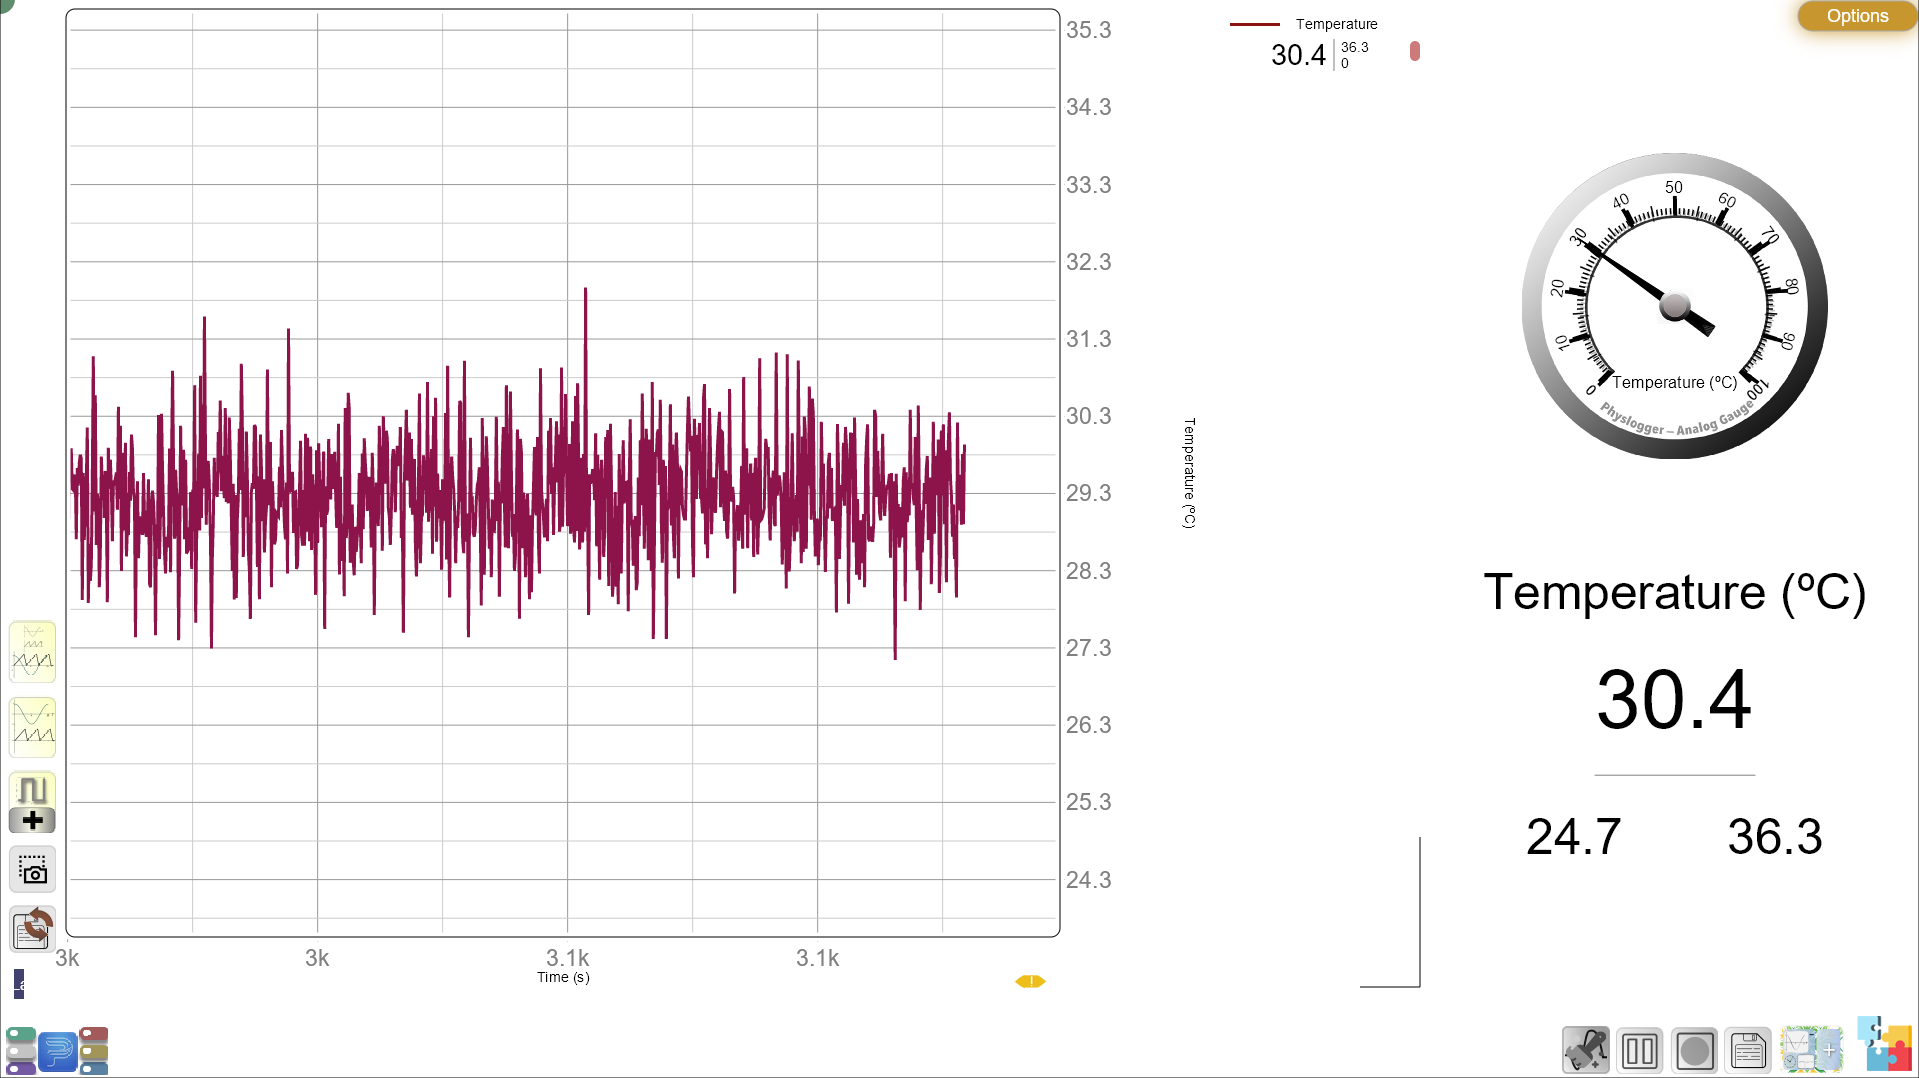
- Do the same for the beaker of water and observe how the temperature rises gradually, not staying constant.
Guided Questions:
You may ask:
- “Why is the temperature not increasing in the ice beaker even though we’re heating it?”
- “Why does the water’s temperature rise while the ice’s temperature stays the same?”
- “What do you think is happening to the heat energy that we’re adding?”
Encourage students to work together to figure out why heat energy is being used to change the state of the ice rather than raising the temperature.
Reflection and Deeper Discussion (10-15 minutes):
This part should be interactive. Divide students into small groups and have them discuss:
- Why does the temperature remain constant during melting and freezing?
- What happens to the heat energy during these changes?
You may say:
- “Energy doesn’t just make things hotter—it’s also used to change their state. That’s why the temperature doesn’t increase even though heat is being added.”
Let each group share their conclusions with the class.
You may ask:
- “What other examples can you think of where energy is used to change states in real life?”
Examples might include melting chocolate, freezing ice cream, or turning water into steam. Build on these examples to reinforce understanding of heat transfer.
Worksheet Activity: (10-15 minutes)
Prediction Table:
Students will note their predictions before the experiment and record their observations during the experiment.
Observations:
- Beaker with Ice:
Starting Temperature: _______
Temperature after 10 minutes: _______ - Beaker with Water:
Starting Temperature: _______
Temperature after 10 minutes: _______
Data Interpretation:
Provide a simple plot showing the temperature for both beakers. Ask students to label which line shows the beaker with ice and which shows the beaker with water.
Follow-up Question:
- “Why do you think one temperature stayed the same while the other increased?”
Variables:
Students identify the independent, dependent, and controlled variables in the experiment.
Reflection Questions:
- “Why do we need energy to change the state of ice to water?”
- “What other examples can you think of where heat energy may be used without increasing temperature?”
Summary and Reflection:
Summarize the key takeaway:
- “Today, we saw that during a phase change, like ice melting or water freezing, heat energy is used to change the state of matter instead of increasing the temperature. This is why the temperature stays constant during these changes.”
Ask students:
- “How does this information help us in everyday life? What other things could we test using MeasureLab?”
Next Session
Previous Session
Glossary:
- Energy: The ability to make things move or change.
- Temperature: A measure of how hot or cold something is.
- Heat Transfer: The movement of energy from one place to another.
- Phase Change: When a substance changes from one state of matter (like ice) to another (like water).
- Independent Variable: The variable we change in an experiment.
- Dependent Variable: The variable we measure in an experiment.
- Controlled Variables: The things we keep the same in an experiment.