Grade 4 - Session 4: “Magnetic Forces—Attraction and Repulsion”
Session Architect: Aleeza Ayaz - Markhor3D
Session Length: 50-60 minutes
Session Overview:
In this session, students will explore the forces of magnetism using MeasureLab’s magnetic flux sensor. They’ll observe how magnets attract and repel each other based on their poles, measure how magnetic force changes with distance, and test how materials affect magnetic fields. Through hands-on activities, students will also identify independent, dependent, and controlled variables, learning how these variables help structure and interpret experiments. This session builds curiosity about magnetic fields and introduces key scientific skills in data recording and variable management.
Equipment Required:
- MeasureLab with a built-in magnetic flux sensor.
- A variety of magnets (e.g., bar magnets, disc magnets).
- Magnetic and non-magnetic materials to test (e.g., paperclips, coins, small metal objects, aluminum foil, plastic, copper).
- Ruler for measuring distance.
- Laptop or PC to display magnetic flux readings and live-plot.
- Worksheet for predictions, observations, and results.
- Pens, pencils, markers, etc.
Learning Objectives:
By the end of this session, students will:
- Understand the concept of magnetic poles (north and south) and how they affect attraction and repulsion.
- Explore how magnetic fields extend into space and how the strength of the field varies with distance and orientation.
- Experiment with how certain materials can block or affect magnetic forces.
- Measure magnetic flux of magnets and observe the live plot.
- Practice recording measurements by determining the minimum distance at which magnetic attraction occurs.
Teacher Resource:
Session Manual: ML44.plf (61.0 KB)
Teaching Aids:
- Projector (optional).
Preparation:
This step has to be done before the session on each workstation/apparatus by the teacher/session instructor:
- Make sure that each computer has Physlogger installed and can detect the Measrelab when connected to it using the provided cable.
- Each Measurelab should have access to a power outlet for sensors that require external power.
- Connect the Photogate to the Measurelab using the following port:

- Launch the Physlogger application and load the session file provided in the resources section.
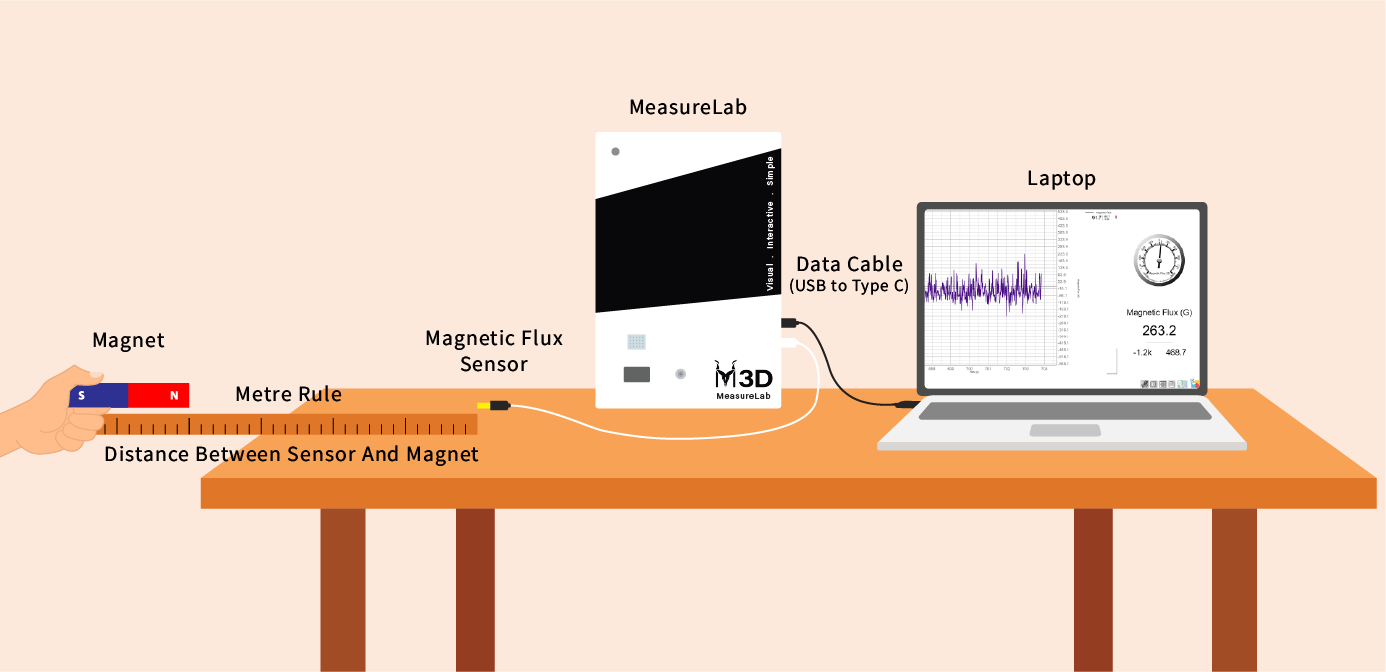
- Your setup will look like this:
Introduction: (10 minutes)
-
Set up the apparatus as shown.
-
You may begin by asking questions to prompt students to recall previous concepts:
“Have you ever played with magnets? What do you think happens when you bring two magnets close together?”
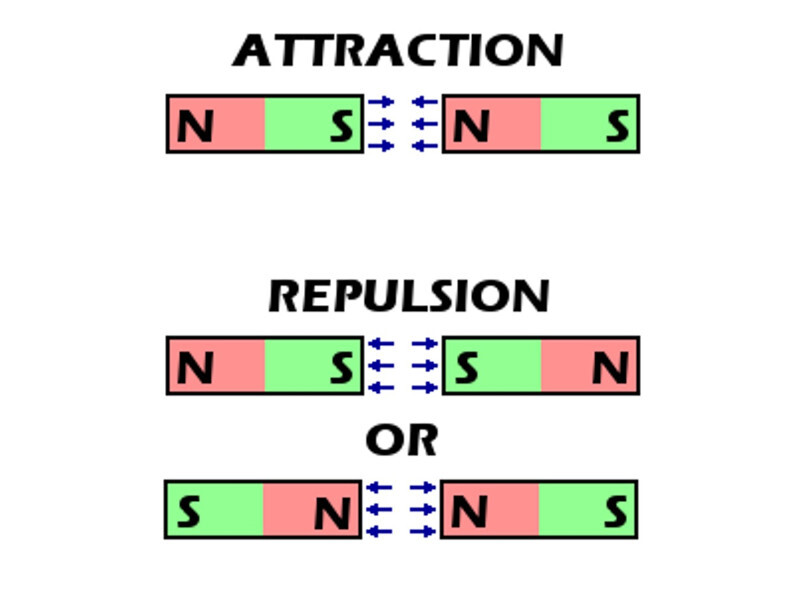
“Can anyone remember what happens if you bring the same ends of two magnets together? What about opposite ends?”
- After gathering responses, you may say:
“That’s right! Magnets have two ends, called poles—north and south. Today, we are going to use a special tool called a magnetic flux sensor to measure the strength of the magnetic force. The sensor will help us see how strong the magnetic pull or push is between two magnets, and we’ll also explore how distance affects this force.”
- You may elaborate further on the magnetic flux sensor:
“This tool doesn’t just help us feel how strong a magnet is—it actually shows us the strength of the magnetic force with numbers on the screen! So, we’ll be able to compare how the force changes when the magnets are close or far apart, or when they attract and repel each other.”
Hands-On Exploration (20-25 minutes):
Exploring Poles, Magnetic Fields, and Attraction Thresholds with the Magnetic Flux Sensor
You may start by saying:
“Let’s begin by bringing the north and south poles of two magnets close together. What do you think will happen? Let’s use the magnetic flux sensor to measure the strength of the force and see what happens.”
- Attraction and Repulsion:
Attraction:
You may hold two magnets with opposite poles (north and south) facing each other and slowly move them closer while measuring the force with the magnetic flux sensor.
You may ask:
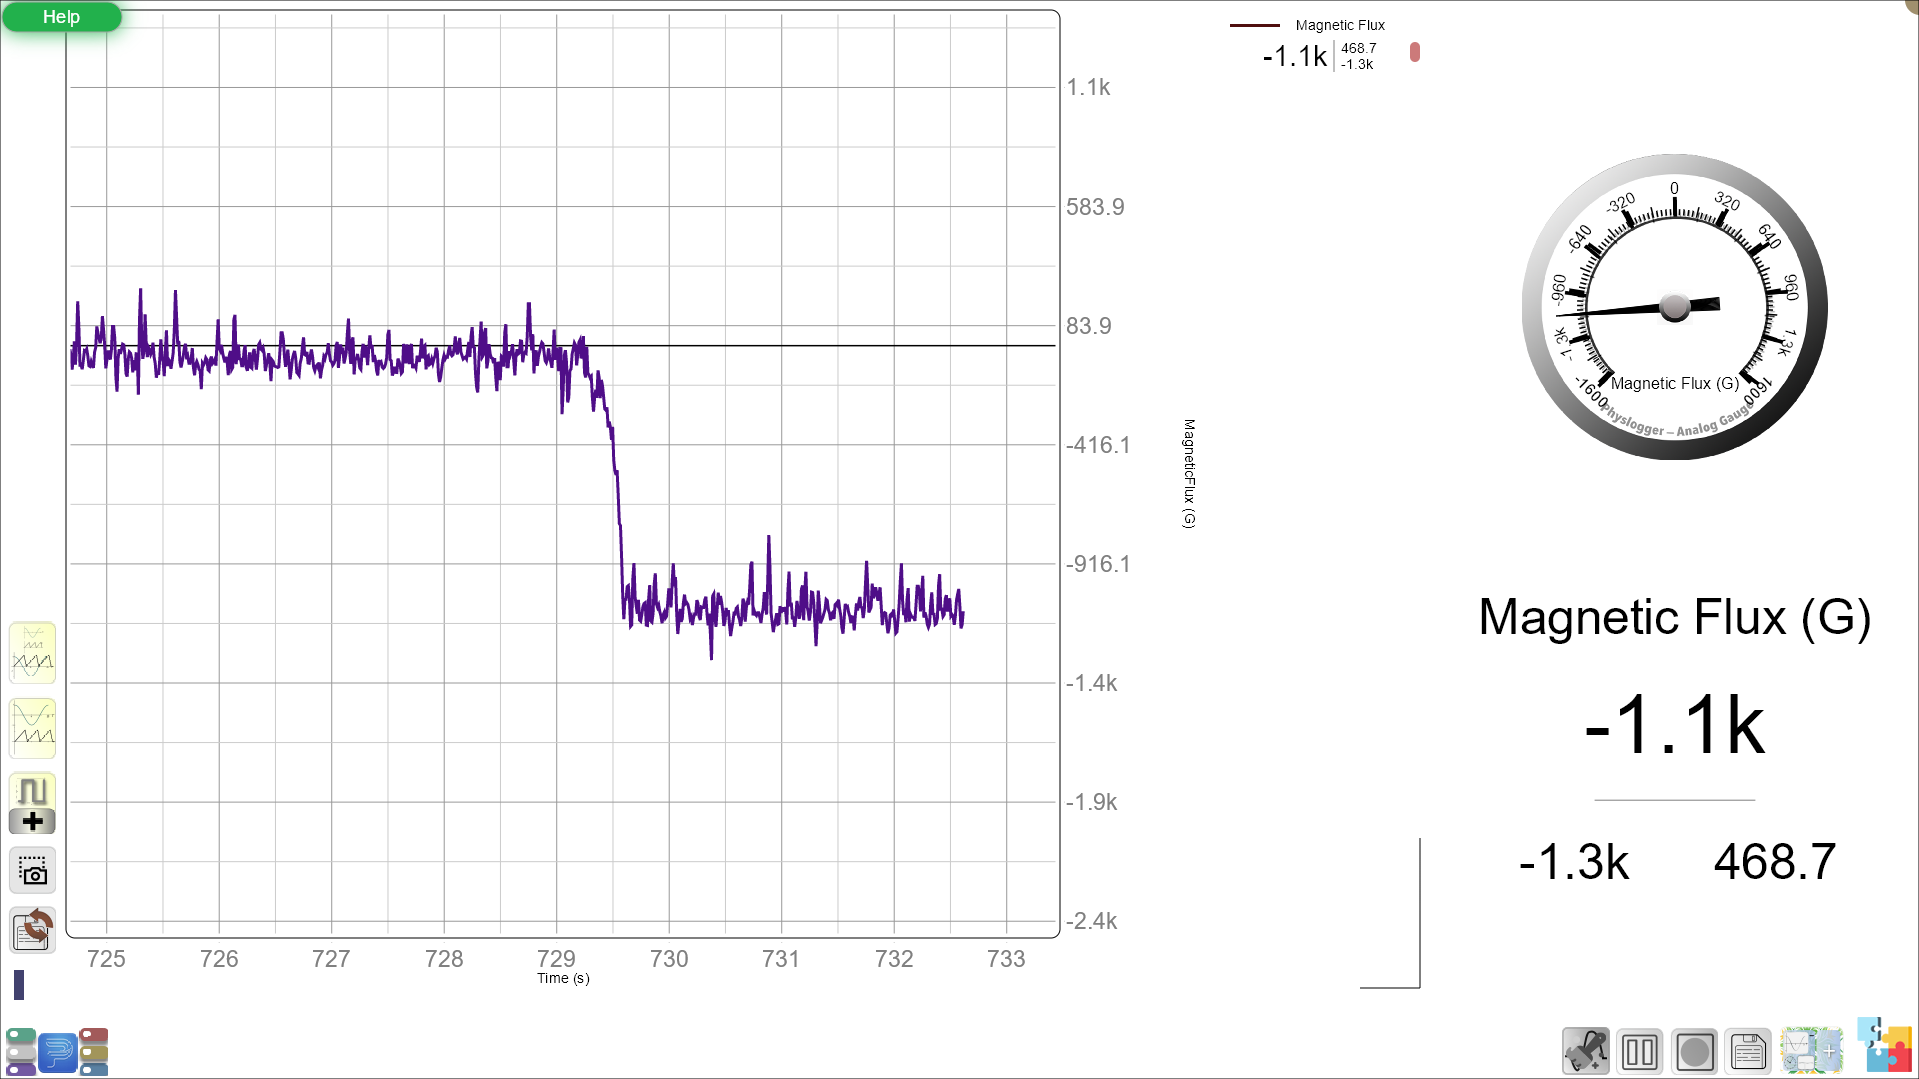
“What do you notice on the screen as the magnets get closer? Does the number/plot line get bigger? How does the gauge change? What does that tell us about the force?”
Repulsion:
You may now turn the magnets so that the same poles (north-north or south-south) face each other and repeat the process.
You may ask:
“What happens when we try to push the same poles together? Can you feel them pushing away? What does the number/plot line on the sensor show? Is the force stronger or weaker when we bring the magnets closer?”
- Explaining Magnetic Force:
You may explain:
“The magnetic flux sensor measures the strength of the magnetic field, which is like an invisible force around the magnet. When we bring the magnets closer, the force gets stronger, which is why we see the number/plot line on the screen go up. When they’re further apart, the force is weaker, and the number/plot goes down.”
- Mapping the Magnetic Field:
You may use the magnetic flux sensor to measure the strength of the magnetic field at different points around a single magnet (above, below, and to the sides). Move the sensor and record the magnetic flux at various distances.
You may ask:
“Let’s see if the magnetic force is the same everywhere around the magnet. Do you think it’s stronger near the poles or the sides? Let’s measure and find out!”
- You may follow up by saying:
“We can see that the magnetic field is strongest near the poles and weaker on the sides. This is why the number/plot line on the screen is higher near the ends of the magnet.”
- Finding the Minimum Attraction Distance:
- You may choose a small magnetic object (like a paperclip) and move it closer to the magnet while measuring the distance at which the object is first attracted.
You may ask:
“How close do we have to bring the paperclip before the magnet pulls it toward itself? Let’s use the ruler to measure the minimum distance where the attraction happens.”
- You may follow up by testing other magnetic materials, like coins or small metal objects, and recording their minimum attraction distances.
You may say:
“Different objects may have different attraction distances. Let’s see if a coin or a metal screw is pulled in at the same distance as the paperclip.”
- How Materials Affect Magnetic Fields:
- You may introduce materials like aluminum foil, plastic, cardboard, and copper. You may test how these materials affect the magnetic force by placing them between the sensor and the magnet.
You may ask:
“What do you think will happen if we put something between the magnet and the magnetic flux sensor? Let’s try putting different materials in between to see if the force is blocked or changed.”
You may follow up by saying:
“Some materials, like aluminum foil, might block or weaken the magnetic force, while others, like plastic, may have no effect. Let’s record what happens.”
Real-World Connection:
You may ask:
“Where have you seen magnets being used in everyday life? Can you think of toys, tools, or gadgets that use magnets?”
After gathering responses, you may build on their ideas:
“In motors, magnets are used to create movement by pushing and pulling on different parts. Compasses use magnets to point north because the Earth itself has a magnetic field, with its own north and south poles. Today, we saw how magnets can push or pull depending on their poles and how the force gets stronger when they’re close and weaker when they’re far apart.”
Guided Activity (15-20 minutes):
Worksheet Activity:
- Magnetic Force and Distance Chart:
The worksheet will include a table where students record the strength of magnetic forces at different distances and orientations around the magnet.
| Distance from Magnet | Force (Attraction or Repulsion) | Magnetic Flux Reading |
|---|---|---|
| Near (Opposite Poles) | Attraction | |
| Near (Same Poles) | Repulsion | |
| Far (Opposite Poles) | Attraction | |
| Far (Same Poles) | Repulsion |
- Finding the Minimum Attraction Distance:
Students will measure and record the minimum distance at which a magnetic object (e.g., a paperclip) is attracted to the magnet.
| Object | Minimum Distance for Attraction |
|---|---|
| Paperclip | |
| Small Coin | |
| Metal Screw |
- Variables Identification:
Students will identify the dependent, independent, and controlled variables for the experiment.
| Variable Type | Description |
|---|---|
| Independent Variable | What we are changing (e.g., distance between magnet and object) |
| Dependent Variable | What we are measuring (e.g., magnetic force or attraction) |
| Controlled Variables | What stays the same (e.g., type of magnet, type of material) |
- Materials and Magnetic Shielding:
Students will test different materials and record how they affect the magnetic force.
| Material | Effect on Magnetic Force (Blocked, Enhanced, No Effect) |
|---|---|
| Aluminum Foil | |
| Plastic | |
| Copper | |
| Cardboard |
6. Follow-Up Questions:
-
What did you notice about the magnetic force when the magnets were close together?
-
What happened to the magnetic force when the magnets were further apart?
-
At what distance did the paperclip get attracted to the magnet? Why do you think that distance was important?
-
Did any of the materials block the magnetic force? Why do you think that happened?
-
Can you think of other places where magnetic forces like these are used in real life?
Summary and Reflection (5-10 minutes):
You may summarize the session by saying:
“Today, we explored how magnets attract and repel each other based on their poles. We saw that the force between magnets gets stronger when the poles are closer and weaker when they’re further apart. We also tested how different materials affect magnetic forces, and we found the minimum distance at which a magnetic object is attracted to a magnet.”
Reflection Questions:
- “What happens to the magnetic force when the magnets get closer together? What about when they’re further apart?”
- “At what distance did we see the paperclip get attracted to the magnet? Why do you think that distance was important?”
- “Did any of the materials we tested block the magnetic force? Why do you think that happened?”
- “Where else do you think magnetic forces like these are used in everyday life?”
Encourage students to think about how magnetic forces can be applied in real-world applications, such as in motors, speakers, and magnetic locks.
Glossary:
- Magnetic Pole: The end of a magnet where the magnetic force is strongest (north and south poles).
- Attract: When opposite poles of magnets pull toward each other.
- Repel: When like poles of magnets push away from each other.
- Magnetic Field: The area around a magnet where magnetic forces can be felt.
- Magnetic Flux Sensor: A tool that measures the strength of magnetic forces.
- Minimum Attraction Distance: The closest distance at which a magnetic object is pulled toward a magnet.