Grade 7 - Session 3: Investigating Waves and Oscillations
Architect: Aleeza Ayaz - Markhor3D
Session Length: 50-60 minutes
Learning Objectives:
In this session, students will:
- Understand the properties of waves, including wavelength, frequency, and amplitude.
- Create standing waves using a vibrating string controlled by a speaker.
- Understand the difference between a standing waving and a travelling wave.
- Observe nodes and antinodes on the string and learn about their relationship to wavelength and frequency.
- Intuitively explore harmonics and their impact on wave patterns.
- Identify and analyze relationships between frequency, wavelength, and the number of nodes and antinodes.
Teacher Resource:
Session File:
Equipment Required:
- MeasureLab
- PC/Laptop to display measurement and live plot
- Speaker to create vibrations and oscillate the string.
- String or light cord attached to the speaker and connected to slotted masses to provide tension.
- Wedge or clamp to secure the string at the speaker end.
- Ruler or measuring tape to measure the wavelength directly.
- Pens, pencils, markers for recording observations.
- Worksheet for drawing graphs and answering follow-up questions.
- Pens, pencils, markers, etc.
Teaching Aids:
- Projector (optional).
- Visual aids showing diagrams of wave properties: wavelength, frequency, amplitude, nodes, antinodes, and harmonics.
Introduction and Hands-On Exploration: (35 minutes)
Engaging Students with Waves and Oscillations
- Starting with Real-Life Examples
- You may start by asking:
“Have you ever plucked a guitar string or seen waves on water? What did you notice about how the waves moved or how they looked?”
- You may start by asking:
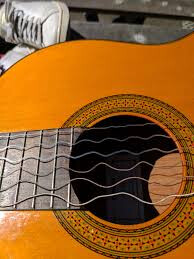
- Encourage students to share what they remember, like waves moving up and down or vibrating in place.

- Setting Up the Context for Standing Waves
- You may explain:
“Today, we’ll make waves on a string, but these waves will stand still in a pattern. These are called standing waves. By changing how fast the string vibrates, we’ll see different wave patterns and measure parts of the wave, like wavelength and frequency.”
- You may explain:
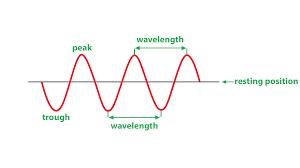
What are Waves?
-
You may ask:
“What do you think a wave is? Can you describe how it moves?”- Let students share ideas before introducing wave properties.
-
You may explain:
“A wave is a way that energy moves through a material, like the way a ripple moves across water. Today’s waves will stay on our string, and we’ll look at the distance between each wave bump (called wavelength) and how fast they happen (frequency).”
Step 1: Setting Up the Experiment
-
Attaching the String and Creating Tension
- Attach the string to the speaker, and secure the other end with slotted masses to add tension.
- You may explain:
“The speaker will vibrate the string, and the masses will keep the string tight so waves can form.”
-
Adjusting the Speaker for Standing Waves
- Place the speaker on a wedge or clamp to keep it steady, and turn it on to create vibrations.
- You may ask:
“What do you think will happen to the string if we increase the speed of the speaker? Will the wave pattern change?”
Step 2: Observing and Measuring Waves and Oscillations
-
Creating and Observing Standing Waves
- Turn on the speaker and adjust the frequency to create a standing wave pattern on the string.
- You may guide students:
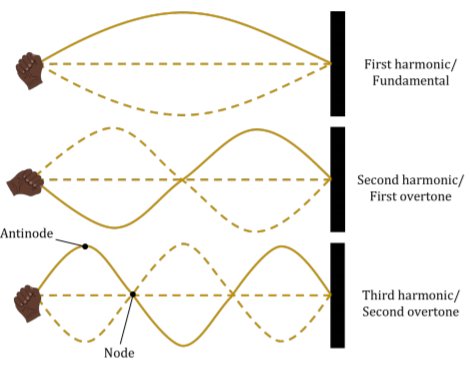
“Look closely at how parts of the string don’t move at all. These still spots are called nodes. The moving parts between the nodes are called antinodes.”
-
Explaining Wavelength with Nodes and Antinodes
- You may explain:
“The distance from one node to the next is half of the wavelength. So, if we measure from one node to the second node, we can calculate the full wavelength by doubling it.”
- You may explain:
-
Visualizing Harmonics
-
Adjust the frequency of the speaker and ask students to observe how the number of nodes and antinodes changes.
-
You may ask:
“What do you notice about the wave when we increase the frequency? How do the nodes and antinodes change?”- Guide students to see that higher frequencies produce more nodes and antinodes, creating a pattern known as harmonics.
-
Step 3: Experimenting with Frequency, Wavelength, and Node Patterns
-
Varying the Frequency and Observing Harmonics
-
Slowly increase the frequency on the speaker, allowing students to observe how the number of nodes and antinodes changes.
-
You may ask:
“As we make the string vibrate faster, what happens to the distance between nodes? How do the wave patterns change?” -
Guide students to observe that as frequency increases, more nodes and antinodes appear, and wavelength gets shorter.
-
-
Recording Observations
- Ask students to note the frequency and count the number of nodes and antinodes at each frequency setting.
Worksheet and Reflection: (15-20 minutes)
Students will record their observations and analyze relationships between frequency, wavelength, and the number of nodes and antinodes.
Part 1: Observing Node Patterns
| Frequency Setting | Number of Nodes | Number of Antinodes | Wavelength (cm) |
|---|---|---|---|
| Low Frequency | |||
| Medium Frequency | |||
| High Frequency |
Part 2: Graphing Data
-
Graphing Nodes and Antinodes vs. Frequency
- Students will create a graph with frequency (x-axis) and number of nodes or antinodes (y-axis).
- You may ask:
“What do you notice about the number of nodes as frequency increases? Is there a proportional relationship between them?”
-
Graphing Nodes and Antinodes vs. Wavelength
- Students will create a second graph with wavelength (x-axis) and number of nodes or antinodes (y-axis).
- You may ask:
“How does the number of nodes change with wavelength? Does this pattern show a direct or inverse relationship?”
-
Identifying Trends and Relationships
- You may guide students:
“What kind of relationship do we see between frequency and the number of nodes? Between wavelength and the number of nodes? Can you describe if they are directly or inversely proportional?”
- You may guide students:
Understanding Waves, Harmonics, and Proportional Relationships
-
What happened to the wave pattern as we increased the frequency?
- Did you see more nodes and antinodes? What happened to the wavelength?
-
Identifying Proportional Relationships
- You may ask:
“Based on your graphs, how is the number of nodes related to frequency? How does the wavelength relate to the number of nodes? Are these relationships direct or inverse?”
- You may ask:
-
Relating Nodes and Antinodes to Real Life
- You may ask:
“Have you ever noticed different pitches on a guitar string or other musical instruments? Each pitch is like a different frequency, creating a new pattern of nodes and antinodes.”
- You may ask:
Exploring Real-Life Applications
-
Waves in Music and Sound
- You may explain:
“Instruments, like guitars or pianos, work by creating standing waves. Each note we hear comes from a different pattern of nodes and antinodes. Higher notes have more nodes, just like the higher frequencies we saw on the string.”
- You may explain:
-
Harmonics in Nature and Technology
- You may ask:
“Did you know that waves like these also happen in technology? Think of speakers or radios—they use waves to create sound. The idea of harmonics helps us understand how to control sounds we hear.”
- You may ask:
Summary and Wrap-Up: (5 minutes)
- You may summarize:
“Today, we explored standing waves on a string. We saw how changing the frequency changes the number of nodes and antinodes and affects the wavelength. These patterns, called harmonics, are used in many real-world things, like music and sound technology.”
Glossary:
- Wave: A repeating disturbance that transfers energy.
- Wavelength: The distance between two peaks of a wave.
- Frequency: How many waves pass a point in a certain amount of time.
- Standing Wave: A wave pattern that stays in place.
- Node: A point on the wave that doesn’t move.
- Antinode: A point on the wave that moves the most.
- Harmonics: Patterns of waves that occur at different frequencies, creating unique wave shapes.