Grade 7 - Session 8: Investigating Ohm’s Law
Architect: Aleeza Ayaz - Markhor3D
Session Length: 50-60 minutes
Learning Objectives:
In this session, students will:
- Develop a foundational understanding of voltage, current, and resistance.
- Measure voltage and current across a fixed resistor to verify Ohm’s Law.
- Calculate resistance at different points, observing that R remains constant for a given resistor.
- Analyze V vs. I plots to confirm the proportional relationship and understand resistance as a constant factor.
Teacher Resource:
Session File:
Equipment Required:
- MeasureLab with voltage and current sensors.
- Fixed resistors (e.g., 100Ω, 220Ω).
- Breadboard and connecting wires.
- Power source (adjustable if possible).
- Laptop or PC to display live measurements.
- Worksheet for recording observations and calculations.
- Pens, pencils, markers, etc.
Introduction and Hands-On Exploration (20-25 minutes)
Engaging Students with Foundational Concepts
-
Introducing Voltage, Current, and Resistance
- You may start by asking:
“Have you noticed how a dim flashlight gets brighter with fresh batteries? Or how a fan speeds up when plugged into a higher power source?” - Explain:
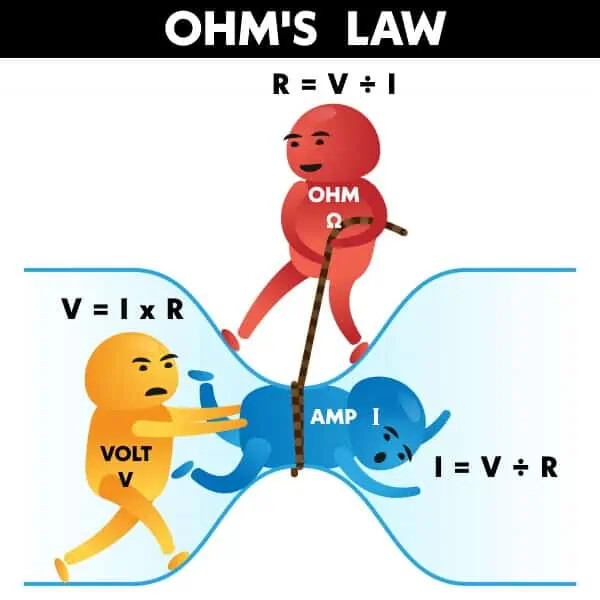
“These behaviors are influenced by voltage (the push or pressure of electricity), current (the flow of electricity), and resistance (the opposition to the flow). Let’s break these down.”
- You may start by asking:
-
Understanding Voltage
- You may explain:
“Voltage is like the pressure that pushes electricity through a circuit. The higher the voltage, the stronger the push driving the current.”
- You may explain:
-
Current as Flow of Electricity
- You may ask:
“If voltage is the push, what do you think happens to the flow (current) as we increase the voltage?” - Guide students to see that higher voltage increases current flow, much like stronger water pressure increases water flow.
- You may ask:
-
Resistance as an Obstacle to Flow
- You may ask:
“What if there’s a blockage, like a pinch in a hose? How would that affect the flow of electricity?” - Explain:
“This blockage is called resistance. Higher resistance makes it harder for electricity to flow, controlling the current.”
- You may ask:
Setting Up the Experiment to Verify Ohm’s Law
-
Building Simple Circuits and Setting Up Measurement Tools
- Guide students to set up a basic circuit with a single resistor, power source, and MeasureLab’s voltage and current sensors.
- You may say:
“We’ll connect a resistor and measure the voltage across it and the current through it to check if they are proportional, as described by Ohm’s Law.”
-
Correct Measurement of Voltage and Current
- Explain Measurement Setup:
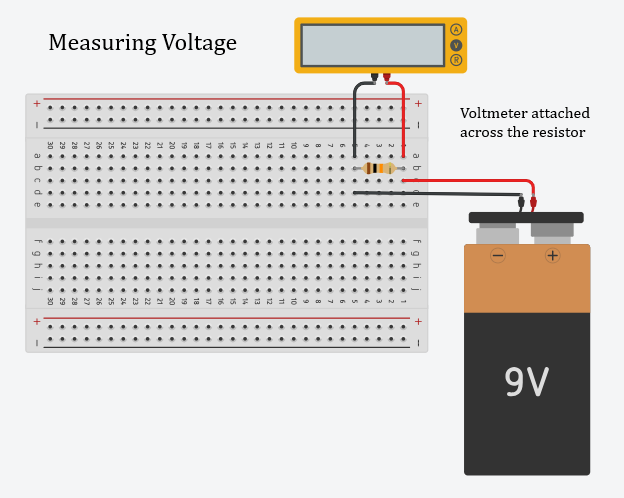
- Voltage is measured across (in parallel with) the resistor.
- Explain Measurement Setup:
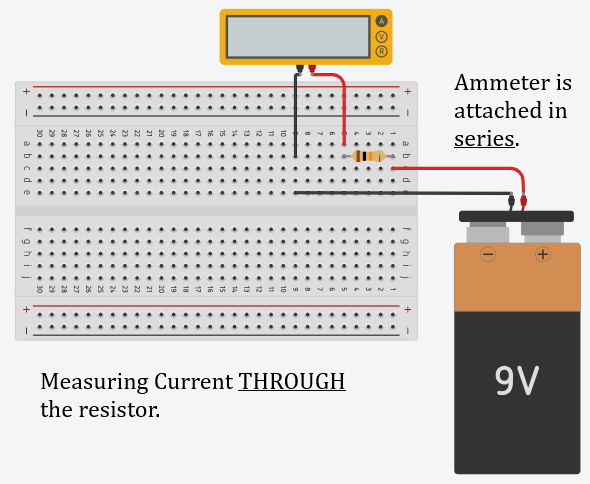
- Current is measured through the circuit (in series with the resistor).
- Explain Ohm’s Law as Proportionality:
“According to Ohm’s Law, V = IR, meaning voltage across a resistor should increase proportionally with current, given a constant resistance.”
-
Taking Multiple Measurements by Adjusting Voltage
- You may say:
“We’ll adjust the voltage in steps, measure the current each time, and calculate R = V/I to see if resistance remains constant.” - Students will record voltage and current values at each step, then calculate R to confirm consistency.
- You may say:
-
Worksheet for Recording Observations
| Voltage (V) | Current (I) | Calculated Resistance (R = V/I) |
|---|---|---|
| 0 V | ||
| 1 V | ||
| 3 V | ||
| 5 V | ||
- You may ask:
“After calculating R for each set of measurements, what pattern do you notice? Does the resistance stay the same?”
Plotting V vs. I and Confirming Ohm’s Law
- Creating the Plot and Analyzing Proportionality
- Students will plot voltage (V) against current (I) and examine the resulting line.
- You may ask:
“What does the shape of the line tell us about the relationship between voltage and current? If it’s straight, what does that mean?” - Explain:
“A straight line shows that voltage and current are proportional. The slope of this line gives us the resistance value for the resistor.”
Reflection and Follow-Up Questions (15-20 minutes)
-
Verifying Ohm’s Law
- You may ask:
“How did our results demonstrate Ohm’s Law? Did we observe that voltage and current are proportional for a fixed resistor?” - Help students conclude that the consistent resistance value R confirms Ohm’s Law.
- You may ask:
-
Real-Life Applications of Resistance Control
- You may ask:
“Why might we need to control resistance in real-world circuits? Think about devices like dimmer switches, phone chargers, or appliances that need different power levels.” - Discuss how resistors help regulate current, ensuring safe operation in various applications.
- You may ask:
Summary and Wrap-Up (5 minutes)
-
Summarize Key Learnings:
- “Today, we explored voltage, current, and resistance and saw how they follow Ohm’s Law. We measured voltage and current across a resistor, confirming that they are proportional when resistance is constant.”
-
Real-Life Connection:
- “Understanding resistance helps engineers design safe, efficient devices that control electricity, from household lights to mobile chargers.”
Glossary
- Voltage: The force that drives electricity through a circuit.
- Current: The flow of electric charge through a circuit.
- Resistance: The opposition to the flow of electric current.
- Ohm’s Law: The principle that voltage equals current times resistance, represented as V = IR .