Grade 5 - Session 2: “Exploring Electrical Resistance”
Session Architect: Aleeza Ayaz - Markhor3D
Session Length: 50-60 minutes
Session Overview
In this session, students will dive into the basics of electricity and circuits, focusing on the concept of resistance and its effects on voltage. They will build simple circuits using a bulb, battery, and wires, then gradually introduce resistors to observe how resistance impacts the flow of electricity. Using MeasureLab to measure voltage, students will learn to interpret live plots and identify trends in data. By engaging in hands-on experimentation, students will make predictions, record observations, and analyze results, strengthening their understanding of resistance, current, and voltage. Finally, they will relate their findings to real-world examples, such as dimmer switches and phone chargers, to understand how resistance is used in everyday electrical devices.
Learning Objectives:
In this this session, students will:
- Understand the basic concept of electric current as the flow of electricity.
- Learn what voltage is and how it acts as the force that pushes electricity through a circuit.
- Understand the concept of resistance and how it affects the flow of current.
- Build and measure simple circuits using resistors of different values.
- Observe and record both qualitative (e.g., brightness of the bulb) and quantitative data (e.g., voltage measurements).
- Apply advanced measurement skills to accurately measure voltage.
- Discuss real-world applications of resistance and electrical flow.
- Collaborate with peers to share and compare predictions, observations, and conclusions.
Teacher Resource:
Session File: ML52.plf (56.0 KB)
Equipment Required:
- MeasureLab kit.
- Circuit components: resistors of different values, wires, a bulb, a battery, and a switch.
- A laptop or PC for displaying measurements and live plots of current and voltage.
- A multimeter for measuring the resistance of resistors.
- Banana-to-Crocodile Connectors.
- Worksheet for recording observations and predictions.
- Small car, rubber band, plastic spoon, etc.
- Pens, pencils, markers, etc.
Teaching Aids:
- Projector for displaying live plots (optional).
- Diagrams showing how resistance limits the flow of electricity (optional).
Preparation:
This step has to be done before the session on each workstation/apparatus by the teacher/session instructor:
- Make sure that each computer has Physlogger installed and can detect the Measrelab when connected to it using the provided cable.
- Each Measurelab should have access to a power outlet for sensors that require external power.
- Connect the Banana-to-Crocodile Plug Cables in the following ports:

- Launch the Physlogger application and load the session file provided in the resources section.
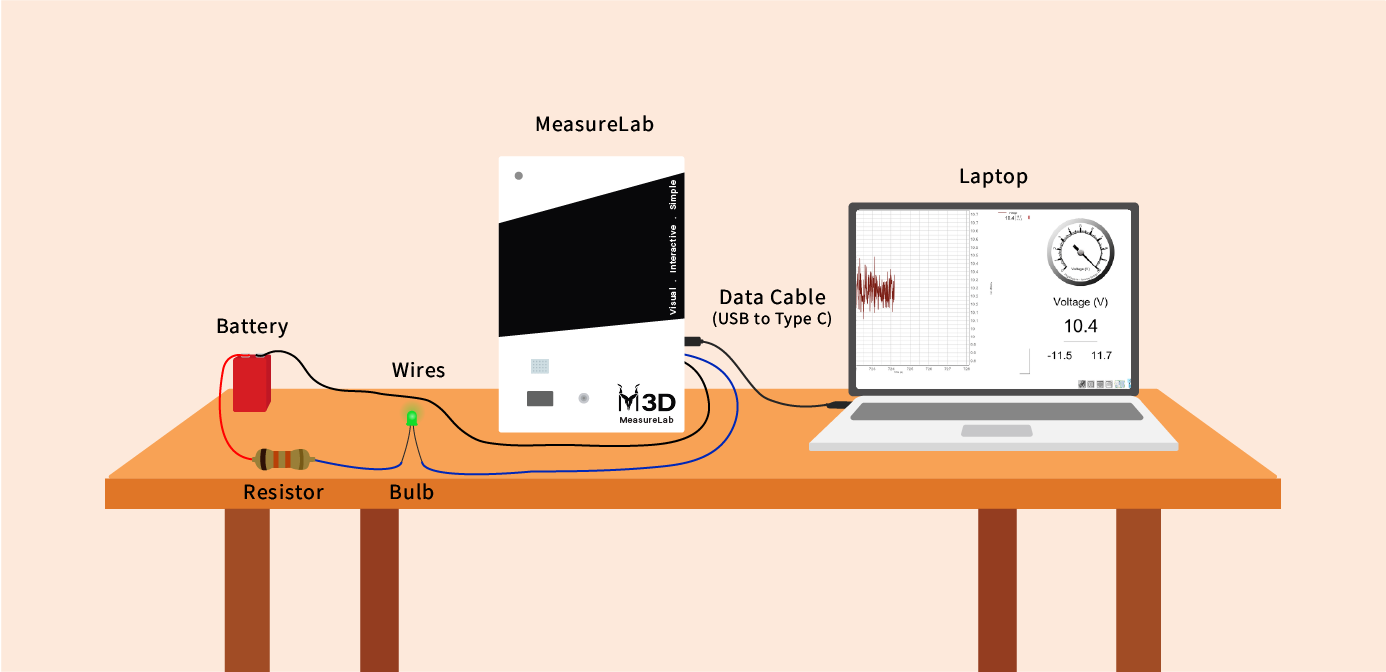
Your setup will look something like this:
Introducing Electric Current and Voltage with Hands-On Exploration: (35 minutes)
- Initial Engagement:
You may start by asking students:
“Have you ever thought about what makes the lights in your house turn on, or how your phone charges? What do you think is needed to make these devices work?”
Let students share their thoughts, which will likely include answers like electricity or batteries.
You may build on this by saying:
“Great! Yes, these devices need electricity to work. But electricity isn’t just one thing—it’s the flow of many tiny particles. We call this flow electric current. This current moves through wires, powering the devices.”
- Interactive Demonstration for Voltage:
Bring out a toy car (or another simple object that can be pushed). Set up a small, flat surface to push the car across. Then you may ask:
“Imagine this car represents the flow of electric current. Let’s see what happens when I push it softly. What do you notice? Is it moving slowly or quickly?”
After students respond, increase the force of the push:
“Now, let’s try pushing the car harder. Does it move faster or slower now?”
After gathering responses, explain:
“Just like how the push makes the car move faster, there is a force that is pushing the tiny particles in electric current. We call this force voltage. Just like our push to the car, the stronger the voltage, the faster the electric current moves.”
Hands-On Experiment:
Now, you may guide students to build a simple circuit using a battery, wires, and a bulb. They’ll use the battery as the source of voltage:
“Now that we’ve talked about how voltage pushes electricity, let’s see it in action! We’re going to build a simple circuit. The battery will provide the voltage to push the electricity through the wires to light up the bulb.”
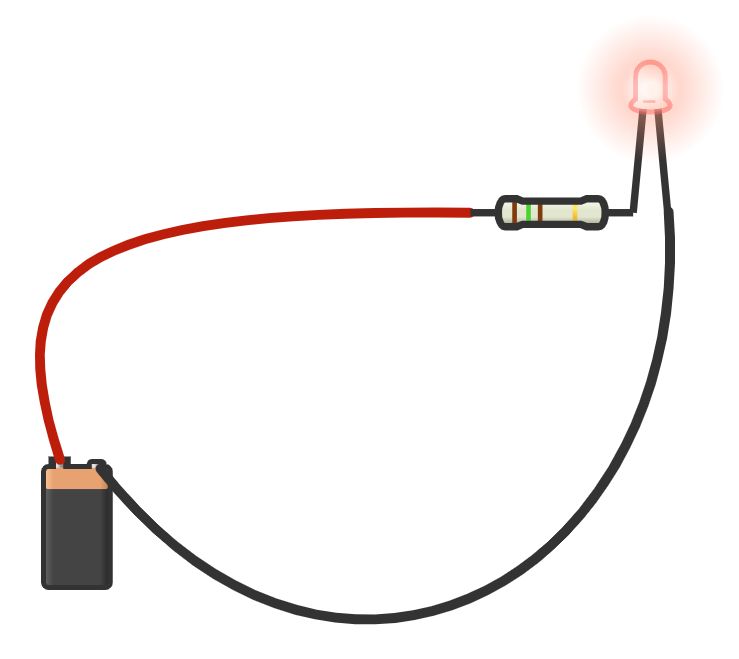
Once the circuit is built and the bulb lights up, you may ask:
“What do you notice? How does the battery help the bulb light up? What happens if we use a bigger battery?”
Guide students in connecting the Banana-to-Crocodile connectors with the circuit so that they can start seeing the voltage on the screen using Measrelab.
Discussion: Allow students to experiment with different batteries (if available) and discuss how the voltage affects the brightness of the bulb They can use the Brightness Gauge to see how much the brightness varies with changes in the circuit. Ask students about the additional component, the resistor, we have added in our circuit and what do they think it does.
- Introducing Conductivity with a Demonstration:
After the voltage experiment, transition into talking about materials that allow electricity to flow through them to steer the conversation towards conductivity and the concept of resistance. You may start by asking:
“Now that we’ve seen how electricity flows, do you think all materials can carry electricity? What do you think will happen if we use something like a rubber band or a plastic spoon instead of wires?”
Let students share their thoughts. Afterward, explain:
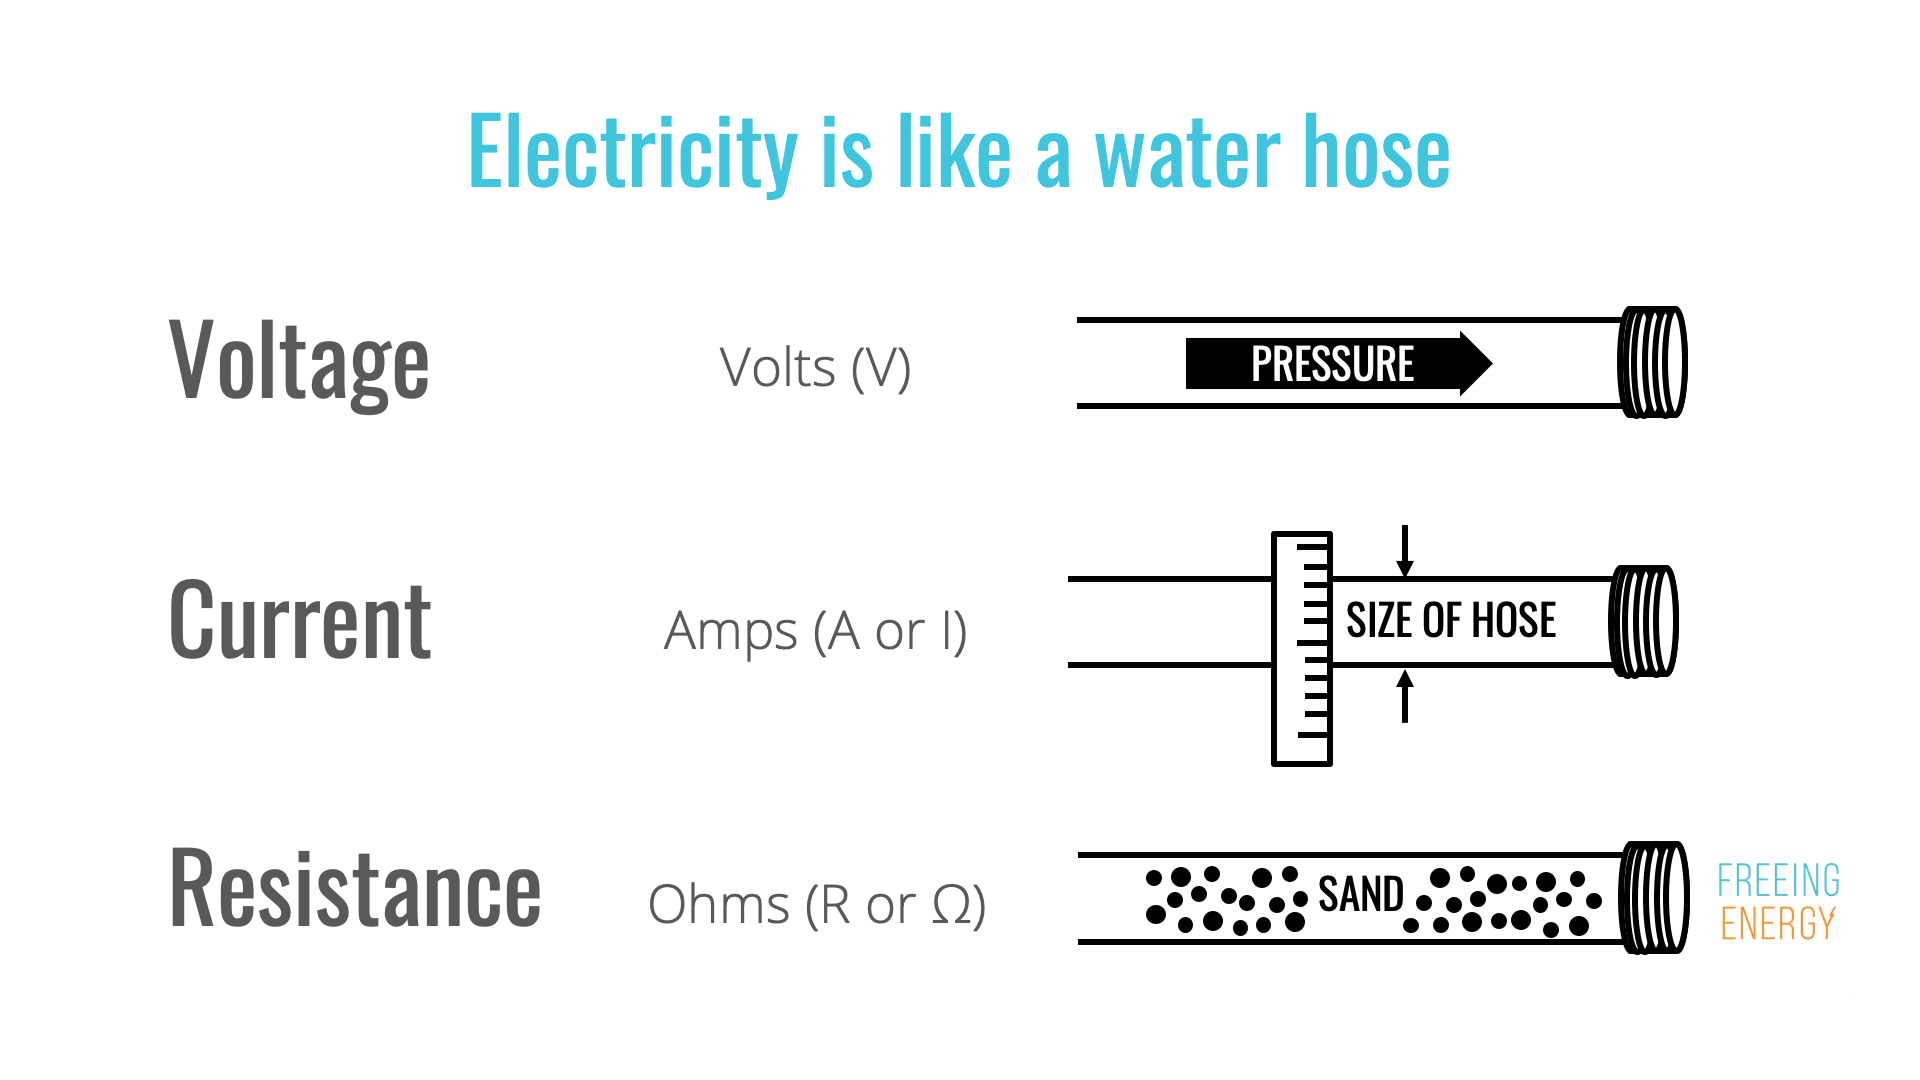
“Some materials are really good at letting electricity flow through them. We call these conductors. Metals like copper are great conductors, which is why we use them in wires. But other materials, like rubber or plastic, don’t allow electricity to flow—they are called insulators.”
Hands-On Experiment:
“Let’s test it! We’ll take out some materials like copper wire, a rubber band, and a plastic spoon, and see which ones can let electricity flow through our circuit.”
Have students replace parts of their circuit with different materials (e.g., swapping out wires for a rubber band or plastic). Ask them to observe what happens when each material is added:
“What do you notice? Does the bulb light up when we use a plastic spoon instead of a wire? Why do you think that is?”
Discussion:
“So, what did we learn? Copper is a conductor, and it lets electricity flow easily, but rubber and plastic are insulators—they stop the electricity.”
- Exploring Resistance:
Now, transition into the concept of resistance. Start by linking it back to the previous discussion:
“We’ve seen how conductors let electricity flow, but what if there’s something in the circuit that slows down the flow of electricity? We call that resistance.”
Demonstration:
“Let me show you how this works. Imagine we’re back to our toy car—if I push it down the road but put something in its way, like a book or a block, what do you think will happen? Will it move faster or slower?”
Allow students to respond. Then explain:
“Just like the car slows down when there’s something in its way, electricity also slows down when there’s resistance in the circuit.”
- Hands-On Experiment with Resistance:
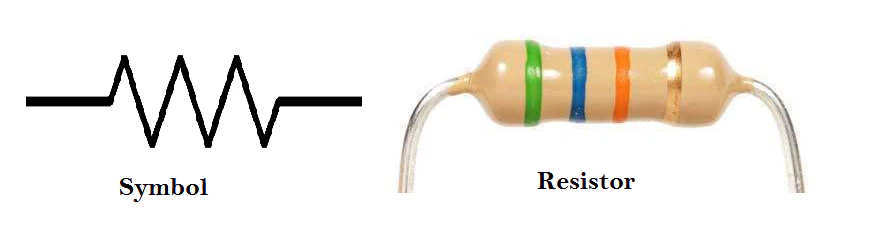
Give students resistors of different resistances (1 ohm, 5 ohm, 10 ohm) to add to their circuit. Explain how resistors work:
“Resistors add resistance to the circuit, slowing down the flow of electricity. Let’s see what happens when we swap the resistor to the circuit.”
After students add the resistor, guide them to observe the effect on the bulb:
“What do you notice about the brightness of the bulb now that we’ve added the resistor? Did it get dimmer or stay the same?”
-
Encouraging Predictions:
Encourage students to think critically about what’s happening and to make predictions:
“Now, let’s talk to your peers or group members. What do you think will happen if we add more resistors? Will the bulb get dimmer, or will it stay the same? Let’s make a prediction together and write it down on the worksheet.”
Real-World Application Discussion:
You may wrap up the session by helping students connect the concepts to real-life scenarios:
- Discussing Resistance and Conductivity in Everyday Devices:
- Ask students: “Where do you think we see resistance or conductivity in our everyday lives? Can you think of devices or objects that control the flow of electricity?”
- You can offer examples like:
- Phone chargers: “Have you noticed that some phone chargers get warm? That’s because of the resistance in the wires.”
- Dimmer switches: “When you turn the knob on a dimmer switch, you’re increasing the resistance to lower the speed of the fan.”
- Conductors and insulators in electrical wires: “The metal inside wires is a good conductor, but the plastic on the outside is an insulator. Why do you think we need both in our electrical systems?”
- Peer Reflection on Real-World Examples:
- You can have students share with other groups: “How do you think resistance and conductivity are used in real-life devices? Share an example with your peers.”
Guided Activity (15-20 minutes):
Worksheet Activity:
Students will record both qualitative and quantitative data for each trial, including predictions, observations, and analysis.
-
Predictions:
- What do you think will happen when we add different resistors? How will the bulb’s brightness change with more resistance?
-
Observations:
- Voltage with low resistance: _______
- Voltage with high resistance: _______
- Brightness low high resistance: _______
- Brightness with high resistance: _______
-
Questions:
- What happens to the flow of current when resistance increases?
- How does the brightness of the bulb change with more resistance?
- Why did the voltage decrease when we added resistance?
Summary and Reflection (5-10 minutes):
You may summarize by saying:
“Today, we learned that resistance slows down the flow of electricity, making the current smaller and the bulb dimmer. We used our tools to measure voltage, and we saw how resistance changes the flow of electricity.”
You may ask students:
- “What was the most surprising thing you learned about resistance today?”
- “How does resistance affect the flow of electricity in real-life devices, like phone chargers or light switches?”
Glossary:
- Resistance: A force that slows down the flow of electricity in a circuit.
- Current: The flow of electricity through a circuit.
- Voltage: The push that drives electricity through a circuit.
- Live Plot: A real-time graph showing how current and voltage change during an experiment.
- Trend: A pattern or direction in data, such as current decreasing as resistance increases.
