Grade 5 - Session 8: “Heat Transfer and Insulation”
Session Architect: Aleeza Ayaz - Markhor3D
Session Length: 50-60 minutes
Learning Objectives:
In this session, students will:
- Explore the three methods of heat transfer: conduction, convection, and radiation through both physical demonstrations and hands-on experiments.
- Use the temperature sensor to measure heat transfer and observe data in real-time using a live plot.
- Understand the properties of materials that make them good conductors or insulators.
- Analyze the effectiveness of different insulating materials and relate this to real-life applications.
Teacher Resource:
Session File: ML58.plf
Equipment Required:
- MeasureLab with a built-in temperature sensor with temperature probe.
- Containers filled with warm water for each group.
- Small ball.
- Different insulating materials (e.g., cloth, aluminum foil, plastic wrap, cotton).
- Candle or small burner (for convection experiment).
- Metal spoon or another solid metal object (for conduction experiment).
- Desk lamp with an incandescent bulb (for radiation experiment).
- Dark and light-colored objects (e.g., black and white paper).
- Stopwatch or timer to measure time intervals.
- Worksheet for recording temperature data, predictions, and reflection questions.
- Pens, pencils, markers etc.
Teaching Aids:
- Visual aids: diagrams illustrating heat transfer methods (conduction, convection, radiation), and examples of insulating materials used in everyday life (thermos, house insulation, jackets).
- Projector or screen to display the measurements and live temperature plots. (optional)
Preparation:
This step has to be done before the session on each workstation/apparatus by the teacher/session instructor:
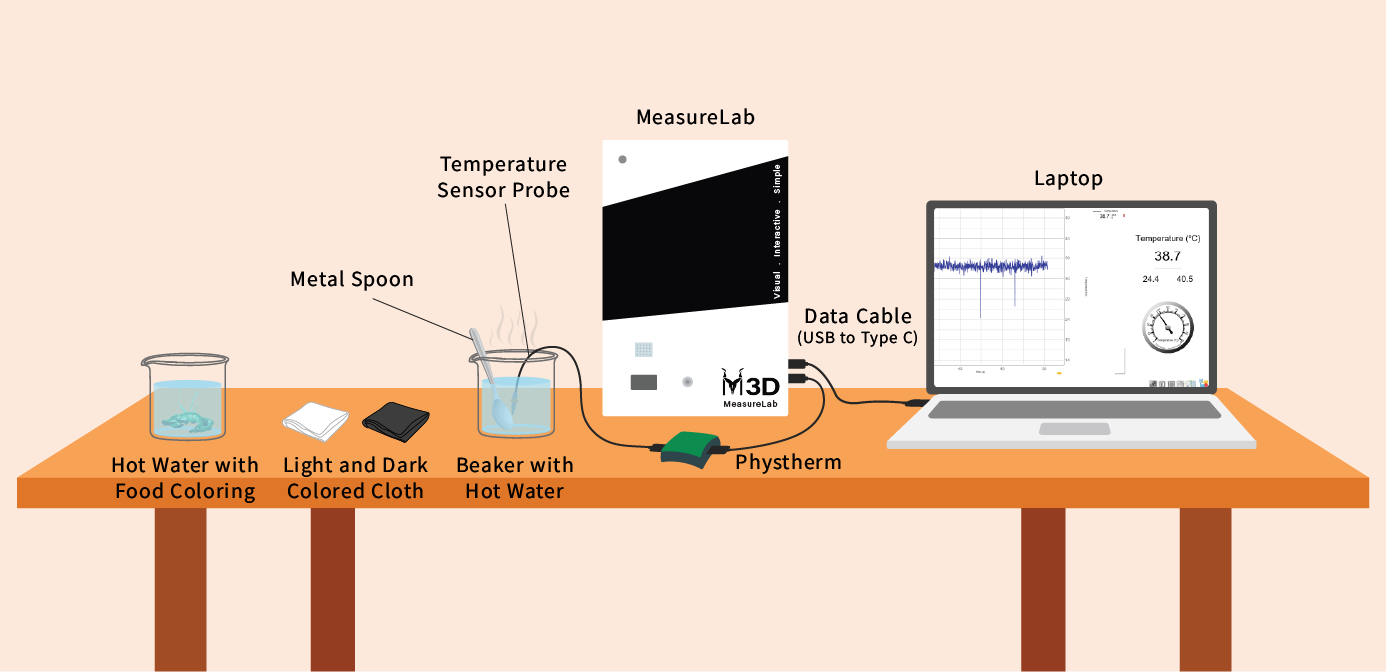
- Make sure that each computer has Physlogger installed and can detect the Measrelab when connected to it using the provided cable.
- Each Measurelab should have access to a power outlet for sensors that require external power. This session uses Temperature Probe which requires external power source to be connected.
- Connect the Temperature Sensor to the Measurelab using the following port:

- Launch the Physlogger application and load the session file provided in the resources section.
Your setup will look something like this:
Introduction: (5-10 minutes)
You may start the session by asking one open-ended question at a time. Wait for student responses and then build upon them to naturally introduce the concept of heat transfer.
You may ask:
-
“Have you ever touched a metal spoon after it was in hot water? What happened?”
- Wait for responses. Students may say that the spoon got hot.
- You may build on this:
“Yes, the spoon gets hot because heat moves from the hot water to the spoon. The heat transfers from one material to another, and that’s what we’re going to explore today—how heat moves.”
-
“What about when you stand next to a fire or a heater? You’re not touching it, but you still feel warm. Why does that happen?”
- Let students respond. Guide them toward the idea of heat traveling through air.
-
You may build on their responses:
Heat can travel through the air, even when we’re not touching the source. This happens because heat can move in different ways.”
-
You may ask:
“So, heat can move in different ways—can anyone think of how heat might transfer from one place to another?”
- Wait for students to share ideas.
-
You may explain:
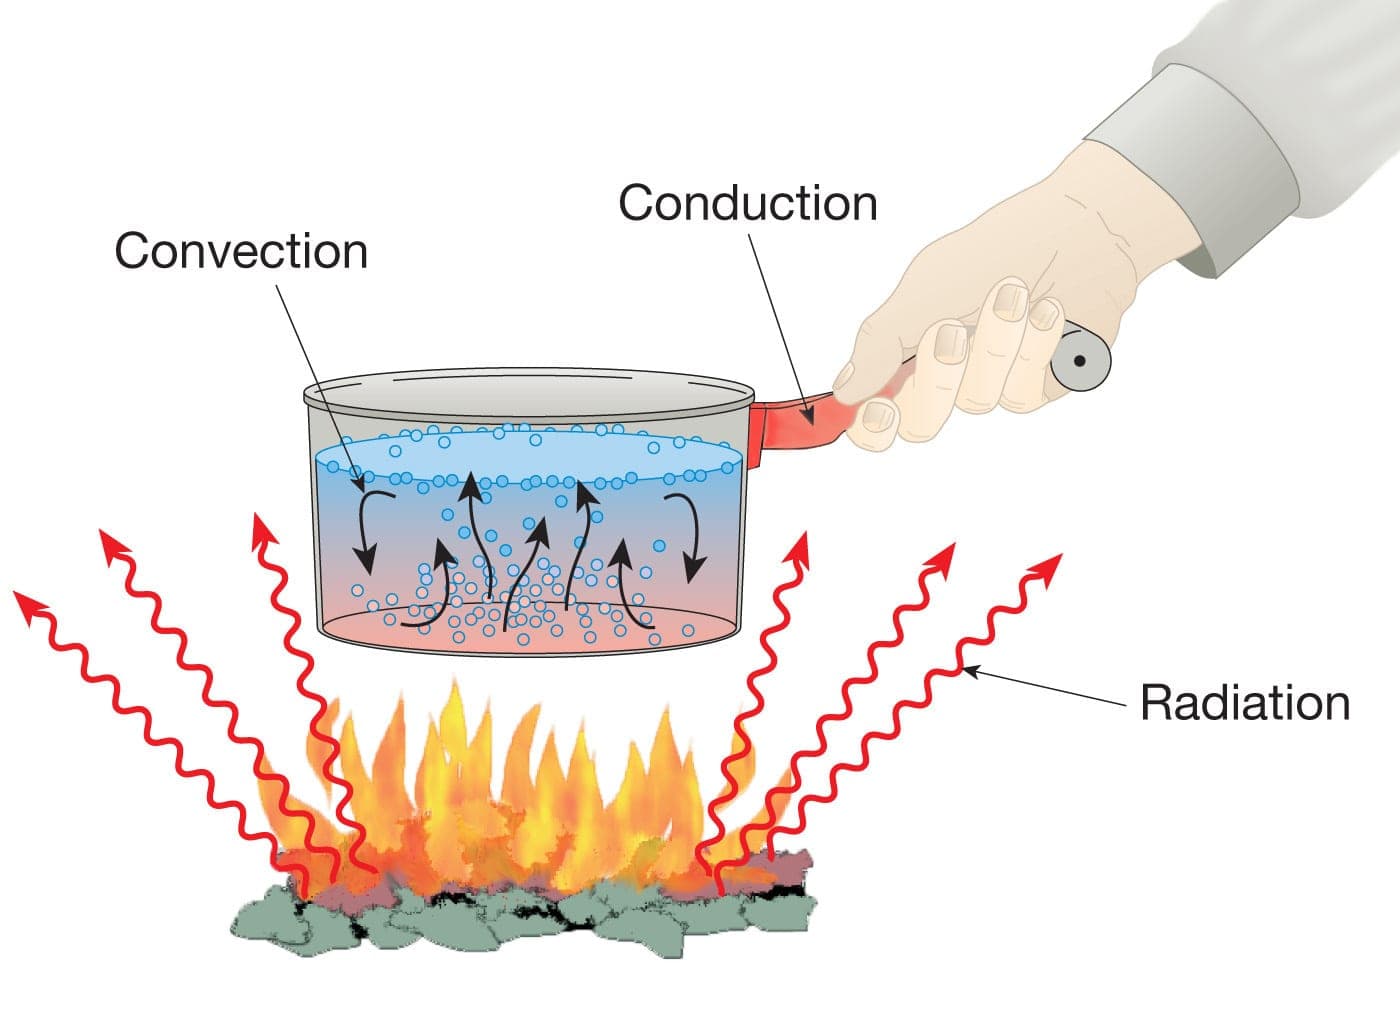
“Heat can transfer in three ways: conduction, convection, and radiation. We’re going to look at all three methods through demonstrations and experiments, and see how heat moves and how we can stop it from escaping.”
Hands-on Exploration and Guided Activity: (30-35 minutes)
1. Physical Demonstrations of Heat Transfer:
Conduction Demonstration (Ball-Passing Activity):
Start with a simple activity to physically demonstrate how heat transfers through solids like metals.
Demonstration:
Have students stand in a line and pass a ball from one person to the next. This simulates how heat moves through particles in a solid.
You may ask:
- “What do you notice as you pass the ball down the line?”
- Wait for students to respond.
You may build on their response:
“Just like passing the ball, heat moves through solids by being passed from one particle to the next. This process is called conduction.”
Conduction Experiment (Using a Metal Spoon):
Experiment:
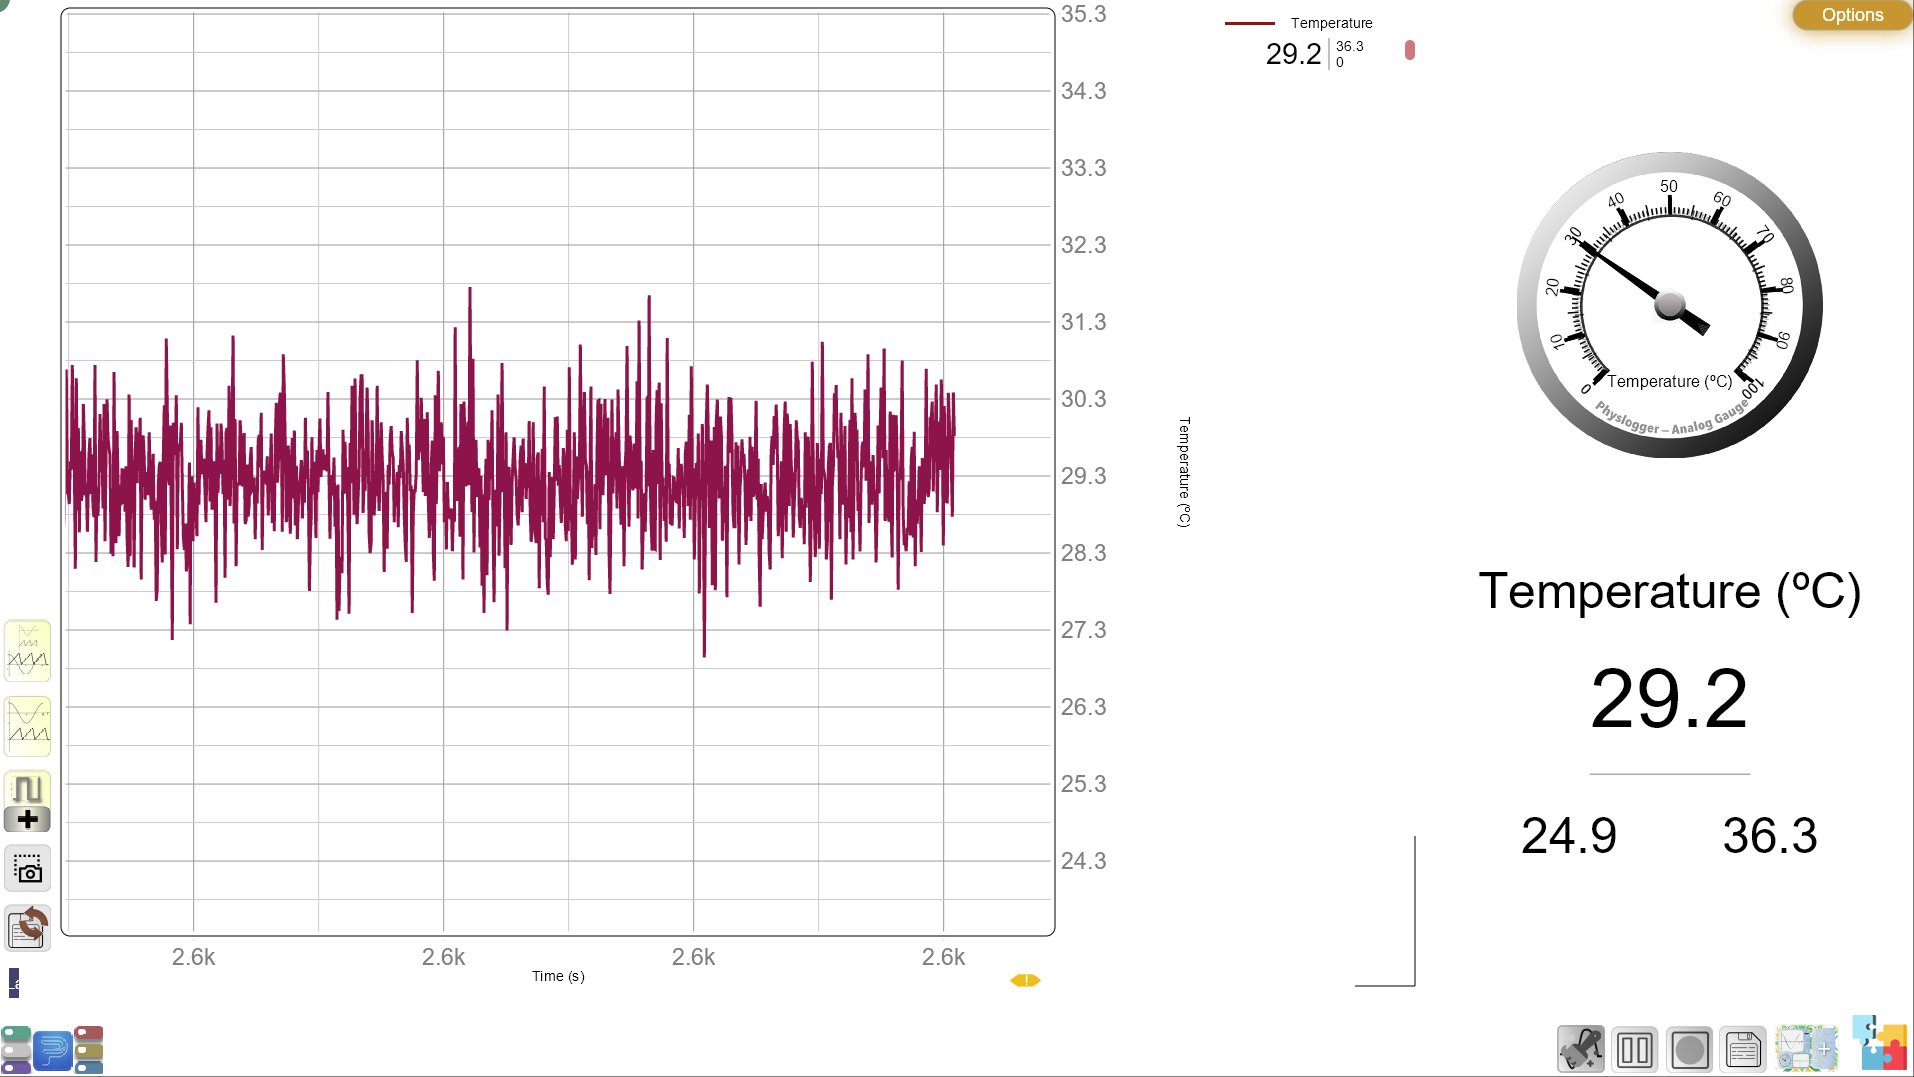
Place a metal spoon in a container of warm water. Use the temperature probe to measure the temperature at both ends of the spoon.
You may ask:
“What do you think will happen to the end of the spoon that’s outside the water? Will it stay cool or get warm?”
- Wait for students to share their predictions.
You may explain after their response:
“The heat from the water travels through the metal spoon. Metals are good conductors because their particles are packed tightly, so they pass heat quickly. That’s why metal objects heat up when placed in hot water.”
Use the live plot to show how the temperature of the spoon changes in real-time, helping students visualize the process of heat transfer.
Follow-Up Explanation for Conduction:
“Conduction is the transfer of heat through direct contact, where particles in the solid vibrate and pass energy to each other. That’s why materials like metals heat up quickly. But remember, heat only transfers in solids like this, not in liquids or gases.”
Convection Demonstration (Physical Movement Activity):
Demonstrate how heat moves through liquids and gases by having students simulate the process.
Demonstration:
Divide the class into two groups: one group represents warm air or water, and the other group represents cool air or water. Have the “warm” group move to the front of the room (rising), while the “cool” group moves to the back (sinking).
You may ask:
“Why do you think the warmer particles rise, and where do the cooler particles go?”
- Let students respond and guide them toward thinking about density.
Build on their response:
“When air or water heats up, it becomes lighter (less dense), so it rises. Cooler air or water is heavier (denser), so it sinks. This process is called convection, and it’s how heat moves in liquids and gases.”
e
Convection Experiment (Using Heated Water and Food Coloring):
Experiment:
Set up a small burner under a clear container of water. Add a few drops of food coloring to visualize the movement of the water as it heats. Use the temperature probe to measure the temperature at different depths in the container.
You may ask:
“What do you think will happen to the warm water as it heats? Where will the cooler water go?”
- Wait for students to respond and make predictions.
You may explain:
-
“The warm water rises, and the cooler water sinks. This movement creates convection currents, where heat circulates through the water.”
Follow-Up Explanation for Convection:
-
“Convection is unique to liquids and gases, unlike conduction. It’s what drives weather patterns—warm air rises, cool air sinks, creating winds. This is why you feel a breeze on a hot day.”
Radiation Demonstration (Using a Desk Lamp):
Use the desk lamp to show how heat transfers through waves, similar to how the sun heats the Earth.
Demonstration:
Shine a desk lamp on both a dark object (e.g., black paper) and a light-colored object (e.g., white paper). After a few minutes, use the temperature probe to measure the temperature of both objects.
You may ask:
“Which object do you think will absorb more heat, the dark one or the light one? Why?”
- Let students share their ideas before moving forward.
You may build on their responses:
“Heat travels through waves—this process is called radiation. Dark objects absorb more heat because they reflect less light, while lighter objects reflect more heat and stay cooler. That’s why dark clothes feel hotter in the sun than light-colored clothes.”
Follow-Up Explanation for Radiation:
“Radiation is different from conduction and convection because it doesn’t need particles to transfer heat. It works in empty space, which is why we can feel the heat of the sun, even though it’s so far away from Earth.”
2. Insulation Experiment: Testing Insulators
After demonstrating heat transfer, introduce the insulation experiment by asking one key question to guide students’ predictions.
You may ask:
“If we wrap different materials around a container of warm water, which material do you think will keep the heat inside the longest? Why might some materials, like aluminum foil or cloth, slow down heat loss more than others?”
- Wait for students to respond and make predictions.
Explain that insulators are materials that slow down heat transfer.
Testing Insulating Materials with Live Plot:
Materials:
- Containers filled with warm water.
- Insulating materials (cloth, aluminum foil, plastic wrap, cotton).
- Temperature sensor and probe.
Experiment:
Have students wrap their containers with different insulating materials and use the temperature sensor to measure how quickly the temperature drops. Track the temperature in real-time using the live plot.
Explain the live plot:
“The live plot will show us how quickly or slowly the temperature drops for each material. The line on the graph will help us understand which material is the best insulator by seeing how fast or slow the heat escapes.”
You may ask:
“What does the live plot show us about how each material slows down heat loss? Which material causes the temperature to drop the slowest?”
- Wait for students to observe the graph and share their findings.
You may explain:
“If the line on the live plot stays flatter for longer, that means the material is keeping the heat inside. A steep drop shows that the heat is escaping quickly.”
Further Elaboration on Live Plot Analysis:
“Notice how different materials create different slopes on the graph. The flatter the slope, the better the insulation, because it’s stopping heat from leaving. This visual data helps us understand the properties of materials in a more scientific way.”
Teacher Guidance:
Now that students have completed the experiment, discuss why some materials are better insulators than others.
You may explain:
“Materials like metals are good conductors because their particles are packed closely together, which allows heat to pass through easily. But materials like cloth, plastic, or cotton don’t let heat transfer easily because their particles are more spread out. That makes them good insulators.”
You may ask:
“Can you think of any real-life examples where we use insulators to keep things warm or cold?”
- Wait for responses, and guide students toward examples like jackets, thermoses, or house insulation.
3. Worksheet Activity and Reflection
Guide students to record their data from the insulation experiment on the worksheet:
| Material Used | Starting Temp (°C) | Temp After 5 Min (°C) | Temp After 10 Min (°C) | Temp After 15 Min (°C) |
|---|---|---|---|---|
| Cloth | _______ | _______ | _______ | _______ |
| Aluminum foil | _______ | _______ | _______ | _______ |
| Plastic wrap | _______ | _______ | _______ | _______ |
| Cotton | _______ | _______ | _______ | _______ |
Reflection Questions:
-
“Which material worked best as an insulator? Why do you think it was the most effective?”
- Wait for responses before explaining further.
-
“How did the live plot help you see which material kept the heat in the longest?”
- Allow students time to analyze the graph and explain their thinking.
5. Summary and Wrap-Up: (5-10 minutes)
You may summarize:
“Today, we learned how heat moves through conduction, convection, and radiation. We also used the live plot to see how different materials slow down heat transfer, and we discovered which materials act as the best insulators.”
Help students connect the lesson to their daily lives.
You may say:
“Next time you use a thermos or wear a jacket, think about how those materials are working to keep heat from escaping. The same principles we learned today are used to keep us warm or cool in everyday situations.”
Glossary:
- Conduction: The transfer of heat through a solid material when particles collide.
- Convection: The movement of heat through liquids or gases, where warmer parts rise and cooler parts sink.
- Radiation: Heat transfer through electromagnetic waves, like the warmth from the sun.
- Insulator: A material that slows down the transfer of heat.
- Live plot: A graph that shows real-time data, such as temperature changes over time.